background image

50 

|

  Dexcom G4 PLATINUM Professional Continuous Glucose Monitoring System

5

Summary of Contents for G4 Platinum Professional

Page 1: ...CONTINUOUS GLUCOSE MONITORING SYSTEM USER S GUIDE LBL 012206 Rev 04 MT22434 Dexcom Inc 6340 Sequence Drive San Diego CA 92121 USA 1 858 200 0200 1 877 339 2664 www dexcom com...

Page 2: ...D Dexcom Technical Support 1 877 339 2664 2014 Dexcom Inc All rights reserved Dexcom Dexcom G4 Dexcom G4 PLATINUM Dexcom G4 PLATINUM Professional Dexcom STUDIO and SEVEN are either registered trademar...

Page 3: ...6 Receiver Shield Overview 20 CHAPTER 2 INDICATIONS FOR USE AND SAFETY STATEMENT 23 2 1 INDICATIONS FOR USE 25 2 2 IMPORTANT USER INFORMATION 25 2 3 CONTRAINDICATIONS 26 2 4 WARNINGS 26 2 5 PRECAUTIO...

Page 4: ...NSOR AND STARTING A SENSOR SESSION 63 6 1 Before You Start 66 6 2 Removing the Sensor from its Packaging 67 6 3 Choosing an Insertion Site 68 6 4 Placing the Sensor 69 6 5 Sensor Insertion 70 6 6 Tran...

Page 5: ...ging the High and Low Glucose Alerts 111 9 2 Advanced Alerts 113 9 2 1 Setting a Snooze Time for the High and Low Glucose Alerts in Real Time Mode 114 9 2 2 Rise and Fall Glucose Rate Alerts in Real T...

Page 6: ...oduct Disposal 162 CHAPTER 13 TROUBLESHOOTING 163 13 1 Sensor Insertion Troubleshooting 165 13 2 Calibration Troubleshooting 166 13 2 1 Types Of Calibration Prompts 167 13 2 2 What To Do For Calibrati...

Page 7: ...e Performance Characteristics 183 14 2 Product Specifications 202 14 3 FCC Requirements 215 CHAPTER 15 USER ASSISTANCE 217 CHAPTER 16 WARRANTY 221 CHAPTER 17 TRAVEL INFORMATION 231 CHAPTER 18 APPENDIX...

Page 8: ...er is set to hide sensor glucose readings and glucose trend information The receiver records glucose information that can be downloaded and reviewed later with the Dexcom STUDIO software BG Meter Bloo...

Page 9: ...ing Hyperglycemia High blood glucose Same as high The default high alert in the receiver is set to 200 mg dL Consult a healthcare professional to determine the appropriate hyperglycemic setting HypoRe...

Page 10: ...patients Rise and Fall Rate of Change Alerts Alerts based on how fast and how much glucose levels rise fall RF Radio frequency transmission used to send glucose information from the transmitter to th...

Page 11: ...s updated every 5 minutes Transmitter The Dexcom G4 PLATINUM Professional System part that snaps into the sensor pod and wirelessly sends glucose information to the receiver Transmitter ID A series of...

Page 12: ...Dexcom G4 PLATINUM Professional System User s Guide 11 1 chapter one DEXCOM G4 PLATINUM PROFESSIONAL CONTINUOUS GLUCOSE MONITORING CGM SYSTEM DESCRIPTION...

Page 13: ...12 Dexcom G4 PLATINUM Professional Continuous Glucose Monitoring System 1...

Page 14: ...iver USB charging download cable AC power adapter MT21255 user s guide 2 quick start guides real time and blinded use site training checklist receiver shield pack containing receiver shield square sea...

Page 15: ...They can be downloaded and reviewed later using the Dexcom STUDIO software The Dexcom G4 PLATINUM Professional System includes the Dexcom G4 PLATINUM Sensor the Dexcom G4 PLATINUM Transmitter and the...

Page 16: ...plicator after insertion The sensor pod stays on the belly for the entire sensor session up to 7 days The pod is made of plastic and an adhesive patch The sensor wire is thin and flexible and inserts...

Page 17: ...usable When healthcare professionals use one transmitter for multiple patients the transmitter must be cleaned and disinfected between each patient s use The transmission range from the transmitter to...

Page 18: ...must be replaced between each patient s use The shield is a thin stretchy plastic that covers the receiver Do not spill fluids on the receiver or drop the receiver into fluids Keep the micro USB port...

Page 19: ...etting Low glucose alert setting Antenna Battery Most recent 5 minute sensor glucose reading Glucose target range Plot of most recent sensor glucose readings Current time Trend arrow Trend graph hours...

Page 20: ...ettings The receiver and transmitter wirelessly pair together to communicate securely and only with each other You will need a commercially available blood glucose meter to use with the system See Sec...

Page 21: ...tton to go back to the last item or screen Press the RIGHT button to highlight the next item 1 6 RECEIVER SHIELD OVERVIEW The Dexcom G4 PLATINUM Professional System requires the use of the receiver sh...

Page 22: ...th each individual patient s use The receiver shield and seals are used to help protect the receiver from contamination The acoustic spacer is used to ensure the alert and alarm sounds are still audib...

Page 23: ...22 Dexcom G4 PLATINUM Professional Continuous Glucose Monitoring System PAGE INTENTIONALLY LEFT BLANK...

Page 24: ...Dexcom G4 PLATINUM Professional System User s Guide 23 2 chapter two INDICATIONS FOR USE AND SAFETY STATEMENT...

Page 25: ...24 Dexcom G4 PLATINUM Professional Continuous Glucose Monitoring System 2...

Page 26: ...information obtained from standard home glucose monitoring devices The Dexcom G4 PLATINUM Professional System aids in the detection of episodes of hyperglycemia and hypoglycemia facilitating both acut...

Page 27: ...ns or with diathermy treatment The magnetic fields and heat could damage the device so that it might not display sensor glucose readings or provide alerts and you might miss a low or high blood glucos...

Page 28: ...ding in the high or low range so you do not miss a low or high blood glucose value Calibrate at least once every 12 hours Calibrating less often than every 12 hours might cause sensor glucose readings...

Page 29: ...a broken sensor please report this to our Technical Support department at 1 877 339 2664 or 1 858 200 0200 The Dexcom G4 PLATINUM Professional System is not approved for use in children or adolescent...

Page 30: ...ow high glucose alerts and the 55 mg dL low glucose alarm are all disabled when using the Dexcom G4 PLATINUM Professional System in blinded mode and will not alert you when the glucose is low or high...

Page 31: ...and you might miss a low or high blood glucose value Do not use the sensor if its sterile package has been damaged or opened Using an unsterile sensor might cause infection To calibrate the system ent...

Page 32: ...thout obstruction Wireless communication does not work well through water so the range is much less if you are in a pool bathtub or on a water bed etc Types of obstruction differ and have not been tes...

Page 33: ...the session return the receiver to the healthcare professional office Do not charge the receiver if you cannot seal it Unsealed receivers could spread contamination Do not puncture the receiver shield...

Page 34: ...not be taken off by the patient If a defect or malfunction is suspected the healthcare professional should retain the shield and contact Dexcom Technical Support The shield helps protect the user and...

Page 35: ...34 Dexcom G4 PLATINUM Professional Continuous Glucose Monitoring System PAGE INTENTIONALLY LEFT BLANK...

Page 36: ...Dexcom G4 PLATINUM Professional System User s Guide 35 3 chapter three RISKS AND BENEFITS...

Page 37: ...36 Dexcom G4 PLATINUM Professional Continuous Glucose Monitoring System 1 3...

Page 38: ...stem will not alert for a low glucose at this time because 82 mg dL is still above your low alert setting In most cases the sensor glucose readings will move in the right direction and will alert you...

Page 39: ...nserted There is a remote chance that a sensor fragment could remain under your skin if the sensor breaks while you are wearing it This did not happen in the clinical study for the Dexcom G4 PLATINUM...

Page 40: ...ility and time spent in low and high blood glucose ranges 1 2 3 which can help reduce diabetes related complications 4 5 These benefits can be seen especially with using real time CGM at least 6 days...

Page 41: ...ons Research Group The effect of intensive treatment of diabetes on the development and progression of long term complications of insulin dependent diabetes mellitus N Eng J Med 1993 329 997 1036 5 Oh...

Page 42: ...Dexcom G4 PLATINUM Professional System User s Guide 41 4 chapter four CHARGING THE RECEIVER AND THE RECEIVER MAIN MENU...

Page 43: ...42 Dexcom G4 PLATINUM Professional Continuous Glucose Monitoring System 4...

Page 44: ...o charge the receiver from the PC Dexcom STUDIO must be installed For system requirements and more information see the Dexcom website www dexcom com or the Dexcom STUDIO Software User s Guide Only use...

Page 45: ...patient is given the system so only a recharge would be necessary during the 7 day sensor session 4 1 1 CHARGING THE RECEIVER BATTERY FROM AN AC POWER OUTLET To recharge the battery during the 7 day s...

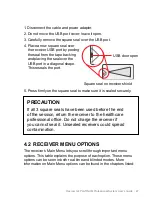
Page 46: ...the battery charging symbol in the upper left corner 4 1 2 CHARGING THE RECEIVER BATTERY FROM A WINDOWS COMPATIBLE COMPUTER You must install the Dexcom STUDIO software to charge the receiver from a c...

Page 47: ...ing symbol in the upper left corner 4 1 3 KNOWING THE RECEIVER IS CHARGED As the battery charges the battery charging symbol fills in When the battery is fully charged the battery charging symbol is c...

Page 48: ...seal to make sure it is sealed securely 4 2 RECEIVER MENU OPTIONS The receiver s Main Menu lets you scroll through important menu options This table explains the purpose of each option These menu opti...

Page 49: ...nge the settings for high and low alerts High and low alerts and alarm are not activated in blinded mode Chapter 9 Settings To change the time date and transmitter ID to look up the Dexcom G4 PLATINUM...

Page 50: ...Dexcom G4 PLATINUM Professional System User s Guide 49 5 chapter five DEXCOM G4 PLATINUM PROFESSIONAL SYSTEM INITIAL SETUP...

Page 51: ...50 Dexcom G4 PLATINUM Professional Continuous Glucose Monitoring System 5...

Page 52: ...d for the first time 1 Remove the transmitter from its packaging Wait 10 minutes for the transmitter to turn on before setting up the receiver 2 Make sure the receiver is fully charged see Chapter 4 S...

Page 53: ...letters found in the following locations On the transmitter box label On the bottom of the transmitter c Set the low and high glucose alert values appropriate for each individual patient The low and h...

Page 54: ...NUM Professional CGM System you must insert a sensor see Chapter 6 Inserting a Sensor and Starting a Sensor Session 5 2 THE SETTINGS MENU The Settings menu lets you change the time date or transmitter...

Page 55: ...TIME AND DATE 1 From the Settings menu press the UP or DOWN button to scroll to Time Date and press the SELECT button 2 Press the RIGHT button to highlight each value in the date and time 3 Press the...

Page 56: ...series of 5 numbers and or letters that can be found in the following locations On the transmitter box label On the bottom of the transmitter If you cannot find the transmitter ID please contact Dexco...

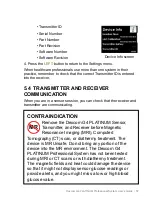
Page 57: ...mitter and receiver are communicating The Transmitter ID menu option only shows when you are not in a sensor session See Section 5 4 for the antenna symbol that shows whether the transmitter and recei...

Page 58: ...can check that the receiver and transmitter are communicating Device Info screen CONTRAINDICATION Remove the Dexcom G4 PLATINUM Sensor Transmitter and Receiver before Magnetic Resonance Imaging MRI C...

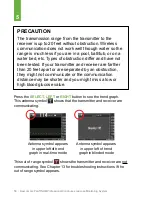
Page 59: ...the transmitter to the receiver is up to 20 feet without obstruction Wireless communication does not work well through water so the range is much less if you are in a pool bathtub or on a water bed et...

Page 60: ...ture the receiver shield for any reason Punctured shields could spread contamination Return the receiver to the healthcare professional if the acoustic spacer moves away from the upper right corner Th...

Page 61: ...e any parts of the receiver shield pack that are damaged or defective If the receiver shield seals and spacer are torn damaged or otherwise defective after giving to the patient the patient should ret...

Page 62: ...inserting the sensor and giving the receiver to the patient for their 7 day session you need to place the acoustic spacer receiver shield and seals 1 Wash hands and put on sterile gloves Peel acoustic...

Page 63: ...ly infectious and are capable of transmitting blood borne pathogens between patients and healthcare professionals For more information refer to Guideline for Isolation Precautions Preventing Transmiss...

Page 64: ...Dexcom G4 PLATINUM Professional System User s Guide 63 6 chapter six INSERTING A SENSOR AND STARTING A SENSOR SESSION...

Page 65: ...64 Dexcom G4 PLATINUM Professional Continuous Glucose Monitoring System 6...

Page 66: ...how to insert the sensor and start a new continuous glucose monitoring session both in real time and blinded modes WARNING Sensors may fracture on rare occasions If a sensor breaks and no portion of i...

Page 67: ...to make sure you are getting accurate blood glucose values for calibration The healthcare professional must clean and disinfect the transmitter before giving it to a new user see Chapter 12 Section 1...

Page 68: ...the sensor to make sure it is not damaged The applicator is for single use and is disposable The safety lock prevents you from releasing the needle accidentally before you are ready PRECAUTION Do not...

Page 69: ...ions in a row You may need to shave the area where you plan to put the sensor so the adhesive patch sticks securely Make sure there are no traces of lotions perfumes or medications on the area Clean t...

Page 70: ...applicator barrel and try not to touch the sticky adhesive patch WARNING Do not use the Dexcom G4 PLATINUM Professional System for treatment decisions such as how much insulin you should take The Dexc...

Page 71: ...ed for transmitter removal but is not required When the glucose monitoring session is over follow the steps in Chapter 11 Section 11 3 Transmitter Removal with or without the safety lock 6 5 SENSOR IN...

Page 72: ...on the collar 4 Keep pinching up on the skin with one hand With the other hand place two fingers under the collar Keep the thumb lightly on top of the white plunger and pull the collar back towards th...

Page 73: ...e sensor pod after you insert the sensor Follow these steps to attach the transmitter 1 Ensure the transmitter is free of dust before placing the transmitter in the sensor pod see Chapter 12 Section 1...

Page 74: ...edge at this time e Make sure the transmitter is secure by sliding the fingers under each long side of the sensor pod and pressing down on the transmitter with the thumb of the same hand like you are...

Page 75: ...n refer to Chapter 13 Section 13 6 Sensor Shut off Troubleshooting 4 Press the SELECT button to confirm the start of a new sensor session The Start Sensor thinking screen lets you know the sensor 2 ho...

Page 76: ...high low glucose alerts during the entire 7 day sensor session 6 8 SENSOR STARTUP PERIOD The sensor needs a 2 hour startup period to adjust to being under the skin The trend graph shows a 2 hour count...

Page 77: ...ill not communicating check the device information screen to make sure the correct transmitter ID is entered into the receiver see Chapter 5 Section 5 2 The Settings Menu If the correct transmitter ID...

Page 78: ...readings or any alerts or alarm while the receiver is shut down but the current sensor session will continue During the shutdown period no sensor glucose readings will be recorded or kept in memory F...

Page 79: ...hing specific to resume 6 11 THE DEXCOM G4 PLATINUM PROFESSIONAL SYSTEM AND WATER The sensor is water resistant when showering bathing or swimming if the transmitter is fully snapped in The sensor has...

Page 80: ...Dexcom G4 PLATINUM Professional System User s Guide 79 7 chapter seven CALIBRATING THE DEXCOM G4 PLATINUM PROFESSIONAL SYSTEM...

Page 81: ...80 Dexcom G4 PLATINUM Professional Continuous Glucose Monitoring System 7...

Page 82: ...you must enter the blood glucose values into the receiver by hand You can use any commercially available blood glucose meter You must calibrate with accurate blood glucose meter values to get accurat...

Page 83: ...bration Alternative site blood glucose values may be different than those taken from a fingerstick blood glucose value and may not represent the timeliest blood glucose value Use a blood glucose value...

Page 84: ...rated if the meter glucose is 40 mg dL or above For safety reasons if the blood glucose is low first treat the low blood sugar Always make sure the antenna symbol is in the upper left corner of the tr...

Page 85: ...measurement Entering incorrect blood glucose values or blood glucose values from more than 5 minutes before entry might affect sensor performance and you might miss a low or high blood glucose value P...

Page 86: ...when you are in the middle of a sensor session 5 Press the SELECT button to choose this option You will see a screen with a blood drop and a number in mg dL units a At all times in real time and blin...

Page 87: ...ps to enter the correct blood glucose value c If you do not press the SELECT button the receiver will time out and no blood glucose value will be recorded for calibration 8 The Enter BG thinking scree...

Page 88: ...tells you that you need to calibrate by showing the startup calibration prompt This means you need to calibrate with 2 separate blood glucose values from the meter If used in real time mode the recei...

Page 89: ...calibration 2 hour startup calibration to make sure the sensor glucose readings remain accurate and close to the blood glucose meter values You can enter blood glucose values earlier than 12 hours if...

Page 90: ...ars soon see Chapter 13 Section 13 2 Calibration Troubleshooting 7 5 OTHER REASONS YOU MAY NEED TO CALIBRATE You may need to calibrate when the system did not accept the last calibration or the blood...

Page 91: ...90 Dexcom G4 PLATINUM Professional Continuous Glucose Monitoring System 7 Wait 15 minutes calibration error screen Wait 1 hour calibration error screen...

Page 92: ...Dexcom G4 PLATINUM Professional System User s Guide 91 8 chapter eight VIEWING SENSOR GLUCOSE READINGS AND TRENDS IN REAL TIME MODE...

Page 93: ...92 Dexcom G4 PLATINUM Professional Continuous Glucose Monitoring System 10 8...

Page 94: ...ith a healthcare professional using the Dexcom STUDIO software The blood glucose meter and sensor measure glucose from two different types of body fluids blood and interstitial fluid Therefore reading...

Page 95: ...nsor glucose readings Using the sensor glucose readings for treatment decisions could lead to low or high blood glucose value 8 1 SENSOR GLUCOSE READINGS IN REAL TIME MODE Press the SELECT button to w...

Page 96: ...sed on the high and low glucose alert settings If the low glucose alert is not set and the user s glucose is 55 mg dL or lower the glucose value is red If the sensor glucose readings are in between th...

Page 97: ...1 hour trend graph shows the current sensor glucose reading and the last 1 hour of sensor glucose readings 3 Hour Trend Graph The 3 hour trend graph shows the current sensor glucose reading and the l...

Page 98: ...h to reach the 24 hour graph 24 Hour Trend Graph The 24 hour trend graph shows the current sensor glucose reading and the last 24 hours of sensor glucose readings The receiver displays LOW when the mo...

Page 99: ...n 1 mg dL each minute The glucose could increase or decrease by up to 15 mg dL in 15 minutes Slowly rising The glucose is rising 1 2 mg dL each minute If it continued rising at this rate the glucose c...

Page 100: ...glucose is rising or falling at this time Trend arrows show to the right of the sensor glucose reading They tell you more about the glucose s speed and direction Trend arrows do not show when there ar...

Page 101: ...ssion You will not get sensor glucose readings during the time a status symbol shows except during the regular 12 hour calibration prompt or if the receiver is in blinded mode See Chapter 8 Section 8...

Page 102: ...or This symbol means the sensor cannot calibrate right now If you see this screen enter at least one more calibration blood glucose value after about 10 15 minutes If the sensor still cannot calibrate...

Page 103: ...102 Dexcom G4 PLATINUM Professional Continuous Glucose Monitoring System PAGE INTENTIONALLY LEFT BLANK...

Page 104: ...Dexcom G4 PLATINUM Professional System User s Guide 103 9 chapter nine ALERTS ALARM PROFILES...

Page 105: ...104 Dexcom G4 PLATINUM Professional Continuous Glucose Monitoring System 9...

Page 106: ...NG THE ALERTS IN REAL TIME MODE 9 1 1 DEFAULT ALERT ALARM SETTINGS The following alerts and alarms are preset on the receiver WARNING Low high glucose alerts and the 55 mg dL low glucose alarm are all...

Page 107: ...the alert level No unless you have turned on the high alert snooze feature Low Glucose Alert The most recent sensor glucose reading is at or below the low alert setting On at 80 mg dL Vibrates 3 time...

Page 108: ...ating to each other Off The alert will not notify you You must change the settings to receive this alert No Rise Fall Alert Single Arrow The glucose is rising falling at or above a rate of 2 mg dL min...

Page 109: ...l rate of change alerts let you know when the glucose levels are changing fast see Chapter 9 Section 9 2 Advanced Alerts The Dexcom G4 PLATINUM Professional System also has a 55 mg dL low glucose alar...

Page 110: ...tting This level shows as a red line on the trend graph The receiver continues to alert until you press the SELECT button to clear the alert or until the sensor glucose readings rise above the low glu...

Page 111: ...elow 55 mg dL The receiver does not alert for reading below 55 mg dL if you calibrated in the last 5 minutes The receiver alerts if the sensor glucose reading stays outside the target range after five...

Page 112: ...steps for changing both the high alert and the low alert are the same Main Menu Alerts highlighted Alerts menu High Alert highlighted WARNING Low high glucose alerts and the 55 mg dL low glucose alarm...

Page 113: ...change the high and low alert settings 1 From the Alerts menu press the UP or DOWN button to select High Alert or Low Alert and press the SELECT button 2 Highlight On Off and then press the SELECT but...

Page 114: ...dL steps 6 Press the SELECT button to confirm the alert level 7 Press the LEFT button to return to the Alerts menu when you finish 9 2 ADVANCED ALERTS Advanced alerts include the high and low snooze...

Page 115: ...set a snooze time for every 15 minutes for up to 5 hours 1 Press the UP or DOWN button to highlight High Snooze or Low Snooze and press the SELECT button 2 Press the UP or DOWN button to select the a...

Page 116: ...minute and the sensor glucose readings fall at this rate or faster the FALLING single arrow screen shows and the receiver vibrates or beeps in line with the profile settings If you set the rise rate...

Page 117: ...s the SELECT button to select On or Off 4 Press the LEFT button to go back to the last screen Highlight Level and then press the SELECT button 5 Choose 2 mg dL min 2 mg dL or more per minute or 3 mg d...

Page 118: ...ucose readings The out of range symbol in the upper right corner of the trend graph and the Out of Range alert screen show when the transmitter and receiver are not communicating The amount of time ou...

Page 119: ...u when you finish 9 3 ALERT PROFILES The Dexcom G4 PLATINUM Professional System lets you set profiles to choose the way you want the alerts to act This feature is found under the Profiles option on th...

Page 120: ...e first alert is vibrate only If the alert is not confirmed in five minutes the system vibrates and beeps If the alert is not confirmed in five more minutes the system vibrates and beeps louder This c...

Page 121: ...ously repeats the fixed low alarm every 5 seconds until the sensor glucose reading rises above 55 mg dL or is confirmed This profile is only applicable if the receiver is used in real time mode and ca...

Page 122: ...ode Only 2 long vibrates 2 long vibrates 2 low beeps 2 long vibrates 2 medium beeps 2 long vibrates 1 short ascending melody 2 long vibrates 2 medium beeps Fall Alert In Real Time Mode Only 3 short vi...

Page 123: ...4 low beeps 4 short vibrates 4 low beeps pause repeat sequence All Other Alerts In Both Real Time and Blinded Modes 1 long vibrate 1 long vibrate 1 low beep 1 long vibrate 1 medium beep 1 long vibrate...

Page 124: ...Main Menu 3 Press the UP or DOWN button to scroll to Profiles and press the SELECT button The Profiles menu will show 4 Press the UP or DOWN button to scroll to the profile you want to set and press...

Page 125: ...124 Dexcom G4 PLATINUM Professional Continuous Glucose Monitoring System PAGE INTENTIONALLY LEFT BLANK...

Page 126: ...Dexcom G4 PLATINUM Professional System User s Guide 125 10 chapter ten EVENTS DEXCOM STUDIO SOFTWARE AND BLINDED MODE...

Page 127: ...126 Dexcom G4 PLATINUM Professional Continuous Glucose Monitoring System 10...

Page 128: ...t carbohydrates insulin exercise and health issues You can view these events with the trends and patterns later with a healthcare professional when the receiver is downloaded using the Dexcom STUDIO s...

Page 129: ...LECT button 10 1 2 SETTING THE DATE AND TIME FOR AN EVENT When you enter an event you must check that the date and time for that event are correct The default is the current date and time stored in th...

Page 130: ...next value 3 Press the SELECT button after choosing AM or PM 4 Press the SELECT button to confirm the entry 10 1 3 CARBOHYDRATES The Carbs event lets you enter the amount of carbohydrates you have ta...

Page 131: ...ton to confirm 4 Press the LEFT or RIGHT button to choose either OK to confirm or Cancel to discard this entry and then press the SELECT button You will return to the Events menu 10 1 4 INSULIN The In...

Page 132: ...ELECT button to confirm 4 Press the LEFT or RIGHT button to choose either OK to confirm this entry or Cancel to discard this entry and then press the SELECT button You will return to the Events menu 1...

Page 133: ...minutes 4 Check that the date and time for this entry are correct Press the SELECT button to confirm 5 Press the LEFT or RIGHT button to choose either OK to confirm this entry or Cancel to discard thi...

Page 134: ...ess the SELECT button to confirm 4 Press the LEFT or RIGHT button to choose either OK to confirm this entry or Cancel to discard this entry and then press the SELECT button You will return to the Even...

Page 135: ...eturns the receiver to its normal functions To obtain a healthcare professional authorization code please contact Dexcom Technical Support For system requirements and more information see the Dexcom w...

Page 136: ...o contact Dexcom Technical Support and provide them with the Activation Request Key that appears in the Activate Clinical Features pop up window Contact Dexcom Technical Support at 1 877 339 2664 or v...

Page 137: ...the Tools option to either blind or unblind the attached receiver 3 The option that appears Blind Attached Receiver or Unblind Attached Receiver depends on whether the connected receiver is currently...

Page 138: ...rt 3 Connect the other end of the cable into any free USB port on the PC The software will first try to assign the new receiver download to an existing patient record using this same receiver If it do...

Page 139: ...eceiver after every time you download data Resetting will erase all data from the receiver database set the receiver time and date to the Internet time and date and set the prior transmitter ID and bl...

Page 140: ...Dexcom G4 PLATINUM Professional System User s Guide 139 11 chapter eleven ENDING A SENSOR SESSION...

Page 141: ...140 Dexcom G4 PLATINUM Professional Continuous Glucose Monitoring System 11...

Page 142: ...session may end before you have finished a full 7 day period If this happens see Chapter 13 Section 13 6 Sensor Shut Off Troubleshooting Glucose alerts and alarm do not work after the sensor session...

Page 143: ...reen 00 00 00 shows Sensor glucose readings do not show on the receiver after the sensor session ends The trend graphs show that the sensor session has ended with a red stoplight symbol at the top You...

Page 144: ...ay fracture on rare occasions If a sensor breaks and no portion of it is visible above the skin do not attempt to remove it Seek professional medical help if you have symptoms of infection or inflamma...

Page 145: ...on a flat surface 2 Hold the rounded edge of the safety lock 3 Make sure the jagged edge of the safety lock is facing down with the arrow pointing up as shown WARNING The transmitter should be cleane...

Page 146: ...em User s Guide 145 Safety lock Transmitter with safety lock snapped in Method 2 Use the fingers to spread out the tabs at the back of the sensor pod end closest to the sensor pod tab wings The transm...

Page 147: ...146 Dexcom G4 PLATINUM Professional Continuous Glucose Monitoring System PAGE INTENTIONALLY LEFT BLANK...

Page 148: ...Dexcom G4 PLATINUM Professional System User s Guide 147 12 chapter twelve TAKING CARE OF THE DEXCOM G4 PLATINUM PROFESSIONAL SYSTEM...

Page 149: ...148 Dexcom G4 PLATINUM Professional Continuous Glucose Monitoring System 12...

Page 150: ...er each patient s use to help reduce the spread of contamination to healthcare professionals and other patients You will need gloves Dispatch Hospital Cleaner Disinfectant Towels with Bleach any disin...

Page 151: ...e shield off the receiver 6 Hold the other corner of the shield near the top of the t shaped slot Stretch that corner of the shield off the receiver 7 Peel back the shield being careful not to touch t...

Page 152: ...the receiver for any soil or signs of contamination to the receiver a Discard the receiver if there is any indication of contamination such as dirt or spots of dried fluid b Consider whether there ha...

Page 153: ...opriate gloves protective goggles lab coat etc Cleaning Cleaning removes dirt from the surface of the transmitter It does not kill bacteria or viruses The transmitter should be cleaned whenever it is...

Page 154: ...Cleaner solution to submerge a transmitter 3 Place the transmitter with the contact metal circles side down on an absorbent wipe or clean surface 4 Hold the Clorox Healthcare Bleach Germicidal Cleaner...

Page 155: ...tacts metal circles 7 Using a nylon brush scrub the transmitter on all sides for thirty seconds 8 Place the transmitter in the Clorox Healthcare Bleach Germicidal Cleaner spray solution for one minute...

Page 156: ...0 parts per million with the EPA registration number 56392 7 may be used Dispatch Hospital Cleaner Disinfectant Towels with Bleach any disinfectant wipes containing a bleach solution strength of 6500...

Page 157: ...the transmitter by passing over the transmitter surface in one direction and then back in the opposite direction back and forth means two passes 7 Turn over the Dispatch Hospital Cleaner Disinfectant...

Page 158: ...rinse it under flowing tap water for ten seconds 14 Wipe the transmitter with a low lint absorbent cloth until it is completely dry After cleaning and disinfection remove and discard gloves and wash...

Page 159: ...g errors symbol see Chapter 8 Section 8 3 Glucose Status Area Symbols in Both Real Time and Blinded Modes that occur with multiple sensors could indicate deterioration of the transmitter References FD...

Page 160: ...lps prevent microorganisms and pathogens from reaching the receiver s surface Replacing the receiver shield between each use helps reduce the spread of contamination between users and healthcare pract...

Page 161: ...for recharging NOTE The receiver shield is not waterproof and does not protect the receiver from water or liquids 12 5 MAINTENANCE Transmitter Keep the transmitter protected when not in use Receiver...

Page 162: ...expiration date The expiration date format is YYYY MM DD Insert sensors on or before the end of the calendar day printed on the sensor package label Store at temperatures between 36 F 77 F Storing ou...

Page 163: ...m Store at humidity levels between 10 95 relative humidity 12 7 PRODUCT DISPOSAL Consult the local waste management authorities for instructions to dispose of devices containing electronic waste trans...

Page 164: ...Dexcom G4 PLATINUM Professional System User s Guide 163 13 chapter thirteen TROUBLESHOOTING...

Page 165: ...164 Dexcom G4 PLATINUM Professional Continuous Glucose Monitoring System 13...

Page 166: ...the arrows on the safety lock as a guide I am not able to pull the collar up Make sure the white plunger is completely pressed down before pulling the collar up Use force when pulling the collar up I...

Page 167: ...tape over the transmitter or the plastic parts of the sensor pod 13 2 CALIBRATION TROUBLESHOOTING Calibration prompts may show during the sensor session Review the following troubleshooting tips for...

Page 168: ...on prompt screen every 15 minutes until the receiver accepts the blood glucose values Additional startup calibration prompt This prompt means you need to enter one more blood glucose value to calibrat...

Page 169: ...d enter it into the receiver 13 3 CALIBRATION ERROR TROUBLESHOOTING This screen means you recently entered a calibration blood glucose value and the sensor is having trouble calibrating If you press t...

Page 170: ...it cannot provide a sensor glucose reading When this happens you will see either the glucose reading error symbol or the wait symbol in the status area These symbols mean the receiver does not unders...

Page 171: ...or peeling up Make sure the transmitter is snapped in completely Make sure nothing is rubbing the sensor pod i e clothing seat belts etc Make sure you selected a good insertion site see Chapter 6 Sec...

Page 172: ...using the second blood glucose value The sensor glucose reading will correct over the next 15 minutes If you see differences between the sensor glucose readings and blood glucose values outside of th...

Page 173: ...d glucose meter and strip accuracy vary between blood glucose meter brands Before taking a blood glucose measurement for calibration wash hands make sure the glucose test strips have been stored prope...

Page 174: ...rove future sensor performance Make sure the sensor is not expired Make sure the transmitter is snapped in Make sure the sensor pod is not dislodged or peeling up Make sure nothing is rubbing the sens...

Page 175: ...r option on the Main Menu Stop the sensor session if you remove the sensor before the end of the full 7 day period 1 To end the sensor session select Stop Sensor from the Main Menu 2 Press the SELECT...

Page 176: ...inserted into the receiver port and wall charger or computer If the battery drains and is not charged for a few weeks it may not turn on If the receiver does not turn on try to charge it see Chapter...

Page 177: ...sound or vibration will warn you that you are no longer getting sensor glucose readings 13 8 3 TRANSMITTER LOW BATTERY This screen shows when the transmitter nears the end of its battery life see Chap...

Page 178: ...9 OUT OF RANGE NO ANTENNA Transmitter Failed screen PRECAUTION The transmission range from the transmitter to the receiver is up to 20 feet without obstruction Wireless communication does not work we...

Page 179: ...10 minutes and communication should be restored You must enter the transmitter ID correctly into the receiver to receive sensor glucose readings see Chapter 5 Section 5 2 The Settings Menu Make sure...

Page 180: ...receiver gets wet dropped or the acoustic spacer moves make sure the speaker and vibrations still work You can do this with the Try It option in the profiles menu see Chapter 9 Section 9 3 1 Alert Pro...

Page 181: ...after giving to the patient the patient should return the receiver to the healthcare professional for a replacement The damaged or defective receiver shield should not be taken off by the patient If a...

Page 182: ...Dexcom G4 PLATINUM Professional System User s Guide 181 14 chapter fourteen TECHNICAL INFORMATION...

Page 183: ...182 Dexcom G4 PLATINUM Professional Continuous Glucose Monitoring System 14...

Page 184: ...r glucose readings up to every 5 minutes The System was evaluated in a clinical study in which System readings were compared to blood glucose values to assess its performance and how well the System r...

Page 185: ...tory standard blood glucose results The remainder of the study took place at home the System performance was also paired with the comparative LifeScan OneTouch Ultra 2 meter results and that is referr...

Page 186: ...I Percent within 20 20 YSI Percent within 30 30 YSI Percent within 40 40 YSI Percent Greater than 40 40 YSI Overall 9152 71 82 92 97 3 40 60 2 2 3 3 512 67 78 88 94 6 61 80 3 4 4 4 781 73 85 94 98 2 8...

Page 187: ...40 40 YSI Percent Greater than 40 40 YSI Overall 9152 71 82 92 97 3 40 2 2 22 59 73 86 100 0 40 60 2 2 3 3 461 75 87 94 98 2 61 80 3 4 4 4 890 69 81 94 98 2 81 180 4 5 10 0 3892 65 76 88 95 5 181 300...

Page 188: ...ues Agreement When CGM Reads LOW or HIGH The System reports glucose concentrations between 40 and 400 mg dL 2 2 22 2 mmol L When the System determines the glucose level is below 40 mg dL 2 2 mmol L it...

Page 189: ...76 89 96 99 1 Concurrence of System and Laboratory Reference The percentage of concurring CGM readings and YSI reference values were included in Table 3 For example when CGM readings are within 81 to...

Page 190: ...0 0 0 0 155 40 60 2 2 3 3 4 49 36 11 1 0 0 0 0 0 0 512 61 80 3 4 4 4 0 22 51 24 1 0 0 0 0 0 0 781 81 120 4 5 6 7 0 2 17 66 13 1 0 0 0 0 0 1706 121 160 6 7 8 9 0 0 1 25 60 13 2 0 0 0 0 1492 161 200 8...

Page 191: ...percent difference tells you the percent difference or distance between the System and YSI values but does not tell you whether the System is reading on average higher or lower than the YSI laborator...

Page 192: ...50 16 7 19 4 775 3 8 2 8 9 8 7 9 351 400 19 4 22 2 447 10 4 7 7 12 8 9 1 For CGM 80 mg dL 4 4 mmol L the differences in mg dL mmol L are included instead of percent differences NOTE CGM readings are w...

Page 193: ...ence Overall 9152 2 9 1 7 13 3 9 8 40 2 2 22 14 4 0 8 12 9 0 7 14 4 0 8 12 9 0 7 40 60 2 2 3 3 461 7 3 0 4 6 3 0 4 11 0 0 4 8 8 0 5 61 80 3 4 4 4 890 3 6 0 2 2 4 0 1 12 2 0 7 10 2 0 6 81 180 4 5 10 0...

Page 194: ...igh and low glucose levels concentrations is assessed by comparing System results to YSI results at low and high blood glucose levels and determining if the alert may have sounded The System and YSI r...

Page 195: ...emia Detection Rate The Detection Rate shows how often the device recognizes and alerts you to an episode of hypoglycemia or how often it misses such an event The Hypoglycemia Detection Rate is the of...

Page 196: ...minutes before or after the device alarmed The False Alert Rate is the of time the device alarmed when the blood glucose level was below the alert setting within 15 minutes before or after the device...

Page 197: ...1 mmol L If your blood sugar goes above 200 mg dL 11 1 mmol L you can expect your alarm to sound 97 of the time and not to sound approximately 3 of time within the 15 minute period before or after yo...

Page 198: ...hours 17 65 76 82 88 12 NOTE CGM readings are within 40 to 400 mg dL 2 2 22 2 mmol L inclusive Sensor Stability Sensors can be worn for up to 7 days To verify sensor performance over time 108 sensors...

Page 199: ...valuated by comparing the glucose readings from the two Systems worn on the same subject at the same time Results showed that System readings from the two sensors generally agreed with each other with...

Page 200: ...g that Number of Readings 0 25 167 491 1 9 26 50 719 914 3 7 51 75 1267 1267 0 9 76 100 1811 1992 93 5 Table 10 System Readings Within Wear Days Statistic Day 1 Day 2 Day 3 Day 4 Day 5 Day 6 Day 7 All...

Page 201: ...61 80 3 4 4 4 968 78 86 95 99 1 81 180 4 5 10 0 3141 65 78 93 98 2 181 300 10 1 16 7 1960 68 81 94 97 3 301 350 16 7 19 4 450 77 88 98 99 1 351 400 19 4 22 2 258 75 85 95 98 2 NOTE CGM readings are w...

Page 202: ...e Median Absolute Percent Difference Overall 7508 0 4 1 4 14 0 11 0 40 60 2 2 3 3 731 9 3 0 5 8 0 0 4 11 7 0 7 8 0 0 4 61 80 3 4 4 4 968 1 0 0 1 1 0 0 1 10 7 0 6 8 0 0 4 81 180 4 5 10 0 3141 1 4 0 0 1...

Page 203: ...ma or edema occurred in low frequency around adhesive area No infection bruising or bleeding occurred at the sensor needle insertion area or the adhesive area 14 2 PRODUCT SPECIFICATIONS Sensor Produc...

Page 204: ...mited Warranty 6 months Moisture Protection IP28 temporary submersion Protection Against Electrical Shock Type BF applied part Transmitter Performance Characteristics Parameter Performance Characteris...

Page 205: ...terference EMI Guidance and Manufacturer s Declaration Electromagnetic Immunity The transmitter P N 9438 01 is intended for use in the electromagnetic environment specified in the next table The custo...

Page 206: ...e IEC 61000 4 4 1 kV for input output lines Battery operated Surge IEC 61000 4 5 1 kV line s to line s 2 kV line s to earth Not applicable Battery operated Voltage Dips Short Interruptions and Voltage...

Page 207: ...elds should be at levels characteristic of a typical location in a typical commercial or hospital environment NOTE UT is the a c mains voltage prior to application of the test level Receiver Product S...

Page 208: ...ation Electromagnetic Immunity The receiver P N MT20649 is intended for use in the electromagnetic environment specified in the next table The customer or the user of the receiver should ensure that i...

Page 209: ...icable Mains power quality should be that of a typical commercial or hospital environment Surge IEC 61000 4 5 1 kV line s to line s 2 kV line s to earth 1 kV line s to line s Not applicable Mains powe...

Page 210: ...UT 95 dipinUT for 5 sec Power Frequency 50 60 Hz Magnetic Field IEC 61000 4 8 3 A m 3 A m Power frequency magnetic fields should be at levels characteristic of a typical location in a typical commerci...

Page 211: ...y Radiated RF IEC 61000 4 3 3 Vrms 150 kHz to 80 MHz 3 V m 80 MHz to 2 5 GHz 3 Vrms 10 V m Portable and mobile RF communications equipment should be used no closer to any part of the receiver includin...

Page 212: ...anufacturer and d is the recommended separation distance in meters m Field strengths from fixed RF transmitters as determined by an electromagnetic site surveya should be less than the compliance leve...

Page 213: ...nce is observed additional measures may be necessary such as reorienting or relocating the Dexcom G4 PLATINUM Professional System b Over the frequency range 150 kHz to 80 MHz field strengths should be...

Page 214: ...mmended Separation Distances Between Portable and Mobile RF Communications Equipment and the Receiver The receiver is intended for use in an electromagnetic environment in which radiated RF disturbanc...

Page 215: ...istance d in feet can be estimated using the equation applicable to the frequency of the transmitter where P is the maximum output power rating of the transmitter in watts W according to the transmitt...

Page 216: ...with Part 15 of the FCC Rules Operation is subject to the following two conditions 1 This device may not cause harmful interference and 2 This device must accept any interference received including in...

Page 217: ...can be determined by turning the equipment off and on the user is encouraged to try to correct the interference by one of the following measures Reorient or relocate the receiving antenna Increase th...

Page 218: ...Dexcom G4 PLATINUM Professional System User s Guide 217 15 chapter fifteen USER ASSISTANCE...

Page 219: ...218 Dexcom G4 PLATINUM Professional Continuous Glucose Monitoring System 15...

Page 220: ...e San Diego CA 92121 TECHNICAL SUPPORT For Dexcom product questions and troubleshooting issues8 Dexcom Technical Support Phone Numbers 1 877 339 2664 or 1 858 200 0200 24 hours 7 days a week Dexcom Te...

Page 221: ...your area If after using a Dexcom G4 PLATINUM Professional System your patients would like to purchase a Dexcom CGM system for their personal use please have them contact Dexcom Sales Support or their...

Page 222: ...Dexcom G4 PLATINUM Professional System User s Guide 221 16 chapter sixteen WARRANTY...

Page 223: ...222 Dexcom G4 PLATINUM Professional Continuous Glucose Monitoring System 16...

Page 224: ...y remaining warranty on the original receiver shall transfer to this replacement receiver and this warranty page shall be void 2 What is Not Covered This Limited Warranty is conditioned upon proper us...

Page 225: ...tainer for shipping accompanied by purchaser s sales receipt or comparable substitute proof of sale showing the date of purchase the ID number of the product and the seller s name and address To obtai...

Page 226: ...N IF DEXCOM OR ITS AGENT HAS BEEN ADVISED OF SUCH DAMAGES AND NOTWITHSTANDING ANY FAILURE OF ESSENTIAL PURPOSE OF THIS LIMITED REMEDY THIS LIMITED WARRANTY SHALL NOT EXTEND TO ANYONE OTHER THAN THE OR...

Page 227: ...is conditioned upon proper use of the product by the purchaser This Limited Warranty does not cover a defects or damage resulting from accident misuse abuse neglect unusual physical electrical or elec...

Page 228: ...able substitute proof of sale showing the date of purchase the ID number of the product and the seller s name and address To obtain assistance on where to deliver the Dexcom G4 PLATINUM Transmitter co...

Page 229: ...ADVISED OF SUCH DAMAGES AND NOTWITHSTANDING ANY FAILURE OF ESSENTIAL PURPOSE OF THIS LIMITED REMEDY THIS LIMITED WARRANTY SHALL NOT EXTEND TO ANYONE OTHER THAN THE ORIGINAL PURCHASER OF THIS PRODUCT A...

Page 230: ...29 PLATINUM RECEIVER DUE TO MISUSE AND IMPROPER INSTALLATION CARE OR MAINTENANCE OF THE SHIELD SEAL SHIELD S LIMITED WARRANTY DOES NOT UNDER ANY CIRCUMSTANCES COVER THE DAMAGE REPAIR REPLACEMENT OR CO...

Page 231: ...230 Dexcom G4 PLATINUM Professional Continuous Glucose Monitoring System PAGE INTENTIONALLY LEFT BLANK...

Page 232: ...Dexcom G4 PLATINUM Professional System User s Guide 231 17 chapter seventeen TRAVEL INFORMATION...

Page 233: ...232 Dexcom G4 PLATINUM Professional Continuous Glucose Monitoring System 17...

Page 234: ...begins Your Dexcom G4 PLATINUM Professional System components that are not attached to your body e g receiver extra sensors should be ready in a separate bag when you approach the Security Officer Fo...

Page 235: ...234 Dexcom G4 PLATINUM Professional Continuous Glucose Monitoring System PAGE INTENTIONALLY LEFT BLANK...

Page 236: ...Dexcom G4 PLATINUM Professional System User s Guide 235 18 chapter eighteen APPENDIX...

Page 237: ...236 Dexcom G4 PLATINUM Professional Continuous Glucose Monitoring System 18...

Page 238: ...changed Disabled in blinded mode Receiver Alerts Alarm and Prompts What will I see on the receiver screen Prompt alert or alarm What does this mean How will the receiver notify me vibrate and or beep...

Page 239: ...times every 5 minutes until confirmed or the glucose value drops below the alert level No unless you have turned on the high snooze feature See Chapter 9 Section 9 2 Advanced Alerts In blinded mode N...

Page 240: ...eceiver battery is low Charge the receiver as soon as possible when you see this alert Vibrates 1 time at 20 battery capacity left Yes at 10 battery capacity left In both real time and blinded modes O...

Page 241: ...Will the receiver re notify me In real time mode Glucose reading error prompt The sensor is sending sensor glucose readings that the receiver does not understand You will not receive sensor glucose re...

Page 242: ...a potential problem with the sensor signal You should wait about 30 minutes for more prompts Do not enter any blood glucose values during this time You will not receive sensor glucose readings Symbol...

Page 243: ...ill the receiver re notify me In both real time and blinded modes Wait 15 minutes calibration error alert The sensor cannot calibrate Wait 15 minutes then enter 1 more blood glucose value Wait 15 more...

Page 244: ...linded modes Wait 1 hour calibration error alert The sensor cannot calibrate Wait a minimum of 1 hour then enter 1 more blood glucose value for calibration If no sensor glucose readings appear on the...

Page 245: ...ose readings will not be displayed at this time Vibrates 1 time then vibrates beeps every 5 minutes until confirmed Yes every 15 minutes In both real time and blinded modes Startup calibration prompt...

Page 246: ...the receiver re notify me In both real time and blinded modes Enter BG processing screen prompt The receiver is processing the blood glucose value you entered Prompt screen only N A In real time mode...

Page 247: ...de Rapid rise alert The glucose levels are rising fast at 3 mg dL per minute or more Vibrates 2 times and then vibrates beeps 2 times every 5 minutes or until confirmed 2 repeats max No In blinded mod...

Page 248: ...lert The glucose levels are falling fast at 3 mg dL per minute or more Vibrates 3 times and then vibrates beeps 3 times every 5 minutes or until confirmed 2 repeats max No In blinded mode No display D...

Page 249: ...sor expiration alert The sensor session will end in 30 minutes Vibrates 1 time and then vibrates beeps every 5 minutes 2 repeats max No In both real time and blinded modes End of session sensor expira...

Page 250: ...ed modes Receiver error code alert The receiver is not working properly Record the error code and call Dexcom Technical Support Vibrates 1 time 4 seconds 4 beeps No In both real time and blinded modes...

Page 251: ...eats max Yes once a day In both real time and blinded modes Transmitter failed alert The transmitter has failed Replace the transmitter immediately Vibrates 1 time and then vibrates beeps every 5 minu...

Page 252: ...t Working 179 Out of Range 177 Setting 117 Profiles 118 Setting 122 Rise and Fall Rate of Change 115 Setting 115 Alternative Site Testing BG 7 Antenna Symbol 58 Missing 177 Arrows Trend Rate of Change...

Page 253: ...g 166 Charging Receiver 43 Troubleshooting 175 Contact Information Dexcom 219 Sales Support 220 Technical Support 219 Website 219 Contents Dexcom G4 PLATINUM Professional CGM System Kit 13 D Device In...

Page 254: ...Transmitter 55 Prompts and Notifications 237 Trend Screen Viewing 94 Settings 53 Temporary Shut Down 77 Risks 37 S Safety Information 25 Caution 33 Contraindications 26 Important User Information 25...

Page 255: ...ff 173 Troubleshooting 165 Wire 15 Settings Alerts 105 Settings Receiver 53 Device Information 56 Date and Time 54 Transmitter ID 55 Setup Wizard 51 Specifications Product 202 Startup Period 75 Status...

Page 256: ...Dexcom G4 PLATINUM Professional System User s Guide 255 Removal 144 Safety Lock 9 Removing 70 165 Using 144 Trend Screen Receiver 94 W Warranty 221 Water Resistance 78...

Page 257: ...M System Some of these symbols may not have meaning in your region and are listed for informational purposes only This table shows what each symbol means Symbols Use By Date Lot Number Caution REF Par...

Page 258: ...Sided Humidity Limitation Non Ionizing Radiation European Union WEEE Directive 2006 66 EC Marking Certifies that the Device Meets the European Council Directive 93 42 EEC Electrical Equipment Designe...

Page 259: ...258 Dexcom G4 PLATINUM Professional Continuous Glucose Monitoring System PAGE INTENTIONALLY LEFT BLANK...

Reviews: