FR
ES
PT
IT
EL
PL
UA
EN
RO
80
1. INTENDED USE
2. SPECIFIC SAFETY WARNINGS
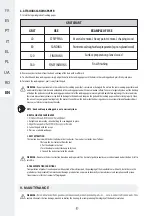
This machine is designed for dry sanding with suitable grained abrasive papers. It is suitable for surface grinding on wood, metal, plastic and
painted surfaces, removal of layers of old paint, intermediate grinding and rust removal. Do not use machines, tools and accessories for additional
applications (see manufacturer’s instructions) or for works other than those for which they are designed for.
The sanding sheet recommendations are to be observed.
A. Always wear safety goggles and dust mask when sanding, especially sanding overhead
B. Do not use a sanding sheet larger than recommended.
C. Do not apply excessive pressure to the product
D. Clamp workpiece with a clamping device.
Unclamped workpieces can cause severe injury .Do not hold the material you are sanding by hand
E. Take special care to guard against these dusts, including the following :
- All persons entering the work area must wear an approved mask specially designed for protection against harmful / toxic dusts, in addition to using
the dust extraction facility, and keeping the work area well ventilated.
- Children and pregnant women must not enter the work area.
- Do not eat, drink or smoke in the work area.
F. Any Pre1960 building may have paint containing lead on wood or metal surfaces. If you suspect workpiece contains lead seek
professional adviceContact with the saw blade may result in injury.
- Some wood and wood type products especially MDF (Medium Density Fibreboard) can produce dust that can be hazardous to your health. We
raction facility.
- When using the sander with metal be aware that sparks may ignite the dust in the dust extraction system or vacuum cleaner.
- This sander is designed for single handed operation. Adopt a stable stance and make sure that the mains cable is prevented from coming into
contact with the machine or getting caught up on other objects preventing completion of the sanding pass.
- Ensure that you have removed foreign objects such as nails and screws from the workpiece before commencing sanding.
- Don’t use it for wet sanding, for dry sanding only.
- Where possible, secure smaller workpieces to prevent it from moving under the sander.
- Do not force the sander, let the tool do the work at a reasonable speed. Overloading will occur if too much pressure is applied and the motor
- Do not continue to use worn, torn or heavily clogged sanding paper.
- Do not touch the moving sanding paper.
G. Clean the air vents on your power tool after each use.
The motor’s fan will draw the dust inside the housing and excessive accumulation of powdered metal may cause electrical hazards.
3. RESIDUAL RISKS
4. RISK REDUCTION
Even when the power tool is used as prescribed it is not possible to eliminate all residual risk factors. The following hazards may arise in connection
with the power tool’s construction and design :
• Damage to health resulting from vibration emission if the power tool is being used over a longer period of time or not
adequately managed and properly maintained.
It has been reported that vibrations from handheld tools may contribute to a condition called Raynaud’s Syndrome in certain individuals. Symptoms
, exposure to cold
and dampness, diet, smoking, and work practices are all thought to contribute to the development of these symptoms. There are measures that can
• Keep your body warm in cold weather. When operating the product, wear gloves to keep the hands and wrists warm. It is
reported the cold weather is a major factor contributing to Raynaud’s Syndrome.
• After each period of operation, exercise to increase blood circulation.
• Take frequent work breaks. Limit the amount of exposure per day.
WARNING :
or passive medical implants. To reduce the risk of serious or fatal injury, we recommend persons with medical implants to consult their
medical specialist and the medical implant manufacturer before operating this machine.
Summary of Contents for 20VMFS2.1
Page 2: ......
Page 4: ...4 102 152 X1 A X1 B X1 C 80 120 X1 D...
Page 6: ...1 i 6...
Page 7: ...1 Clic 2 7...
Page 8: ...3 4 8 1 2 3...
Page 9: ...5 6 9 1 2 3 4...
Page 10: ...7 8 10...
Page 11: ...9 10 1 2 11...
Page 12: ...11 12 1 2 3 12...
Page 13: ...13 14 1 2 13...
Page 14: ...14 15 16 1 2 3...
Page 15: ...17 18 1 2 3 4 15...
Page 22: ...FR ES PT IT EL PL UA EN RO 22 13 VUE CLAT E AVEC LISTE DES PI CES...
Page 30: ...FR ES PT IT EL PL UA EN RO 13 VISTA DETALLADA Y LISTA DE PIEZAS DE RECAMBIO...
Page 38: ...FR ES PT IT EL PL UA EN RO 13 PERSPETIVA EXPLODIDA COM LISTA DE PE AS...
Page 46: ...FR ES PT IT EL PL UA EN RO 13 LISTA DEI PEZZI CON VISTA ESPLOSA...
Page 48: ...FR ES PT IT EL PL UA EN RO 48 1 O 2 A B E 1960 3 4 Raynaud Raynaud MDF...
Page 52: ...FR ES IT EL PL UA EN RO PT 10 11 0 C 45 C 0 C 40 C 80...
Page 54: ...FR ES IT EL PL UA EN RO PT 13...
Page 62: ...FR ES IT EL PL UA EN RO PT 13 PERSPEKTYWICZNY WIDOK EKSPLODUJ CY LISTA CZ CI ZAMIENNYCH...
Page 65: ...FR ES PT IT EL PL UA EN RO 5 6 1 2 3 4 5 DC 2 1 4 5 1 3 Sterwins UP20 Lexman UP20...
Page 67: ...FR ES PT IT EL PL UA EN RO 1 2 3 4 5 C 1 2 3 4 D A 1 2 3 4 40 8 120 180 9 B...
Page 70: ...FR ES IT EL PL UA EN RO PT 13...
Page 78: ...FR ES IT EL PL UA EN RO PT 13 PERSPETIVA EXPLODIDA COM LISTA DE PE AS...
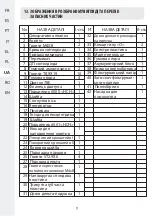
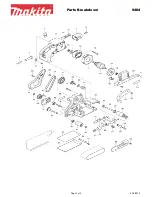
Page 86: ...FR ES PT IT EL PL UA EN RO 13 EXPLODEDVIEWWITH PART LIST...
Page 90: ......
Page 91: ......


