136
WARNING!
The metal bracket must always be aligned to the
cutting disc so that the metal bracket does not Interfere with
material being cut.
WARNING!
Product damage! Do not over-tighten hex bolt and
locking knob. The upper protective guard must be free to rise and
fall as the workpiece is pushed toward the cutting disc.
WARNING!
The mitre cutting guide can be set to a desired angle
(0°-45°). The mitre cutting guide can only be used when the
parallel cutting guide is mounted.
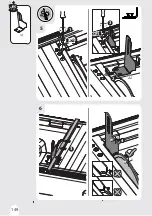
ASSEMBLE/ADJUST THE METAL BRACKET
• Raise the 45° vertical fence approx. 45° and remove.
• Loosen the cross-screws with the star-head screwdriver (not supplied) and remove them.
• Push metal bracket into the place located under the working table and align the holes on the metal
bracket with the working table.
• Tighten cross-screws.
• Replace the 45° vertical fence.
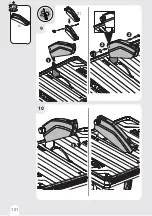
MOUNTING THE UPPER PROTECTIVE GUARD
• Align upper protective guard with metal bracket and slide over metal bracket. Line up through holes
in upper protective guard with slot in metal bracket.
• Install hex bolt through upper protective guard and metal b
before the thread locking knob and tighten the locking knob.
• Ensure that upper protective guard can move freely and that it cannot touch the cutting disc when in
use.
MOUNTING THE PARALLEL CUTTING GUIDE
• Slide the parallel cutting guide from the side of the working table.
• Turn locking knob clockwise to tighten securely.
ADJUSTING THE PARALLEL CUTTING GUIDE
• Gently turn locking knob on parallel cutting guide counter-clockwise to loosen.
• Use parallel cutting guide scale, located on front and rear of working table, to set parallel cutting
guide to desired width of cut.
• Turn locking knob clockwise to tighten securely.
INSTALLING THE MITRE CUTTING GUIDE
• Push mitre cutting guide down onto parallel cutting guide.
• Adjust parallel cutting guide to desired position and secure.
• Adjust to desired angle using angle scale and tighten securely with locking knob .
WARNING !
Do not lose the special wrenches for mounting the
cutting disc. They are indispensable for safe mounting of the disc.
Make sure once again that the cutting disc is attached securely
and perfectly. Check the correct rotational direction again. Turn
the disc manually and check that it runs and rotates freely. Make
sure that the hex nut is fully tightened.
FR
ES
PT
IT
EL
PL
UA
RO
EN
Summary of Contents for 450ETC1-18030.1
Page 2: ......
Page 4: ...4 4 A F C B E D G I H...
Page 17: ...FR ES PT IT EL PL UA RO EN 17 79 11 VUE D TAILL E...
Page 32: ...32 FR ES PT IT EL PL UA RO EN VISTA ESPLOSA ED ELENCO DEI PEZZI DI RICAMBIO 11 79...
Page 47: ...47 FR ES PT IT EL PL UA RO EN PERSPETIVA EXPLODIDA E LISTA DE PE AS SOBRESSALENTES 11 79...
Page 62: ...62 FR ES PT IT EL PL UA RO EN 11 VISTA ESPLOSA ED ELENCO DEI PEZZI DI RICAMBIO 79...
Page 65: ...65 FR ES PT IT EL PL UA RO EN 1 2 3 4 5 I Y 6 O 7 I 8 9 10 O Y 11 E H 12 13 Y...
Page 66: ...66 FR ES PT IT EL PL UA RO EN 1 2 2 1 1 2...
Page 67: ...67 FR ES PT IT EL PL UA RO EN RCD RCD 3 off 4 H...
Page 68: ...68 FR ES PT IT EL PL UA RO EN 5 2 2...
Page 69: ...69 FR ES PT IT EL PL UA RO EN 9 10 11 15 1 14 2 3 4 13 12 5 6 7 8...
Page 71: ...FR ES PT IT EL PL UA RO EN 71 6 45 45 rpm rpm...
Page 72: ...72 FR ES PT IT EL PL UA RO EN 45 45...
Page 75: ...75 FR ES PT IT EL PL UA RO EN 45 0 45 8...
Page 76: ...76 FR ES PT IT EL PL UA RO EN 2012 19 E...
Page 77: ...77 FR ES PT IT EL PL UA RO EN...
Page 78: ...78 FR ES PT IT EL PL UA RO EN 11 79...
Page 93: ...93 FR ES PT IT EL PL UA RO EN...
Page 94: ...94 FR ES PT IT EL PL UA RO EN PERSPEKTYWICZNY WIDOK EKSPLODUJ CY LISTA CZ CIZAMIENNYCH 11 79...
Page 97: ...97 FR ES PT IT EL PL UA RO EN 1 2 3 4 5 6 7 8 9 10 11 12 13...
Page 98: ...98 FR ES PT IT EL PL UA RO EN 1 2 2 1 1 a b c 2 a b c d...
Page 99: ...99 FR ES PT IT EL PL UA RO EN e f 3 a b c d e f g h 4 a b c d e...
Page 100: ...100 FR ES PT IT EL PL UA RO EN f g h 5 a 2 2...
Page 101: ...101 FR ES PT IT EL PL UA RO EN...
Page 102: ...102 FR ES PT IT EL PL UA RO EN 9 10 11 15 1 14 2 3 4 13 12 5 6 7 8...
Page 104: ...104 FR ES PT IT EL PL UA RO EN 45 45 45 6...
Page 105: ...105 FR ES PT IT EL PL UA RO EN 45 45 45...
Page 106: ...106 FR ES PT IT EL PL UA RO EN 0 45 45 45 45 45 45 M 45 MIN 1 0 2 90 90 7...
Page 107: ...107 FR ES PT IT EL PL UA RO EN 45 45 45 90 22 5 45 45 45 45 22 5 45 45 45 45 0...
Page 108: ...108 FR ES PT IT EL PL UA RO EN 45 8...
Page 109: ...FR ES PT IT EL PL UA RO EN...
Page 110: ...110 FR ES PT IT EL PL UA RO EN...
Page 111: ...111 FR ES PT IT EL PL UA RO EN 11 79...
Page 118: ...118 FR ES PT IT EL PL UA RO EN 9 10 11 15 1 14 2 3 4 13 12 5 6 7 8...
Page 125: ...FR ES PT IT EL PL UA RO EN...
Page 126: ...126 FR ES PT IT EL PL UA RO EN VEDERE DETALIAT I LISTA PIESELOR DE SCHIMB 11 79...
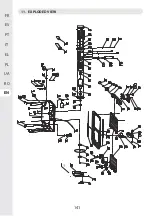
Page 141: ...141 11 EXPLODED VIEW FR ES PT IT EL PL UA RO EN 79...
Page 144: ...144...
Page 145: ...145...
Page 149: ...149 6 G G 5 1 2 3 4 3 x2 x2 x2 x2...
Page 150: ...150 8 7 5 x2 x2...
Page 151: ...10 151 1 2 2 D 3 D 9...
Page 152: ...152 12 2 1 3 B C B C 11...
Page 154: ...154 3 4 4...
Page 156: ...156 4 1 3 2...


