background image

www.dfi.com

64

Chapter 5 RAID

Chapter 5

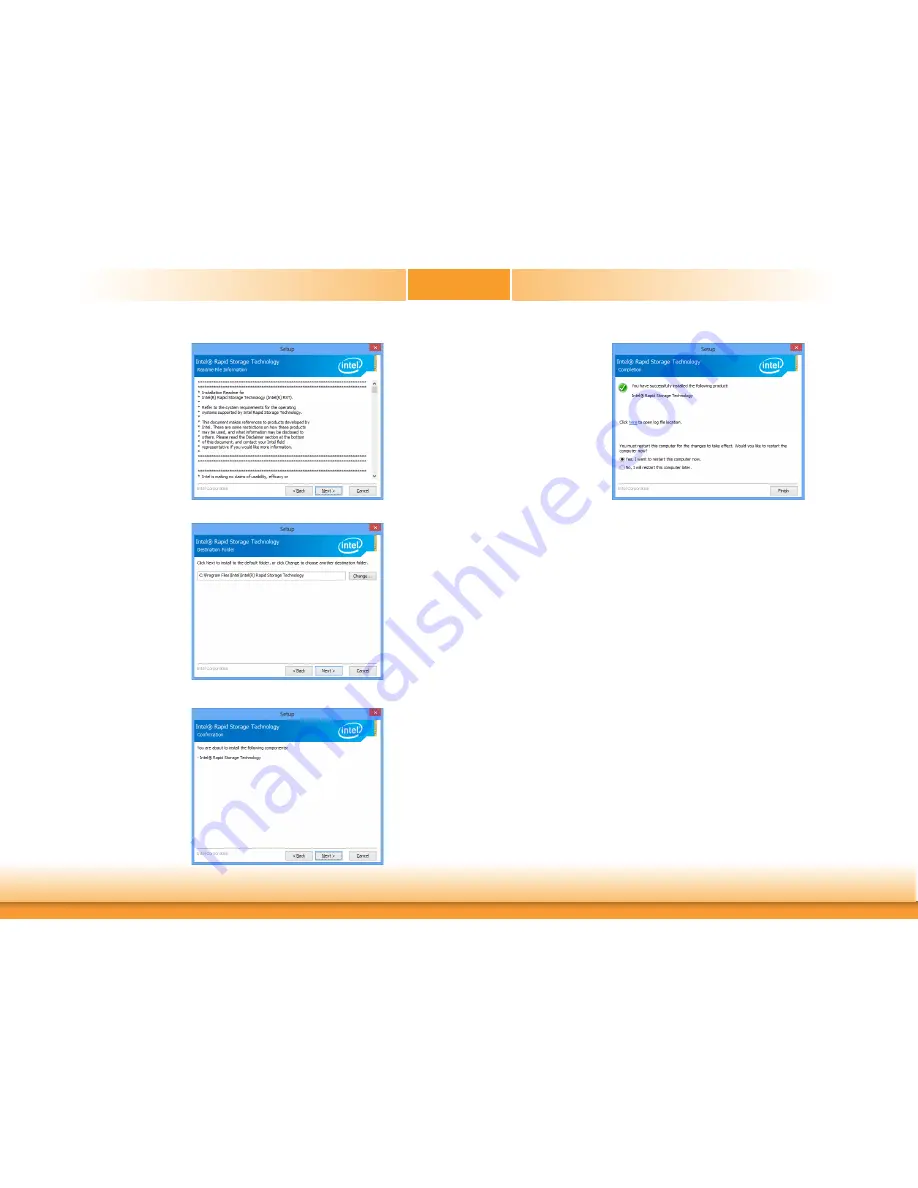
5.  Go through the readme 

document to view system 

requirements and  installa-

tion information then click 

Next.

7.  Confirm the installation and 

click Next.

6.  Click Next to install to 

the default folder or click 

change to choose another 

destination folder.

8.  Click “Yes, I want to restart 

this computer now” to 

complete the installation 

and then click Finish.

Summary of Contents for SD330-Q170

Page 1: ...1 SD330 Q170 MicroATX Industrial Motherboard User s Manual A42200618 ...

Page 2: ...C Statement on Class B This equipment has been tested and found to comply with the limits for a Class B digital device pursuant to Part 15 of the FCC rules These limits are designed to provide reason able protection against harmful interference when the equipment is operated in a residential installation This equipment generates uses and can radiate radio frequency energy and if not installed and ...

Page 3: ...SATA Signal Select 18 Auto Power on Select 19 Rear Panel I O Ports 20 PS 2 Keyboad Mouse Port 20 COM Serial Ports 21 Graphics Interfaces 21 RJ45 LAN Ports 22 USB Ports 22 Audio 23 I O Connectors 24 SATA Serial ATA Connectors 24 Digital I O Connector 24 Cooling Fan Connectors 25 Power Connectors 25 LVDS LCD Panel Connector 26 Chassis Intrusion Connector 27 Front Panel Connector 27 Standby Power LED...

Page 4: ...atic electrical discharge can damage computer components without causing any signs of physical damage You must take extra care in han dling them to ensure against electrostatic build up 1 To prevent electrostatic build up leave the system board in its anti static bag until you are ready to install it 2 Wear an antistatic wrist strap 3 Do all preparation work on a static free surface 4 Hold the dev...

Page 5: ...OM port cable Thermal solution Serial ATA data cable LPC EXT RS232 module LPC EXT RS485 module The board and accessories in the package may not come similar to the information listed above This may differ in accordance to the sales region or models in which it was sold For more information about the standard package in your region please contact your dealer or sales representative Before Using the...

Page 6: ...altek ALC888S VD2 GR ETHERNET Controller 1 x Intel WGI210AT PCIe 10 100 1000Mbps 1 x Intel I219LM PCIe with iAMT11 0 10 100 1000Mbps only Core i7 i5 supports iAMT REAR I O Ethernet 2 x GbE RJ 45 Serial 1 x RS 232 422 485 RS 232 w power DB 9 USB 4 x USB 3 0 2 x USB 2 0 PS 2 1 x PS 2 mini DIN 6 Display 1 x VGA 1 x DVI I DVI D signal 1 x DP Audio 1 x Line in available upon request 1 x Line out 1 x Mi...

Page 7: ...n the system Important The 5V_standby power source of your power supply must support 720mA Important The 5V_standby power source of your power supply must support 720mA Wake On USB This function allows you to use a USB keyboard or USB mouse to wake up a system from the S3 STR Suspend To RAM state RTC Timer The RTC installed on the system board allows your system to automatically power on on the se...

Page 8: ...able of running at a maximum transmis sion speed of up to 5 Gbit s 625 MB s and is faster than USB 2 0 480 Mbit s or 60 MB s and USB 1 1 12Mb s USB 3 0 reduces the time required for data transmission reduces power consumption and is backward compatible with USB 2 0 It is a marked improvement in device transfer speeds between your computer and a wide range of simultaneously accessible external Plug...

Page 9: ...A 0 1 SATA 1 1 SATA 2 1 SATA 3 SATA 3 0 Chassis Intrusion 1 11 10 1 USB 5 6 USB 2 0 1 2 10 9 USB 7 8 1 2 40 39 LVDS LCD Panel 1 LCD Inverter Power Intel WGI219LM Intel WGI210AT ASMedia ASM1442 Chrontel CH7517A 1 ATX Power 12 24 13 1 2 11 12 1 2 7 8 Auto Power on Select JP5 1 Realtek ALC888 1 1 2 5 6 SMBus 1 2 7 8 SPI Program Header LAN LED Front Panel 1 2 10 9 USB 9 10 LCD Inverter Power Select JP...

Page 10: ...el can be identical or completely different However we highly recommend using identical DIMMs Not all slots need to be populated Dual Channel DIMMs of the same memory configuration are on different channels Note The system board used in the following illustrations may not resemble the actual board These illustrations are for reference only 1 Make sure the PC and all other peripheral devices connec...

Page 11: ...ep the protective cap RMA requests will be accepted and pro cessed only if the LGA 1151 socket comes with the protective cap Note The system board used in the following illustrations may not resemble the actual board These illustrations are for reference only 7 Seat the module vertically pressing it down firmly until it is completely seated in the socket 6 Grasping the module by its edges position...

Page 12: ...ables 3 Locate the LGA 1151 CPU socket on the system board 4 Unlock the socket by push ing the load lever down moving it sideways until it is released from the reten tion tab then lift the load lever up Retention tab Load lever 6 Remove the protective cap from the CPU socket The cap is used to protect the CPU socket against dust and harmful particles Remove the protective cap only when you are abo...

Page 13: ...U must align with the corner of the CPU socket shown on the photo The CPU s notch will at the same time fit into the socket s alignment key Alignment key Alignment key Gold triangular mark 8 Close the load plate then push the load lever down While closing the load plate make sure the front edge of the load plate slides under the retention knob Retention knob 9 Hook the load lever under the retenti...

Page 14: ...t sink already has a patch of thermal paste on its underside Peel the strip that covers the paste before you place the fan heat sink on top of the CPU 2 Place the heat sink on top of the CPU The 4 screw around the heat sink which are used to secure the heat sink onto the sys tem board must match the 4 mounting holes around the socket Mounting hole 3 Orient the heat sink such that the CPU fan s cab...

Page 15: ...efault setting pins 1 and 2 On 3 Now plug the power cord and power on the system JP1 2 3 On Clear CMOS Data 1 2 On Normal default 3 1 2 3 1 2 COM1 COM2 RS232 422 485 Select JP7 for COM 1 and JP11 for COM 2 are used to configure the COM ports to RS232 RS422 Full Duplex or RS485 The pin functions of the COM ports will vary according to the jumper s setting JP7 JP11 RS232 RS422 Full Duplex RS485 COM ...

Page 16: ...to RS232 RS422 Full Duplex or RS485 The pin functions of Serial COM port 1 and port 2 will vary ac cording to jumper setting JP10 COM 1 JP8 COM 1 2 1 3 5 4 6 2 3 5 4 6 On RS422 Full Duplex RS485 1 3 5 2 4 6 1 3 2 4 On RS232 default JP12 COM 2 JP13 COM 2 Blacklight Power Select JP3 is used to select the power supplied with backlight 2 3 On 5V 1 2 On 3 3V default 3 1 2 3 1 2 JP3 3 5 4 6 On RS422 Ful...

Page 17: ...Select 1 2 On 12V JP2 is used to select the power supplied with backlight 5 6 On 3 3 default LCD Inverter Power Select JP4 is used to select the power supplied with backlight 2 3 On 5V 1 2 On 3 3V default 3 1 2 3 1 2 JP4 JP2 3 4 On 5V 6 4 2 5 3 1 6 4 2 5 3 1 6 4 2 5 3 1 ...

Page 18: ...tions of COM 2 will vary according to JP14 s setting rexpec tively Mini PCIe mSATA Signal Select JP6 is used to select the power supplied with backlight 2 3 On mSATA 1 2 On PCIe default 3 1 2 3 1 2 1 3 RI 2 4 DCD On RS232 default 1 3 5 4 6 3 5 5V 4 6 12V On RS232 with power 1 3 5 2 4 6 2 1 3 5 4 6 2 3 5 5V 4 6 12V On RS232 with power 1 3 5 2 4 6 1 3 RI 2 4 DCD On RS232 default JP9 COM 1 JP14 COM 2...

Page 19: ...elect JP5 is used to select the method of powering on the system If you want the system to power on whenever AC power comes in set JP5 pin 2 and pin 3 to On If you want to use the power button set pin 1 and pin 2 to On JP5 2 3 On AC power 1 2 On Power on default 3 1 2 3 1 2 ...

Page 20: ...RQ12 Wake On PS 2 Keyboard Mouse The Wake On PS 2 Keyboard Mouse function allows you to use the PS 2 keyboard or PS 2 mouse to power on the system To use this function Jumper Setting JP1 must be set to 2 3 On 5V_standby Refer to PS 2 Keyboard Mouse Power Select in this chapter for more information BIOS Setting Configure the wake up function of PS 2 keyboard mouse in the Advanced menu ACPI Con figu...

Page 21: ...5 Select and COM1 COM2 RS232 Power Select in this chapter for more information COM 2 port The pin functions of COM 1 port will vary according to JP11 s setting JP14 is used to configure Serial COM ports to pure RS232 or RS232 with power Refer to COM1 COM2 RS232 422 485 Select and COM1 COM2 RS232 Power Select in this chapter for more information COM 3 to COM 6 are fixed at RS232 The pin functions o...

Page 22: ...5 10 and four onboard USB 3 0 ports USB 1 2 3 4 The 10 pin connectors allow you to connect 6 additional USB 2 0 ports USB 5 6 7 8 9 10 The additional USB ports may be mounted on a card edge bracket Install the card edge bracket to an available slot at the rear of the system chassis and then insert the USB port cables to a connector BIOS Setting Configure these onboard USB devices in the Advanced m...

Page 23: ...B Keyboard Mouse function allows you to use a USB keyboard or USB mouse to wake up a system from the S3 STR Suspend To RAM state To use this function Audio Rear Audio The system board is equipped with 2 audio jacks A jack is a one hole connecting interface for inserting a plug Line out Jack Lime This jack is used to connect a headphone or external speakers Mic in Pink This jack is used to connect ...

Page 24: ... more information Features Note Some 3rd party SATA Gen 2 speed device controllers used on the system board paired with the Intel 8 series chipset are intermittently detected Before using SSD devices or mSATA SSD devices please check whether the device and the cable which are used on the system board conform to Intel s official regulations SATA 0 SATA 1 SATA 3 0 6Gb s 7 RXN GND TXP TXN GND 1 RXP G...

Page 25: ...ore 12VDC current to the processor s Voltage Regulator Module VRM The power connectors from the power supply unit are designed to fit the 24 pin and 8 pin connectors in only one orientation Make sure to find the proper orientation before plugging the connectors The system board requires a minimum of 300 Watt power supply to operate Your system configuration CPU power amount of memory add in cards ...

Page 26: ...DS_Out7 5 LVDS_Out3 6 LVDS_Out7 7 GND 8 GND 9 LVDS_Out2 10 LVDS_Out6 11 LVDS_Out2 12 LVDS_Out6 13 GND 14 GND 15 LVDS_Out1 16 LVDS_Out5 17 LVDS_Out1 18 LVDS_Out5 19 GND 20 GND 21 LVDS_Out0 22 LVDS_Out4 23 LVDS_Out0 24 LVDS_Out4 25 GND 26 GND 27 LVDS_CLK1 28 LVDS_CLK2 29 LVDS_CLK1 30 LVDS_CLK2 31 GND 32 GND 33 DDC_CLK 34 NC 35 DDC_DATA 36 3 3V 37 Panel Power 38 Panel Power 39 Panel Power 40 Panel Po...

Page 27: ...RESET SW PWR LED ATX SW 12 11 2 1 Front Panel HDD LED HDD LED This LED will light when the hard drive is being accessed RESET Reset Switch This switch allows you to reboot without having to power off the system Power_Button This switch is used to power on or off the system PWR LED Power Standby LED When the system s power is on this LED will light When the system is in the S1 POS Power On Suspend ...

Page 28: ... do so will cause severe damage to the motherboard and components Standby Power LED S PDIF Connector The S PDIF connector is used to connect an external S PDIF port Your S PDIF port may be mounted on a card edge bracket Install the card edge bracket to an available slot at the rear of the system chassis then connect the audio cable to the S PDIF connector Make sure pin 1 of the audio cable is alig...

Page 29: ...ted over a 4 bit serialized data interface which uses a 33MHz LPC bus clock For more information about LPC bus refer to the Intel Low Pin Count Interface Specification Revision 1 1 The table below indicates the pin fuctions of the LPC connector Pins Pin Assignment Pins Pin Assignment 1 L_CLK 2 L_AD1 3 L_RST 4 L_AD0 5 L_FRAME 6 3V3 7 L_AD3 8 GND 9 L_AD2 10 Key 11 INT_SERIRQ 12 GND 13 5VSB 14 5V LPC...

Page 30: ... slot then press it down firmly until it is completely seated in the slot The retaining clip of the slot will automatically hold the graphics card in place PCI Slot The PCI slot supports expansion cards that comply with PCI specifications You can install a PCI expansion card or a customized riser card designed for only 2 PCI slots expansion for low profile PCI card only into the PCI slot PCI Expre...

Page 31: ...fter you power up the system the BIOS message appears on the screen and the memory count begins After the memory test the message Press DEL to run setup will appear on the screen If the message disappears before you respond restart the system or press the Reset button You may also restart the system by pressing the Ctrl Alt and Del keys simultaneously Legends Scroll Bar When a scroll bar appears t...

Page 32: ...Speed Channel A DIMM 0 Unknown 1 Channel B Unknown 0 Unknown 1 PCH Rev SKU Intel ME Version SKU System Time System Date SD330 Q170 63 31Q Intel R Core TM i7 6700 CPU 3 40GHz 0x506E3 SKYLAKE DT HALO 3400 MHz 03 R0 S0 Stepping 32 KB 32 KB 256 KB 8192 KB 4 Core s 8 Thread s 0000006A 4096 MB 2133 MHz 4096 MB Not Installed Not Installed Not Installed 31 D1 Stepping SKL PCH H Q170 11 0 0 1205 CORPORATE ...

Page 33: ...e up event occurs ACPI Configuration Wake on LAN Enabled After G3 S0 State Advanced F1 Help Select Item F5 F6 Change Values F9 Setup Defaults Esc Exit Select Item Enter Select SubMenu F10 Save and Exit InsydeH20 Setup Utility Rev 5 0 CPU Configuration This section is used to configure the CPU Intel R SpeedStep tm This field is used to enable or disable the Intel Enhanced SpeedStep Technology Turbo...

Page 34: ... Save and Exit InsydeH20 Setup Utility Rev 5 0 Auto Disabled VGA DVI 18 Bit Disabled 1024x768 Boot display LCD DVI LCD VGA LCD DP DVI LCD DVI VGA DVI DP VGA LCD VGA DVI VGA DP DP LCD DP DVI DP VGA Panel Color Depth Select the LFP panel color depth 18 bit 24 bit 36 bit and 48 bit LVDS Support Turn on off LVDS Select which of IGFX PEG PCI Graphics device should be Primary Display or Slect SG fro Swi...

Page 35: ...up Utility Enabled Control Detection of the HD Audio device Disabled HDA will be unconditionally disabled Enabled HDA will be unconditionally enabled Auto HDA will be ena bled if present disabled otherwise Rev 5 0 LCD Panel Type Select the LCD panel type Backlight Type Setting Video Configuration Internal Graphics Always Enabled PEG Boot display Panel Color Depth LVDS Support LCD Panel Type Advanc...

Page 36: ...m Enter Select SubMenu F10 Save and Exit InsydeH20 Setup Utility Rev 5 0 Enabled AHCI ST4000NM0033 9ZM170 Enabled Not Installed Enabled Not Installed Enabled Not Installed Enabled Not Installed Enabled SATA Controller s This field is used to enable or disable Serial ATA devices SATA Mode Selection The mode selection determines how the SATA controller s operates AHCI Mode This option allows the Ser...

Page 37: ...ss Root Port PCI Express Root Port 5 PCIe Speed Advanced F1 Help Select Item F5 F6 Change Values F9 Setup Defaults Esc Exit Select Item Enter Select SubMenu F10 Save and Exit InsydeH20 Setup Utility Rev 5 0 Enabled AUTO Control the PCI Express Root Port PCI Express Root Port 9 PCIe Speed Advanced F1 Help Select Item F5 F6 Change Values F9 Setup Defaults Esc Exit Select Item Enter Select SubMenu F1...

Page 38: ... 3 Boundary 4 Advanced F1 Help Select Item F5 F6 Change Values F9 Setup Defaults Esc Exit Select Item Enter Select SubMenu F10 Save and Exit InsydeH20 Setup Utility Rev 5 0 Enable 30 40 50 60 30 40 50 75 Enable 30 40 50 60 30 40 50 75 Enable 30 40 50 60 SYS CPU Smart Fan Fan 2 Control Enable or disable the system CPU smart fan fan 2 Boundary 1 to Boundary 4 Set the boundary temperature The range i...

Page 39: ...o Flow Choose RS485 auto flow to be enabled or disabled Configure Serial port using options Disable No Con figuration Enable User Configuration WDT Enable or disable the watchdog function A counter will appear if you select to enable WDT Input any value between 1 to 255 Case Open Enable or disable the case open AC Power Loss Set the AC power loss always off on Fan Speed Count 1 Fan Speed Count 2 F...

Page 40: ...oot Exit Rev 5 0 TPM 2 0 DTPM Enabled Owned Available No Operation Not installed TMP Availability Available Hidden PC Health Status This field only displays the PC health status PC Health Status Voltage VCORE 5V 12V VDDQ VBAT 3VSB Temperature System o C o F CPU o C o F Fan Speed SYS FAN CPU FAN SYS FAN 2 Advanced F1 Help Select Item F5 F6 Change Values F9 Setup Defaults Esc Exit Select Item Enter ...

Page 41: ... Name This option allowes you to go to Storage Password List Help Device Name Security Mode Set Storage Password Set Master Hdd Password Main Advanced F1 Help Select Item F5 F6 Change Values F9 Setup Defaults Esc Exit Select Item Enter Select SubMenu F10 Save and Exit InsydeH20 Setup Utility Security Boot Exit Rev 5 0 Security Mode Description Lock HDD security status is enable and lock Unlock HDD...

Page 42: ...and USB Boot will show up If you select Legacy Boot PXE Boot to LAN and USB Boot will show up PXE Boot Capability Disabled Suppoort Network Stack UEFI PXE IPv4 IPv6 Legacy Legacy PXE OPROM only USB Boot Enable or disable the booting to USB boot devices Boot Normal Boot Menu Normal Based on the boot normal priority it determines the EFI device first or the legacy device first Advance All boot devic...

Page 43: ...5 F6 Change Values F9 Setup Defaults Esc Exit Select Item Enter Select SubMenu F10 Save and Exit InsydeH20 Setup Utility Security Exit Rev 5 0 Boot Boot Type Order CD DVD ROM Drive USB Others Hard Disk Drive Floppy Drive Boot Type Order Boot Type Order Use and keys to arrange the sequence of storage devices that the system s hardware checks for the operating system s boot files The first device in...

Page 44: ...2012 2016 Insyde Software Corp All Rights Reserved Initializing Current BIOS Model name SD330 Q170 New BIOS Model name SD330 Q170 Current BIOS version 65 05A New BIOS version 65 05A Updating Block at FFFFF000h 0 25 50 75 100 100 C SD330 Q170 _ Updating the BIOS To update the BIOS you will need the new BIOS file and a flash utility Please contact techni cal support or your sales representative for ...

Page 45: ...that the MAC address should be burned or not Notice BIOS SPI ROM 1 The Intel Management Engine has already been integrated into this system board Due to the safety concerns the BIOS SPI ROM chip cannot be removed from this system board and used on another system board of the same model 2 The BIOS SPI ROM on this system board must be the original equipment from the factory and cannot be used to rep...

Page 46: ...ons required to enhance the performance of the system board Insert the DVD into a DVD ROM drive The autorun screen Mainboard Utility DVD will appear If after inserting the DVD Autorun did not automatically start which is the Mainboard Utility DVD screen did not appear please go directly to the root directory of the DVD and double click Setup For Windows 10 For Windows 8 1 ...

Page 47: ...ation Utility is used for updating Windows INF files so that the Intel chipset can be recognized and configured properly in the system To install the utility click Intel Chipset Software Installation Utility on the main menu 1 Setup is ready to install the utility Click Next 2 Read the license agreement then click Yes For Windows 7 ...

Page 48: ...dy to install the graphics driver Click Next By default the Automatically run WinSAT and enable the Windows Aero desktop theme is enabled With this enabled after installing the graphics driver and the system rebooted the screen will turn blank for 1 to 2 minutes while WinSAT is running before the Windows 7 Windows 8 1 Windows 10 desktop appears The blank screen period is the time Windows is testin...

Page 49: ...t 5 Click Yes I want to restart this computer now then click Finish Restarting the system will allow the new software installation to take effect Audio Drivers To install the driver click Audio Drivers on the main menu 2 Click Yes I want to restart my computer now then click Finish Restarting the system will allow the new software installation to take effect 1 Setup is ready to install the driver ...

Page 50: ...tel LAN Drivers on the main menu 1 Setup is ready to install the driver Click Next 2 Click I accept the terms in the license agreement then click Next 3 Select the program featuers you want installed then click Next 4 Click Install to begin the installation 5 After completing installa tion click Finish ...

Page 51: ...el Mode Driver Framework For Windows 7 only To install the driver click Kernel Mode Driver Framework on the main menu 1 Click Yes to install the update 2 The update is installed now 3 Click Restart Now to restart your computer when the installation is complete ...

Page 52: ...Management Engine Drivers on the main menu 1 Setup is ready to install the driver Click Next 2 Read the license agreement then click Next 3 Setup is currently installing the driver After installation has completed click Next 4 Please wait while the prod uct is being installed 5 After completing installa tion click Finish ...

Page 53: ...you are using Windows 7 you need to access the operating system as an administrator to be able to install the utility 1 Setup is ready to install the driver 2 Click Next to continue 3 Read the license agreement then click I accept the terms in the license agreement Click Next 4 The wizard is ready to begin installation Click Install 5 Please wait while the program features are being installed ...

Page 54: ... 6 After completing installa tion click Finish SD330 Q170 Note Note The screenshot displayed above is for illustrative purpose only and may not resemble the actual screen The SD330 Q170 HW Utility features the following tabs Information HW Health HW Health set Watchdog DIO and backlight Click on the tabs to access information about the board ...

Page 55: ...p is currently installing the driver After installation has com pleted click Next 5 After completing installation click Finish Intel USB 3 0 Drivers For Windows 7 and Windows 8 1 To install the driver click Intel USB 3 0 Driver on the main menu 2 Read the license agreement then click Yes 1 Setup is ready to install the driver Click Next ...

Page 56: ...Read the file information then click Next IO Driver For Windows 8 1 and Windows 10 To install the driver click Intel Serial IO Driver on the main menu 1 Setup is ready to install the driver Click Next 2 Read the license agreement care fully Click I accept the terms in the Li cense Agreement then click Next ...

Page 57: ...on the main menu 1 Setup is now extracting files Note Before installing Microsoft Framework 4 5 2 make sure you have updated your Windows 7 operating system to Service Pack 3 2 Read the license agreement care fully Click I have read and accept the terms of the License Agree ment then click Install 5 Setup is now installing the driver 6 Click Finish ...

Page 58: ...utility that allows you to monitor the current status of the SATA drives It enables enhanced performance and power management for the storage subsystem To install the driver click Intel Rapid Storage Technology on the main menu Please refer to Chapter 5 for more information 4 Click Finish 3 Setup is now installing the driver ...

Page 59: ...ver and tool option on the main menu 1 The setup program is preparing to install the driver 2 The setup program is now ready to install the utility Click Next 3 Click I accept the terms in the license agreement and then click Next 4 Enter the necessary information and then click Next 5 Select a setup type and then click Next 6 Click Install ...

Page 60: ...re Chapter 4 7 TPM requires installing the Micro soft Visual C package prior to installing the utility Click Install 8 The setup program is currently installing the Microsoft Visual C package 9 Click Finish 10 Click Yes to restart your system ...

Page 61: ... Adobe Acrobat Reader 9 3 To install the reader click Adobe Acrobat Reader 9 3 on the main menu 1 Click Next to install or click Change Destination Folder to select another folder 2 Click Install to begin installa tion 3 Click Finish to exit installation ...

Page 62: ...drives to read and write data in parallel interleaved stacks Data is divided into stripes and each stripe is written alternately between two disk drives This improves the I O performance of the drives at different channel however it is not fault tolerant A failed disk will result in data loss in the disk array RAID 1 Mirroring Disk Array with Fault Tolerance RAID 1 copies and maintains an identica...

Page 63: ... Exit and press Enter 12 Press Y to confirm exit Note These steps are cited from the Intel Suppot site Set Up a System with Intel Matrix RAID Technology Article ID 000005789 http www intel com content www us en support boards and kits 000005789 htm Step 4 Install the Intel Rapid Storage Technology Utility The Intel Rapid Storage Technology Utility can be installed from within Windows It allows RAI...

Page 64: ...irements and installa tion information then click Next 7 Confirm the installation and click Next 6 Click Next to install to the default folder or click change to choose another destination folder 8 Click Yes I want to restart this computer now to complete the installation and then click Finish ...

Page 65: ...hen critical software agents are removed Enable Intel AMT in the Insyde BIOS 1 Power on the system then press Del to enter the main menu of the Insyde BIOS 2 In the Advanced menu select Avtive Management Technology Support 3 In the Advanced menu select Enable in the AMT field Enable Disable Intel R Active Management Technology BIOS Extension Note iAMT H W is al ways enabled This Option Just contro...

Page 66: ...Enter Intel R Management Engine BIOS Extension v11 0 0 0005 Intel R ME v11 0 0 1205 Copyright C 2003 15 Intel Corporation All Rights Reserved MAIN MENU MEBx Login Intel R ME General Settings Intel R AMT Configuration MEBx Exit Intel R ME Password Move Highlight Enter Select Entry Esc Exit Exit system setup and save your changes Exit Saving Changes Load Optimal Defaults Discard Changes Main Advance...

Page 67: ... Password Move Highlight Enter Select Entry Esc Exit Intel R ME Password 3 You will be asked to verify the password Enter the same new password in the space pro vided under Verify Password then press Enter Intel R Management Engine BIOS Extension v11 0 0 0005 Intel R ME v11 0 0 1205 Copyright C 2003 15 Intel Corporation All Rights Reserved MAIN MENU MEBx Login Intel R ME General Settings Intel R A...

Page 68: ...Exit 6 Select Local FW Update then press Enter Select Enabled or Disabled or password Protected then press Enter Intel R Management Engine BIOS Extension v11 0 0 0005 Intel R ME v11 0 0 1205 Copyright C 2003 15 Intel Corporation All Rights Reserved Change ME Password Local FW Update Enabled Move Highlight Enter Complete Entry Esc Discard Changes Disabled Enabled Password Protected 7 Select Previou...

Page 69: ...s Reserved SOL Storage Redirection KVM Username and Password Enabled SOL Enabled Storage Redirection Enabled KVM Feature Selection Enabled Disabled Enabled 11 In the SOL Storage Redirection KVM menu select SOL then press Enter Select Enabled or Disabled then press Enter Intel R Management Engine BIOS Extension v11 0 0 0005 Intel R ME v11 0 0 1205 Copyright C 2003 15 Intel Corporation All Rights Re...

Page 70: ...led Storage Redirection Enabled KVM Feature Selection Enabled Disabled Enabled Move Highlight Enter Complete Entry Esc Discard Changes Move Highlight Enter Complete Entry Esc Discard Changes 14 Select Previous Menu until you return to the Intel R AMT Configuration menu Select User Consent then press Enter Intel R Management Engine BIOS Extension v11 0 0 0005 Intel R ME v11 0 0 1205 Copyright C 200...

Page 71: ...rk Access Unconfigure Network Access Full Unprovision Remote Setup And Configuration Power Control INTEL R AMT CONFIGURATION Default Password Only During Step And Configuration Anytime Move Highlight Enter Complete Entry Esc Discard Changes Move Highlight Enter Complete Entry Esc Discard Changes 18 In the Intel R AMT Configuration menu select Network Setup then press Enter Intel R Management Engin...

Page 72: ... Domain Name _ Shared Dedicated FQDN Shared Dynamic DNS Update Disabled Computer Domain Name Enter Complete Entry Esc Discard Changes 22 Select Shared Dedicated FQDN then press Enter Select Shared or Dedicated then press Enter Intel R Management Engine BIOS Extension v11 0 0 0005 Intel R ME v11 0 0 1205 Copyright C 2003 15 Intel Corporation All Rights Reserved INTEL R ME NETWORK NAME SETTINGS Host...

Page 73: ... R AMT Configuration menu select Unconfigure Network Access then press Enter Intel R Management Engine BIOS Extension v11 0 0 0005 Intel R ME v11 0 0 1205 Copyright C 2003 15 Intel Corporation All Rights Reserved INTEL R AMT CONFIGURATION Manageability Feature Selection Enabled SOL Storage Redirection KVM User Consent Password Policy Anytime Network Setup Activate Network Access Unconfigure Networ...

Page 74: ...isioning Mode Provisioning Record Provisioning Server IPV4 IPV6 _ Provisioning Server FQDN _ RCFG TLS PKI Provisioning Mode PKI 30 In the Intel R Remote Setup And Configuration menu select Provisioning Re cord then press Enter Intel R Management Engine BIOS Extension v11 0 0 0005 Intel R ME v11 0 0 1205 Copyright C 2003 15 Intel Corporation All Rights Reserved INTEL R REMOTE SETUP AND CONFIGURATIO...

Page 75: ...e BIOS Extension v11 0 0 0005 Intel R ME v11 0 0 1205 Copyright C 2003 15 Intel Corporation All Rights Reserved INTEL R REMOTE SETUP AND CONFIGURATION ESC Exit Current Provisioning Mode Provisioning Record Provisioning Server IPV4 IPV6 _ Provisioning Server FQDN _ RCFG TLS PKI Move Highlight Enter Select Entry Esc Exit 35 In the Intel R Remote Configuration menu select Remote Configuration then pr...

Page 76: ...Hash Esc Exit Active Active Active Active Active Active Active Active Active Active Active Active Active Active Active Active Active Active Default Default Default Default Default Default Default Default Default Default Default Default Default Default Default Default Default Default SHA256 SHA256 SHA256 SHA256 SHA256 SHA256 SHA256 SHA256 SHA256 SHA256 SHA256 SHA256 SHA256 SHA256 SHA256 SHA256 SHA2...

Page 77: ...press Enter Intel R Management Engine BIOS Extension v11 0 0 0005 Intel R ME v11 0 0 1205 Copyright C 2003 15 Intel Corporation All Rights Reserved MAIN MENU Intel R ME General Settings Intel R AMT Configuration MEBx Exit Exit Move Highlight Enter Select Entry Esc Exit 65535 40 In the Intel R AMT Power Control menu select Intel R AMT ON in Host Sleep States then press Enter Select an option then p...

Page 78: ...that the video input cable is properly attached to the monitor and the system s display adapter 4 Adjust the brightness of the display by turning the monitor s brightness control knob The picture seems to be constantly moving 1 The monitor has lost its vertical sync Adjust the monitor s vertical sync 2 Move away any objects such as another monitor or fan that may be creating a magnetic field aroun...

Page 79: ...rks by attaching it to a serial port that is working and configured correctly If the serial device does not work either the cable or the serial device has a problem If the serial device works the problem may be due to the onboard I O or the address setting 4 Make sure the COM settings and I O address are configured correctly Keyboard Nothing happens when a key on the keyboard was pressed 1 Make su...

Reviews: