background image

  Hardness Tester DHT-100

 PLUS


-Press the 

  key and the

key to enter 

MEASURE-


DIRECTION

-Press the 

  key to enter this item,   

-Press the 

  key or 

  key for setting,   

-Press the 

  key to confirm. 

Notice:  During  measurements,  the  actual  impacting  direction  must 
conform to the one selected.     

6.3.2 Material and hardness scales settings 

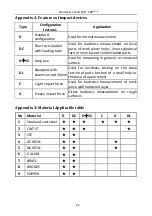
During  measurement  performance,  the  material  set  must  conform  to  the 

actual  measured  material.  DHT-100Plus  hardness  tester  supplies  9  kinds  of 
materials  for  actual  measurement.  For  each  material,  there  is  accordingly 
different hardness scales. For details, please refer to appendix 2 and 3. 

Before  measurement,  users  should  firstly  confirm  the measured materials 

and the corresponding hardness scales. Set the proper materials and hardness 
scales as following: 


- Press the 

  key and the

key to enter 

MEASURE-


MATERIAL

-

SCALE 

- Press the 

  key to enter this item,   

- Press the 

  key or 

  key for setting,   

- Press the 

  key to confirm. 


Keys 

and


for setting

key 

  for 

confirmation 

Summary of Contents for DHT-100Plus

Page 1: ...INSTRUCTION MANUAL HARDNESS TESTER DHT 100Plus V1 0 0...

Page 2: ...performance of impact device 4 4 1 Selection of impact device 4 4 2 performance of impact devices 4 5 Functions of DHT 100Plus 5 5 1 Technical specifications 5 5 2 Nomenclature of DHT 100Plus 5 5 2 1...

Page 3: ...ough USB to PC 17 6 7 Deleting of wrong measuring data 18 7 Repairing and Maintenance 18 7 1 Maintenance of battery 18 7 2 Maintenance of impact body tip 18 7 3 Maintenance of impact device cable 18 7...

Page 4: ...steel aluminum etc Leeb hardness value represents a direct relationship to its hardness properties For ordinary metal conversion curves of hardness HL versus other standard static hardness HB HV HRC...

Page 5: ...ta transfer without software Auto converse to hardness value HL HRC HRB HB HV HSD Low Battery Indicator 2 4 Symbol of Leeb s hardness values Just like the other hardness scales users will get differen...

Page 6: ...or work piece weight more than 5kg Work piece with weight of 2 5kg and also heavier work piece with protruding parts or thin walls should be placed on a solid support In such a manner they do not move...

Page 7: ...ion of impact device Before testing users should correctly select the proper impact devices according to testing requirement work piece size and shape For details please refer to appendix 1 4 2 perfor...

Page 8: ...y accuracy Error 0 5 HL 800 Repeatability 0 5 Memory 100 customized files X 100 data each file Power 2 AA rechargeable batteries continuous work 8 hours Auto turn off 1Min 2Min 5Min and off shutdown W...

Page 9: ...1 Impact direction 2 Auto save 3 Date and time 4 Current file 5 Sound indication 6 Power indication 7 Impact device type 8 Avg value of testing result 9 Hardness scale 10 Max value of testing result...

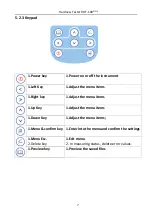
Page 10: ...st the menu items 1 Right key 1 Adjust the menu items 1 Up Key 1 Adjust the menu items 1 Down Key 1 Adjust the menu items 1 Menu confirm key 1 Enter into the menu and confirm the settings 1 Menu Esc 2...

Page 11: ...etting Various parameter settings and management can be accomplished via the instrument menu Press the key to Enter the menu and press the key or key to select the setting items Press the key to confi...

Page 12: ...et must conform to the actual measured material DHT 100Plus hardness tester supplies 9 kinds of materials for actual measurement For each material there is accordingly different hardness scales For de...

Page 13: ...desired average times Press the key to confirm Notice 3 5 times are usually recommended in normal measurement 6 3 4 Tolerance During measurements this function will be very useful for identifying che...

Page 14: ...s the key to enter this item Press the key or key for setting press the or to move the cursor Press the key to confirm Notice In actual measurement adjust the range of within 30HLD is recommended If t...

Page 15: ...k appears on the screen and the measured values will be saved in the file in a series of codes When the memory is full it will give a Notice and said that please build another file or the memory is fu...

Page 16: ...ress the key and the key to enter PRINT PRINTER PAIR choose CONFIRM Meanwhile the main unit is searching for Bluetooth printer automatically At this time please keep them as close as possible 2 When L...

Page 17: ...ata to PC or print them out after the measurement 6 4 4 Delete file settings Via this function the saved files and data can be deleted Both single file delete and all files delete are available Delete...

Page 18: ...ptional settings are available for users in the option function 6 5 1 Date and Time settings Via this setting users are allowed to set date and time which will be saved together with other data when t...

Page 19: ...settings DHT 100Plus supplies the function of brightness settings of LCD Users can adjust the brightness freely according to the operation circumstance Press the key and the key to enter OPTION BRIGHT...

Page 20: ...t is used to renew the factory settings when some terrible parameter settings error appears Press the key and the key to enter OPTION DEFAULT Press the key to enter this item Press the key or key for...

Page 21: ...ong please take out the batteries for free of corrosion to the electronic board 7 2 Maintenance of impact body tip Owing to the abrasion of impact body tip if it shows within the range of tolerance 6H...

Page 22: ...nstrument for its whole life 3 During the warranty term we will supply cost free repairing and maintenance services if the malfunction is caused by the manufacturing quality And when it is out of the...

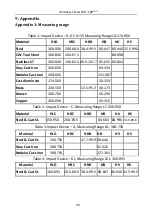
Page 23: ...7 Cast Aluminum 174 560 20 159 Brass 200 550 13 5 95 3 40 173 Bronze 300 700 60 290 Copper 200 690 45 315 Table 2 Impact Device C Measuring Range LC 350 950 Material HLC HRC HRB HB HV HS Steel Cast St...

Page 24: ...parts D 15 Long size Used for measuring in grooves or concaved surface DL Equipped with extension rod 50mm Used for hardness testing on the deep section of parts bottom of a small hole or the base of...

Page 25: ...urface R25 R50 4 HZ11 13 For cylindrical inside surface R11 R13 5 HZ12 5 17 For cylindrical inside surface R12 5 R17 6 HZ16 5 30 For cylindrical inside surface R16 5 R30 7 K10 15 For spherical outside...

Reviews: