background image

ES

L mites de peso:

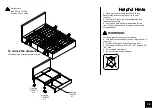
Consejos  tiles

   Mueva sus muebles nuevos con cuidado, con dos personas levantando y 

llevando el aparato a su nueva ubicaci n. 

   Sus muebles DHP se pueden desmontar y volver a ensamblar en caso de 

mudanza. 

   Algunas partes han sido pre-ensambladas en este producto. Se encuentran 

ilustradas en esta p gina y disponibles para reemplazo. 

Precauc on

Por razones de seguridad y para prevenir lesiones: 

   Este producto no ha sido dise ado para ser utilizado por ninos menores de 4 

a os. 

   Prohibido saltar o jugar sobre la cama. 
   Utilice  nicamente un colch n que sea de 79" - 80" de largo y 59" - 60" de 

ancho.


No se suba en la gaveta.

   No utilice elevadores para cama con este producto. 

Bed: 500 Lb / 227 Kg
Drawer: 40 Lb / 18 Kg

Summary of Contents for 4296439N

Page 1: ...orage KT 2018 6 6 If parts are missing or damaged we will gladly ship your replacement parts free of charge Lot Number Thank you for purchasing from DHP THIS INSTRUCTION BOOKLET CONTAINS IMPORTANT SAF...

Page 2: ...r of the original warranty period only The defective components will be repaired or replaced without charge subject to the terms and conditions described above Visit www dhpfurniture com to view the l...

Page 3: ...mplete this assembly Replacement Parts visit www dhpfurniture com eng replacement parts A Headboard T962400 X 1 B Footboard T962410 X 1 E I K J X Y O1 Single Slat Cap T926370 X 24 Double Slat Cap T926...

Page 4: ...the assembly There are inner box es that include components required to complete this assembly Replacement Parts visit www dhpfurniture com eng replacement parts L M C Front Panel T962420 X 4 Drawer B...

Page 5: ...unless otherwise indicated in the step by step instructions The screw s bolt s to be used at each step are shown in actual size in the lower right corner of the page 7 8 4 5 3 2 1 1 4 X 3 4 X 12 1 4...

Page 6: ...6 Step 1 StickA1tothebackof AwithVelcroas illustrated A A1...

Page 7: ...7 Step 2 Attach J X 2 to A and B with J A B J 3 X 6...

Page 8: ...8 Step 3 X 6 3 Attach G X 2 to K with Fully tighten all bolts in this Step K G G G K G K...

Page 9: ...9 Step 4 Attach E and F to G with Don t completely tighten the bolts until STEP 6 is complete X 8 E F 1 F E K G E F G F E G...

Page 10: ...10 Step 5 Attach E and F to A and B with X 8 A B E F F E A 4 E...

Page 11: ...11 Step 6 6 1 Attach I x2 to A and B with 6 2 Attach I x2 to K with then properly tighten all the bolts X 4 1 5 A I 1 X 2 5 A B I I K 6 1 6 2 I K The slat holes should be oriented towards upside...

Page 12: ...bed with a new O1 and X 7 3 Insert ends of both slats O1 into Y then press Y into I as illustrated Repeat the same procedures going backwards for every row of slats 7 1 7 2 7 3 O1 X O1 X O1 O1 Y I E E...

Page 13: ...n t completely tighten the bolts until STEP 10 is complete X 16 Make sure that these holes are all located on the top side before assembling M S N X 4 7 For better performance please orient the plasti...

Page 14: ...14 Step 9 9 1 Attach Q to L with 9 2 Attach Q X 4 and L to S and N with 9 3 Attach L to M with X 32 X 8 X 4 6 8 X 8 7 9 3 9 2 9 1 6 L Q 8 S L Q M 7 L L M N Q Q S...

Page 15: ...15 Step 10 Attach sub assembly L S N M from previous step to C with then properly tighten all the bolts X 24 X 4 C 8 L S N M...

Page 16: ...16 Step 11 Attach and to C X 4 2 X 4 X 4 C 2 9 9 C...

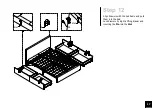
Page 17: ...17 Step 12 Align Drawers with the bed frame and push them into the bed Lock drawers by slightly lifting drawer and inserting the Pin into the Slot Slot Pin Slot Pin...

Page 18: ...e for replacement WARNINGS For safety reasons and to prevent injuries This bed is not intended for use by children under 4 years old Prohibit jumping and horseplay on this bed Only use a mattress whic...

Page 19: ...ar n o reemplazar n sin cargo sujeto a las condiciones descritas anteriormente Visite www dhpfurniture com para ver la garant a limitada v lida en los Estados Unidos y Canad Informaci n sobre la garan...

Page 20: ...6 2 Una I x2 con K con los tluego apriete completamente todos los PERNOS Paso 7 7 1 Inserte O1 en X 7 2 Presione X en E F repita el mismo procedimiento para el lado opuesto de la cama con una nueva O...

Page 21: ...das en este producto Se encuentran ilustradas en esta p gina y disponibles para reemplazo Precauc on Por razones de seguridad y para prevenir lesiones Este producto no ha sido dise ado para ser utiliz...

Page 22: ...ment Les composants d fectueux seront r par s ou remplac s sans frais sous r serve des conditions d crites ci dessus Visitez www dhpfurniture com pour voir la garantie limit e valide aux tats Unis et...

Page 23: ...n Bois T926780 Q Roulettes T953410 S Panneau Lat ral du tiroir T953420 X Bouchon Plastique Simple T926370 Y Bouchon Plastique Double T926380 tape 1 Coller A1 l arri re de A avec le Velcro comme illust...

Page 24: ...nt t pr assembl es pour ce produit Ils sont illustr s sur cette page et disponibles pour le remplacement Avertissement Pour des raisons de s curit et pour pr venir les blessures Ce lit n est pas con u...

Reviews: