background image


REV. H   10/12 


E.


RATCHET AND DIRECT OPERATION 
 

RATCHET OPERATION 

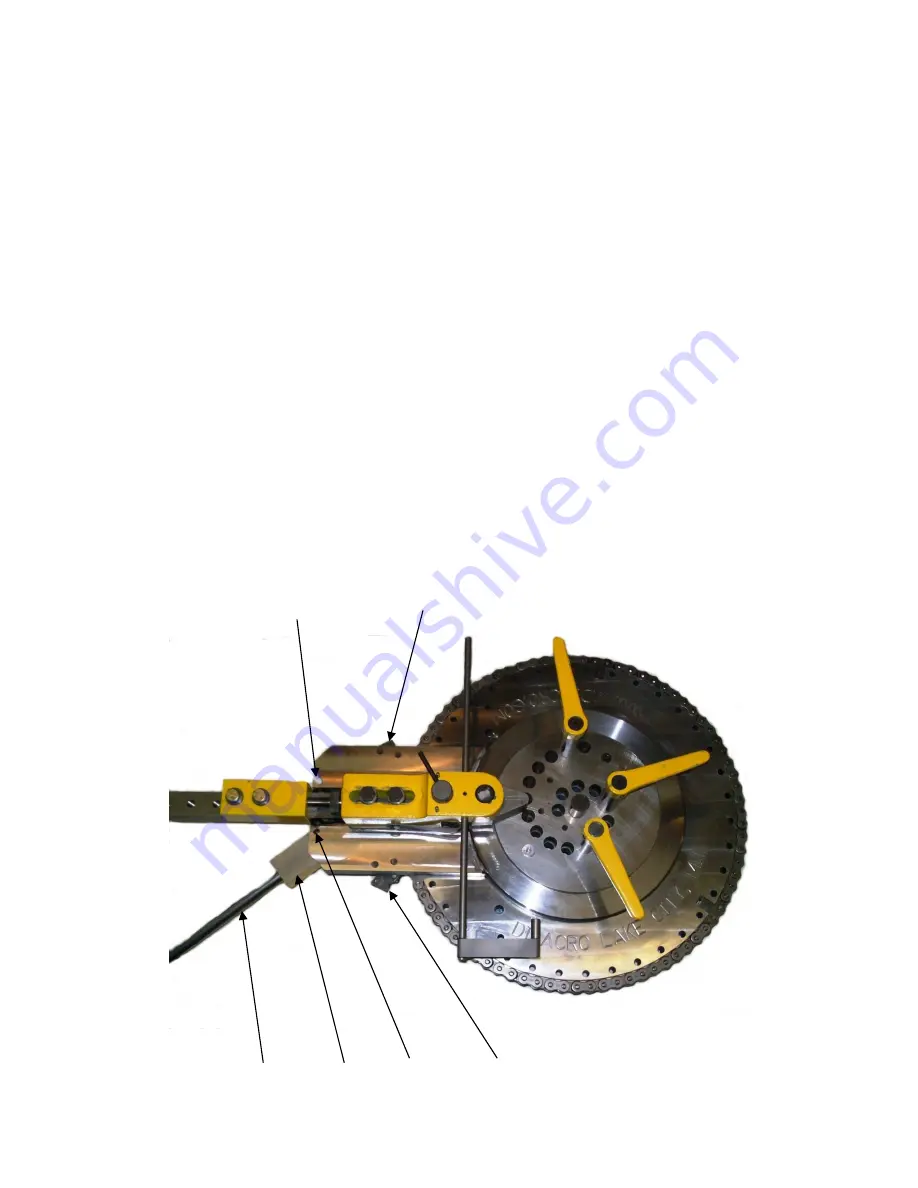
For clockwise operation of the Di-Acro No. 4 Bender, engage check 
pawl (B) and disengage check pawl (C). Remove stop pin (F) from hole 
(D) and place in hole (E). For counter-clockwise operation, engage 
check pawl (C) and disengage check pawl (B). Remove stop pin (F) 
from hole (E) and place in hole (D). 

*CAUTION* 

STOP PINS MUST BE USED AS DESCRIBED ABOVE WHEN USING 
THE RATCHET MECHANISM. FAILURE TO DO SO CAN RESULT IN 
SERIOUS BODILY INJURY. 
 

DIRECT OPERATION 

For direct drive operation without the ratchet, disengage both check 
pawls (B) and (C). Remove handle (H), place handle holder (I) in 
neutral position between holes (D) and (E). Insert stop pins into both 
holes. 


E-F


                C


                H              I            D             B 

Summary of Contents for 4 Bender

Page 1: ...REV H 10 12 1 DI ACRO 4 HAND BENDER INSTRUCTION MANUAL ...

Page 2: ...AINTENANCE PG 3 C 4 HAND BENDER BREAKDOWN AND PARTS LIST PG 4 6 D QUIK LOK BREAKDOWN AND PARTS LIST PG 7 8 E SPECIFICATIONS THE ART OF BENDING PG 9 F RATCHET AND DIRECT OPERATION PG 10 G QUIK LOK INSTALLATION OPERATION PG 11 H OPTIONAL STAND PG 12 WARRANTY PG 13 ...

Page 3: ...re bender is set up for operation mount on work bench or stand with stand or work bench bolted in place IF BRAKE IS MOUNTED ON ITS OWN STAND SECURE STAND TO FLOOR B MAINTENANCE Lubricate chain as needed Add grease in grease zerk periodically ...

Page 4: ...REV H 10 12 4 4 HAND BENDER PARTS BREAKDOWN 8140800 080 ...

Page 5: ...0 LCKG PIN ASSY C 1 1 16 1 22 8200121 701 NOSE HOLDER 1 23 8000120 301 NOSE PIN 1 24 23A0308C0102 SCREW SSS 3 8 16X1 2 1 25 8130121 701 FORMING NOSE 1 26 8120510 401 NOSE SPRING 2 27 21A0516C0102 SCREW HHCS 5 16 18X1 2 2 28 0102WILLIAMS WASHER 1 2 WILLIAMS WASHER 4 29 21A0102F3000 SCREW HHCS 1 2 20X3 2 30 8158121 702 TRIGGER 1 31 18A0104X3000 PIN SPRING 1 4X3 1 32 8310301 200 NEEDLE ROLLER 2 33 80...

Page 6: ...4 2 56 19A0308X1304 PIN DOWEL 3 8X1 3 4 2 57 8500121 804 CHECK PAWL SPACER 2 58 8300121 804 CHECK PAWL SPRING STOP 2 59 8400121 804 CHECK PAWL HANDLE 2 60 8000120 304 RATCHET PAWL PIN 1 61 8140510 405 RATCHET PAWL SPRING 1 62 8140121 804 RATCHET PAWL 1 63 23A0104C0104 SCREW SSS 1 4 20X1 2 1 64 8200120 800 EXTENSION ARM 1 65 100 0142 M HANDLE GRIP 1 66 21A0308C2104 SCREW HHCS 3 8 16X2 1 4 2 67 61X0...

Page 7: ...11 300 LINK 1 11 19A0102X1104 PIN DOWEL 1 2X1 1 4 1 12 8146111 301 CLAMP 1 13 21A0102F2102 SCREW HHCS 1 2 20X2 1 2 1 14 8100111 301 SPACER A 1 15 8146111 370 HANGER ASSEMBLY OUTER 1 16 19A0516X1000 PIN DOWEL 5 16X1 4 17 21A0308C1102 SCREW HHCS 3 8X16X1 1 2 1 18 8200111 370 HANGER ASSEMBLY INNER 1 19 8000111 301 SUPPORT BAR 1 20 21A0308C3102 SCREW HHCS 3 8 16X3 1 2 1 21 21A0308C1000 SCREW HHCS 3 8 ...

Page 8: ...check pawl C and disengage check pawl B Remove stop pin F from hole E and place in hole D CAUTION STOP PINS MUST BE USED AS DESCRIBED ABOVE WHEN USING THE RATCHET MECHANISM FAILURE TO DO SO CAN RESULT IN SERIOUS BODILY INJURY DIRECT OPERATION For direct drive operation without the ratchet disengage both check pawls B and C Remove handle H place handle holder I in neutral position between holes D a...

Page 9: ...and then tighten 1 2 20 hex screw M To open Quik Lok Clamp move handle arm W to the right To mount Quik Lok clamp for counter clockwise forming remove clamp assembly from base by removing 3 8 hex screws T 1 and T 2 Remove mounting plate from bender base by loosening 1 2 20 hex screws L and L 1 Press 3 8 dowel pins K and K 1 through base U and turn plate over so 3 8 dowel pins cab be inserted in ho...

Page 10: ...REV H 10 12 8 D SPECIFICATIONS THE ART OF BENDING ...

Page 11: ...EP 33 1 4 HIGH CALL DI ACRO FOR PRICE AND AVAILABILITY Fasteners needed to attach Hand Bender to stand are the following Fasteners to attach stand to floor are not included PART NUMBER DESCRIPTION QTY 21A0102C3000 SCREW HHCS 1 2 13X3 3 61X0102 WASHER FLAT 1 2 3 31X0102C NUT FULL 1 2 13 3 ...

Page 12: ... with a reasonable life expectancy of less than one year are warranted only to the extent of the reasonable life under normal use and service Authorization must be obtained from DI ACRO before returning parts or equipment to the factory DI ACRO will satisfy this warranty by replacing the product or refunding the purchase price upon receipt inspection and defect identification DI ACRO s liability u...

Reviews: