background image

OPERATION AND MAINTENANCE (CONT.)

12. Method for replacing the brush disk

A. Installation of the brush pad: Put the brush pad under 

its cover (If the dial is used, the brush pad should be 

installed on the dial, then put the brush pad under its 

cover.) Lay down the brush pedal and align the brush 

head with the brush clip. Then press, the brush disk will 

be installed automatically with the running of the motor. 

And then you can carry out your operation as usual. 

B. Removal of the brush pad: There are two ways to 

remove the brush pad:

The first way is to step on the brush pedal after the work 

(Uplift the brush pad), then turn off the brush switch. At 

this time, the brush pad will be removed automatically 

after the motor stops running. The second way is to 

press, and then the brush pad should be removed auto-

matically in the condition that the brush pedal is stepped 

on.

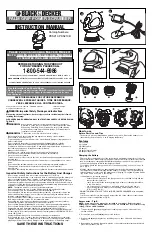
13. Method for replacing the batteries

n


turn off all the switches, lift off the dirty water tank

(see figure11) 

n


loosen the strap of the batteries, discharge the

connecting cables, replace the batteries separately.

14. Maintenance of the squeegee

As a major component of the machine, the squeegee 

will be worn away due to friction between the glue bars 

and the ground during operation. In case it is not effec

-

tive, the following procedures should be conducted: 

A. Check whether there is anything in the rubber scraper; 

(Prepare a towel to wipe the dirty rubber blade at any 

time)

B. Check whether the joint of the squeegee and hose is 

clogged up by the small pieces. (Remove the connection 

of hose or squeegee to clean the clog.) 

C. Check whether the angle between the scraper and 

ground is proper; if not, you can adjust the angle by 

regulating the hand wheel. (Seen in figure8)

D. Check the wearing condition of the scraper edge. If the 

wearing condition is so serious that the adjustment will 

not work, turn over the rubber blade and use another 

side of it. (see figure 12) If another side is also worn out, 

it has to be replaced by new rubber blade.


Note: If the brush pad is in the process of being 

raised, the brush motor should not be started up 

arbitrarily; otherwise, the brush disk will be 

removed automatically.

Figure 12

15.Daily upkeep when operation is finished:

n


clean the machine surface with a wet and dry cloth, and 

open the water tank cover to check and make sure there 

is no damage with the inside seal. 

n


pumping out the dirty water from the pollution tank,then 

add more clean water to wash the inside again.

n


uplift the brush and the squeegee, pack the machine in 

a dry, flat place without combustible gas, combustible 

liquid, chemicals, or fire. 

n


if unused for a period of time, please disassemble the 

battery from the machine and clean the tanks. Cover the 

opening of the tank cover with a dust cloth. 

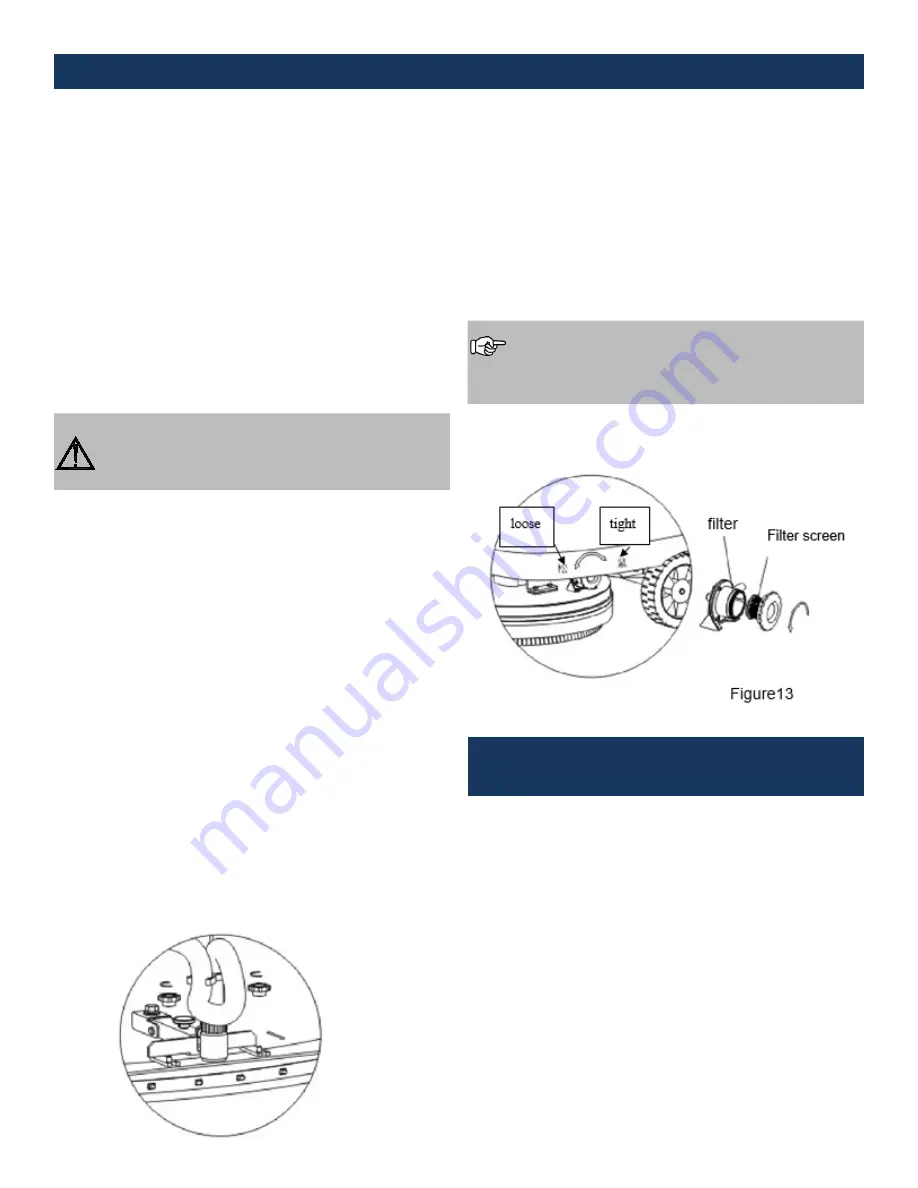
16.Ensure the clean water tank is clean. Cumulation may 

cause a blockage. Clean the filter weekly to ensure the 

water pipe expedite when in operation (see figure 13)

 For the battery, you should keep charging as per the 

instruction in the clause <battery maintenance and 

charging> even though the battery is disassembled 

from the machine.

MAINTENANCE AND CHARGE 

OF BATTERY

This machine is battery-powered and thus the quality of 

the battery will directly affect the function of the machine. 

Please use the battery recommended by our company or 

other high-quality power batteries. 

(Never use any automotive battery.)

In order to adapt itself to the requirements of various work-

ing conditions, battery 12V×2/100AH can be used in this 

machine. Please choose proper batteries according to your 

demands. Except for the difference in capacity, the batter

-

ies can be classified in two main categories: maintenance 

battery and maintenance-free battery according to their 

nature. 

As an open type battery, a great deal of vapor bubbles 

will be produced when charging the maintenance battery. 

Therefore, the battery chamber cover should be taken off 

every time it is being charged.  The liquid height of the 

electrolyte should be often checked. If it is lower than a 

specified height, distilled water should be added in time. 

Summary of Contents for DP-SCRUB20

Page 1: ...OWNER S MANUAL DP SCRUB20 AUTO SCRUBBER USER MAINTENANCE BOOK SAVE THESE INSTRUCTIONS FOR FUTURE REFERENCE ...

Page 2: ...he risk of fire this machine is only appropriate for cleaning explosion proof commercial floorings Half installed or half fit machine might cause damage to the operator or others and might also cause casualty to the machine or parts of the machine Before fitting it in completely do not conduct any operation on the machine Before operation one should make sure all components of the machine are well...

Page 3: ...void the spilling of acid liquid Do not put any article on the batteries Do not put any article on the handlebar While cleaning the machine do not run water into the air inlet of the lift pump Safe and economical operation of the machine is only possible if the machine operators are thoroughly familiar with the signs and contents on this Operator s Manual Failure to do so could be harmful This mac...

Page 4: ...ng Handle of Squeegee 15 Water Suction Pipe 16 Water Drain Out Pipe 17 Water Valve 18 Metal Frame 19 Wheel 20 Brush 21 Clean Water Filtration 22 Water Level Indicator 23 Solution Tank 24 Dirty Water Tank 25 Dirty Water Tank Cover a Battery Indicator b Suction Motor Button c Brush Motor Button d Brush Install and Release Button e Rate Regulation slow Button f Rate Regulation fast Button g Rate Indi...

Page 5: ...uid it is useful to wipe the machine with a wet cleaning cloth 9 Maintenance and amendment should be done by professional personnel FUNCTIONS AND NOTES Battery powered and equipped with an automatic walking device The DP SCRUB20 is a professional floor cleaning machine with following characteristics 1 Simple operation All actions including accelerating stopping or retreating can be conducted by op...

Page 6: ...crew down fixed handle and connect the tube to the machine connection 6 Take out the brush disk or needle bed and then choose a proper brush disk or cleaning pad to prepare for installation in accordance with the floor condition 7 With the lock open the function test is carried on to observe whether the power display and function keys are normal Only after further tests show nothing wrong the next...

Page 7: ...to the start switch and rotate it to 1 Seen in figure1 to check the battery capacity Op eration should never be carried out until the green light turns on seen in figure2 to indicate the full capacity of the battery 3 Fill the solution tank with clean water add detergent according to the floor status There are 2 ways for water filling see figure 3 Green light x4 Green light x3 Green light x2 Green...

Page 8: ...n brush on only clean a floor with heavy dirt n both switches on dual cleaning 6 Use pressurized function when cleaning heavy dirt Lifting the handle gives the brush more pressure on the floor Regress to get back to normal See figure 6 7 Control the clean water flow rate by operating the water valve knob according to different floor situations This makes for high efficiency cleaning and no waste b...

Page 9: ...ient with a suitable included angle see figure8 9 Regulating the pressure between the squeegee and the floor n screw the small casters up to keep them from touching the floor when the squeegee is working then adjust the included angle between the squee gee and floor to have the best working status for the squeegee the included angle is 90 between the rubber blade and floor n screwing the casters d...

Page 10: ...r side is also worn out it has to be replaced by new rubber blade Note If the brush pad is in the process of being raised the brush motor should not be started up arbitrarily otherwise the brush disk will be removed automatically Figure 12 15 Daily upkeep when operation is finished n clean the machine surface with a wet and dry cloth and open the water tank cover to check and make sure there is no...

Page 11: ... electrolyte 5 In low temperature when this machine enters the low temperature zone full discharging of the battery should be avoided The charging rate in low temperature will become slow 6 Discharge this machine uses a microcomputer to moni tor the discharging of the battery When the discharge is lower than the specified scale the red light may turn on to alarm the operator At that time the batte...

Page 12: ...connection l Replace the switch No water came out when cleaning l The solution tank is empty l The hose is blocked l The water adjustment knob is closed l The valve is broken l Add water and detergent in solution tank l Clean the blockage l Turn the knob l Replace the valve The suction power is low when cleaning l Sealed circle and sealed strip are broken l There is debris or a broken area in the ...

Page 13: ...DiamaPro Systems 3343 Peachtree Road NE Suite 145 24 Atlanta GA 30326 470 977 2323 ...

Reviews: