background image

Method: Take the waste pipe out of the clip, open the 

cap of the tube, discharge sewage to the sewer and 

clean the recovery tank. 

(Seen in figure 9)

B. If the water level of the recovery tank is not too high and 

it’s not bubbling, the connection between squeegee and 

hose should be checked for clogs. In this case, the wa-

ter sucker will recover normal after being cleaned.

C. If the water level of recovery tank is not so high but 

it is bubbling too much, that indicates that excessive 

cleansers have been added or the cleanser you used 

is a bubble-productive one. The water absorption motor 

recovers only after enough bubble-dispelling agents are 

put into the recovery tank.

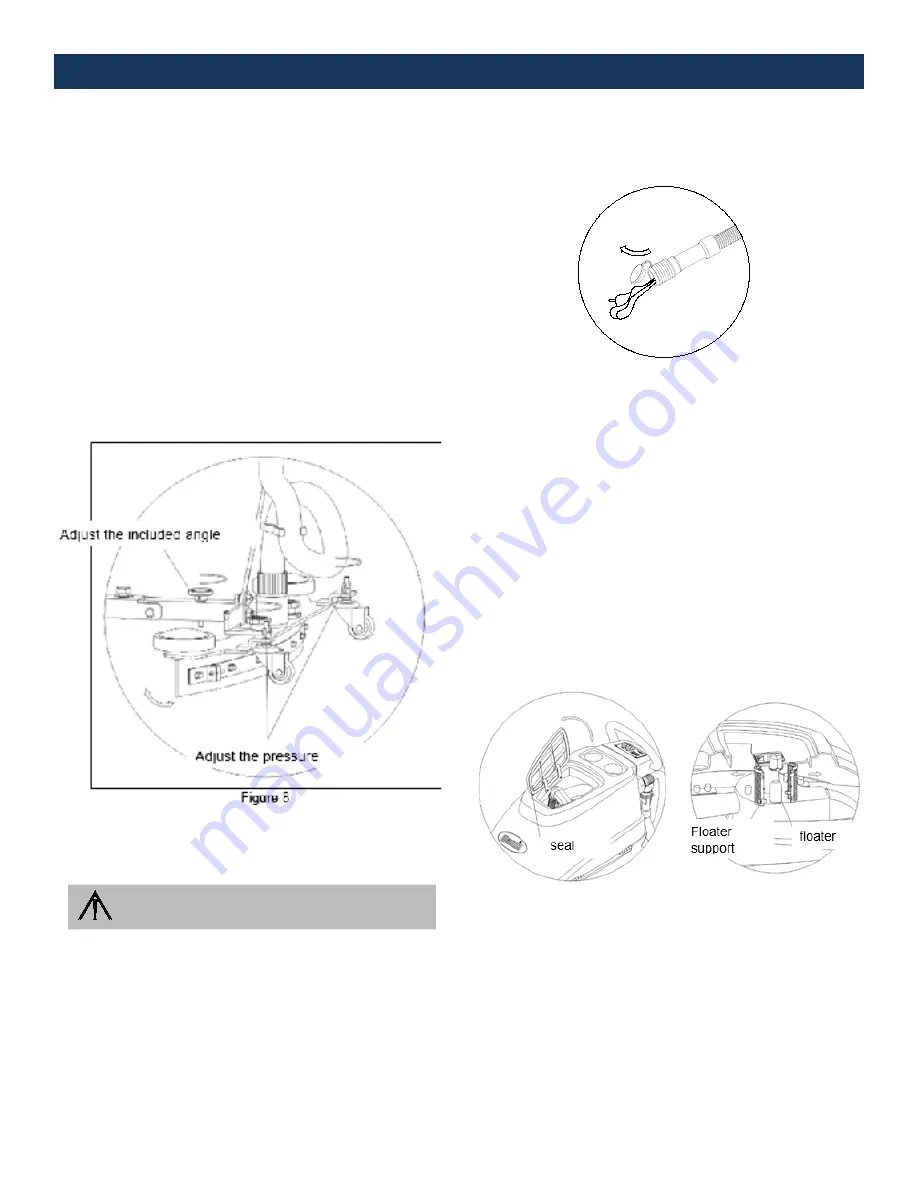
D. Remove the upper cover (see in figure 10), start up the 

suction motor, and make sure that the suction intake is 

normal. If the suction is too weak, check the seal and 

whether the floater is jammed (Seen in figure 10).

8.   With the regulating handle of squeegee, increase or de-

crease the angle between the squeegee and the floor. 

The suction of dirt would be efficient with a suitable 

included angle.(see figure8)

9.   Regulating the pressure between the squeegee and the 

floor

n


screw the small casters up to keep them from 

touching the floor when the squeegee is working, 

then adjust the included angle between the squee

-

gee and floor to have the best working status for the 

squeegee.(the included angle is 90° between the 

rubber blade and floor).

n


screwing the casters down keeps them on the floor 

when the squeegee working. Keep adjusting the 

casters until the squeegee is working efficiency.

n


screw the casters up a bit, to give the squeegee the 

best working efficiency (see figure 8).

10. If there is still cumulation after one way cleaning on a 

rough floor, just lift up the squeegee and switch on the 

suction motor, repeat the sucking in that area.

11.Problems occurred while adjusting the water suction.

During the operation, you should stop the machine and 

check it immediately if the suction motor sounds abnor-

mal, or if the squeegee can not suck or absorb water at 

all.

A. When the water level rises to the highest point (the 

bobber can touch the cap), the sewage should be dis

-

charged. 

OPERATION AND MAINTENANCE (CONT.)


Deep grooves may cause incomplete cleaning, 

please dispose separately.


Figure 9

Summary of Contents for DP-SCRUB20

Page 1: ...OWNER S MANUAL DP SCRUB20 AUTO SCRUBBER USER MAINTENANCE BOOK SAVE THESE INSTRUCTIONS FOR FUTURE REFERENCE ...

Page 2: ...he risk of fire this machine is only appropriate for cleaning explosion proof commercial floorings Half installed or half fit machine might cause damage to the operator or others and might also cause casualty to the machine or parts of the machine Before fitting it in completely do not conduct any operation on the machine Before operation one should make sure all components of the machine are well...

Page 3: ...void the spilling of acid liquid Do not put any article on the batteries Do not put any article on the handlebar While cleaning the machine do not run water into the air inlet of the lift pump Safe and economical operation of the machine is only possible if the machine operators are thoroughly familiar with the signs and contents on this Operator s Manual Failure to do so could be harmful This mac...

Page 4: ...ng Handle of Squeegee 15 Water Suction Pipe 16 Water Drain Out Pipe 17 Water Valve 18 Metal Frame 19 Wheel 20 Brush 21 Clean Water Filtration 22 Water Level Indicator 23 Solution Tank 24 Dirty Water Tank 25 Dirty Water Tank Cover a Battery Indicator b Suction Motor Button c Brush Motor Button d Brush Install and Release Button e Rate Regulation slow Button f Rate Regulation fast Button g Rate Indi...

Page 5: ...uid it is useful to wipe the machine with a wet cleaning cloth 9 Maintenance and amendment should be done by professional personnel FUNCTIONS AND NOTES Battery powered and equipped with an automatic walking device The DP SCRUB20 is a professional floor cleaning machine with following characteristics 1 Simple operation All actions including accelerating stopping or retreating can be conducted by op...

Page 6: ...crew down fixed handle and connect the tube to the machine connection 6 Take out the brush disk or needle bed and then choose a proper brush disk or cleaning pad to prepare for installation in accordance with the floor condition 7 With the lock open the function test is carried on to observe whether the power display and function keys are normal Only after further tests show nothing wrong the next...

Page 7: ...to the start switch and rotate it to 1 Seen in figure1 to check the battery capacity Op eration should never be carried out until the green light turns on seen in figure2 to indicate the full capacity of the battery 3 Fill the solution tank with clean water add detergent according to the floor status There are 2 ways for water filling see figure 3 Green light x4 Green light x3 Green light x2 Green...

Page 8: ...n brush on only clean a floor with heavy dirt n both switches on dual cleaning 6 Use pressurized function when cleaning heavy dirt Lifting the handle gives the brush more pressure on the floor Regress to get back to normal See figure 6 7 Control the clean water flow rate by operating the water valve knob according to different floor situations This makes for high efficiency cleaning and no waste b...

Page 9: ...ient with a suitable included angle see figure8 9 Regulating the pressure between the squeegee and the floor n screw the small casters up to keep them from touching the floor when the squeegee is working then adjust the included angle between the squee gee and floor to have the best working status for the squeegee the included angle is 90 between the rubber blade and floor n screwing the casters d...

Page 10: ...r side is also worn out it has to be replaced by new rubber blade Note If the brush pad is in the process of being raised the brush motor should not be started up arbitrarily otherwise the brush disk will be removed automatically Figure 12 15 Daily upkeep when operation is finished n clean the machine surface with a wet and dry cloth and open the water tank cover to check and make sure there is no...

Page 11: ... electrolyte 5 In low temperature when this machine enters the low temperature zone full discharging of the battery should be avoided The charging rate in low temperature will become slow 6 Discharge this machine uses a microcomputer to moni tor the discharging of the battery When the discharge is lower than the specified scale the red light may turn on to alarm the operator At that time the batte...

Page 12: ...connection l Replace the switch No water came out when cleaning l The solution tank is empty l The hose is blocked l The water adjustment knob is closed l The valve is broken l Add water and detergent in solution tank l Clean the blockage l Turn the knob l Replace the valve The suction power is low when cleaning l Sealed circle and sealed strip are broken l There is debris or a broken area in the ...

Page 13: ...DiamaPro Systems 3343 Peachtree Road NE Suite 145 24 Atlanta GA 30326 470 977 2323 ...

Reviews: