background image

© Diamond Mowers®, LLC

 DRUM


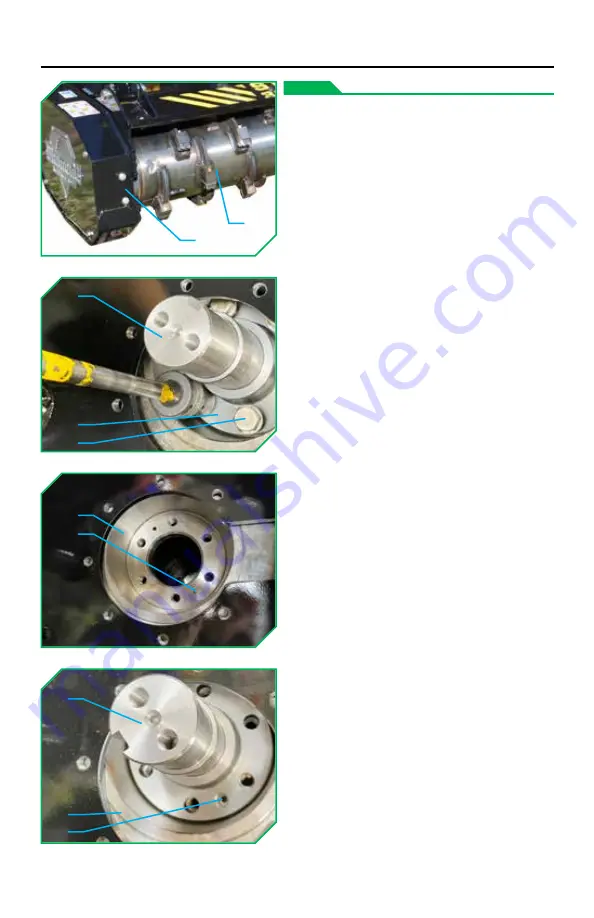
The drum

(1)

 should be inspected 

every 10 hours or daily.


Access covers

(6)

 are provided on 

each end of the drum

(1)

 on the front 

of the machine as illustrated to 
allow for the removal of wrapped 
wire and trapped debris.


Raise the attachment to inspect the 
drum

(1)

 for any cracks, damage, etc. 

Replace the drum

(1)

 as needed if 

damage is found:


Support the weight of the 
drum, and remove the bearings 
securing the drum

(1)

 as described 

in the 

BEARINGS

 section.


Remove the hardware

(2)

 retaining 

the stub shafts

(3)

 on the drum

(1)

.


-

Remove the stub shafts

(3)

 and 

set them aside with  
their hardware

(2)

.


Replace the drum

(1)

 and 

reassemble in reverse order.


-

NOTE:

 Confirm the breather 

holes

(5)

 on the drum are 

aligned and visible through 
the non-threaded holes on the 
stub shafts

(3)

 as illustrated.


-

Use Loctite 262.


-

Torque the stub shaft 
hardware

(2)

 to  

240ft-lbs (325Nm).

MAINTENANCE

(1)

(6)

(3)

(4)

(2)

(4)

(5)

(3)

(4)

(5)

28

Summary of Contents for Drum Mulcher OD Pro X

Page 1: ...DIAMONDMOWERS COM OPERATOR S MANUAL...

Page 2: ...o read understand and follow the instructions found in this operator s manual could lead to serious injury Operators who choose to operate this equipment without following instructions or who choose t...

Page 3: ...ghest most reliable and safest equipment that will allow you to do your job better That also means being there when you need us CONTACT US Parts 888 960 0361 parts diamondmowers com Warranty Service 8...

Page 4: ...so you can get back to work fast TRANSFERRED OWNERSHIP If you have acquired this Drum Mulcher OD Pro X from a previous owner we encourage you to register your equipment online By registering your Diam...

Page 5: ...INTENDED USE 6 TAKE A LOOK AROUND 7 GETTING STARTED 8 OPERATING YOUR DRUM MULCHER 12 MAINTENANCE 19 TROUBLESHOOTING 37 INDEX 41 TABLE OF CONTENTS...

Page 6: ...r in an area that is not clear of persons and property is strictly prohibited Any use outside of the aforementioned application is considered contrary to its intended use Any damage that may occur as...

Page 7: ...atch debris and assist in protection of the carrier vehicle PUSH BAR The two position push bar helps to guide material away from the loader DRUM LINER Replaceable drum liner to protect the frame from...

Page 8: ...conditions Loosen the hardware 4 on the push barfront and rear supports 1 3 Unbolt the push bar rear supports 1 and reposition them in the adjacent mounting location 2 on the rear support brackets an...

Page 9: ...ck loaders Larger couplers are available to purchase at DiamondMowers com Clean connections before attaching 1 to prevent contamination NOTE The pressure 1 hose will have a red ID band attached Make s...

Page 10: ...motor side top access cover 1 Temporarily remove the plug 2 marked G from the motor and install the adapter 3 hose 4 and 5000PSI 345Bar rated gauge 5 Use teflon tape on pipe threads Adapter 3 hose 4...

Page 11: ...l not change resulting in low torque and slow recovery if too low it will shift into high displacement too early resulting in slow drum speed and low pressure performance The pressure reading motor SH...

Page 12: ...ere SERIOUS injury or death WILL result if instructions are not followed Indicates where SERIOUS injury or death COULD result if instructions are not followed Indicates where MINOR injury COULD result...

Page 13: ...m Mulcher OD Pro X between operations make sure to protect it from collisions and accidental damages by placing it in the stowed position Failure to place the head in its stowed position could result...

Page 14: ...the tree Reach as high as possible Cut the top of the tree and push it away from the cutter head to mulch it later Make certain to allow enough recovery time for the drum to rebuild momentum Mulch th...

Page 15: ...nd mulch debris laying on the ground Lift the front of the head slightly to pull in branches or tree tops underneath the drum for mulching Tip the drum s nose down to re process material on the ground...

Page 16: ...process on the ground Pitch the mulcher back slightly to engage the drum into the tree Drive forward to engage the tree with the drum Tip forward using the push bar to guide the tree away from the car...

Page 17: ...e drum angled slightly down cut the stump low to the ground Rebuild speed before proceeding with a stump cut Angle the drum s nose down cutting the stump flush to the ground NOTE The more you use the...

Page 18: ...o clean up branches and large debris Re processing the debris will provide a groomed finish Raise lift arms about 6 152mm and drop the front of the drum toward the ground Back over the remaining debri...

Page 19: ...ect BELT PULLEYS Inspect CHAIN GUARD Inspect DRUM Inspect DRUM LINER Inspect Replace HOSE CARRIER Inspect HYDRAULIC HOSES FITTINGS Inspect MOTOR BOLTS Inspect PUSH BAR Inspect QD COUPLERS Inspect SAFE...

Page 20: ...nd the drum in the interior of the machine Replace the anti wrap guards 1 as needed Remove the side access covers 2 Anti wrap guard 1 hardware is accessed from inside the side access covers 2 Mounting...

Page 21: ...s Inspect the bearings every 50 hours or weekly Rotate the drum while simultaneously pushing on it Side to side play or extreme vibration when operating indicate bearing wear or loosening Replace the...

Page 22: ...it in its mounts Remove the remote grease hose 13 each side from the bearings 14 Remove the retention plate 3 and its hardware 4 from the idle side bearing 14 Unbolt the bearing hardware 15 from the...

Page 23: ...art 10 1083 onto the drum stub shaft 8 Confirm the the threaded grease zerk hole 17 is orientated as illustrated previous Replace the bearing hardware 15 Use Loctite 262 Torque to 106ft lbs 144Nm DO N...

Page 24: ...tub shaft 8 to retain the drive side pulley 5 Use Loctite 262 Torque to 106ft lbs 144Nm Tighten down the set screws 6 on the drive side pulley 5 Torque to 55ft lbs 75Nm Remove the bearing cover 19 wit...

Page 25: ...the idle side bearing 14 Torque to 18ft lbs 24Nm Replace the retention plate 3 with its hardware 4 into the stub shaft 8 to retain the idle side bearing 14 Use Loctite 262 Torque to 106ft lbs 144Nm Re...

Page 26: ...d or replace as needed for wear or damage To re tension or replace the belt 2 Loosen the motor mount plate bolts 4 Loosen the lock nut 6 on the tension adjustmentbolt 7 Adjust the tension of the belt...

Page 27: ...orrect as needed Remove the belt 2 as detailed in the previous section Remove the motor pulley 9 set screws 11 Thread a set screw 11 into the unlocking hole 14 to slightly open loosen the taper lock s...

Page 28: ...e is found Support the weight of the drum and remove the bearings securing the drum 1 as described in the BEARINGS section Remove the hardware 2 retaining the stub shafts 3 on the drum 1 Remove the st...

Page 29: ...section Back the attachment away from the drum 2 to allow access to the drum liner 1 Remove the top access covers 4 to gain access to the interior drum liner hardware 5 Replace the drum liner 1 NOTE...

Page 30: ...bbed DO NOT check for hydraulic leaks with your hands or any part of your body Use a heavy piece of paper or cardboard to check areas that are not readily visible Pressurized hydraulic fluid can penet...

Page 31: ...Motor mount plate 1 and motor 2 hardware and should be inspected every 50 hours or weekly Remove the motor top and side access covers 3 for access Use Loctite 262 on hardware 1 2 Torque the hardware...

Page 32: ...Check the push bar 1 for cracks excessive wear or other damage Replace as needed Inspect connections 1 for leaks damage etc Replace as needed MAINTENANCE SAFETY POLYCARBONATE REQUIRED Debris can be th...

Page 33: ...ing or wear the tooth can be rotated 180o in its tooth holder to expose the fresh points Lightly sharpen the inside leading edge of the tooth with a 4 1 2 114mm angle grinder equipped with a flap styl...

Page 34: ...edge When this edge has been worn down to the bottom of the depth gauge from sharpening or wear the tooth can be rotated 180o in its tooth holder to expose the fresh edge Lightly sharpen the outside l...

Page 35: ...h 1 LOOSE TEETH BOLTS REPLACING TEETH Use a torque wrench set to torque to 120ft lbs 163Nm DO NOT over torque as you could strip the threads and allow it to become loose Remove the bolts and flat wash...

Page 36: ...o the drum 2 Remove the old tooth holder 1 Position new tooth holder 1 in the correct orientation using the locating pin and weld in place onto the drum 2 using triple pass fillet welds NOTE DO NOT gr...

Page 37: ...connecting the hoses to the machine start machine at low idle and verify that the drum is spinning correctly teeth are cutting Hydraulic motor failure Will require replacement Contact Diamond Parts a...

Page 38: ...sive Vibration Vegetation build up on drum or cutting teeth Clean drum to remove debris by first disengaging the implement and backing up This will typically clear the cutting head If the cutting head...

Page 39: ...nd torque stub shaft hardware to 240ft lbs 325Nm PROBLEM POTENTIAL CAUSE SOLUTION Teeth Worn Need to sharpen teeth Four Point and Twin Chisel Tooth Only Sharpen the tooth as described in the maintenan...

Page 40: ...Worn Need to replace teeth Four Point Twin Chisel and Twin Maul Teeth Remove the bolts and flat washers DO NOT use Loctite Replace the tooth Using new hardware hand thread the bolts washers or use an...

Page 41: ...als 19 O Operation Safety Tips 12 Start Up Procedures 13 Stowed Position 13 Techniques Base Cut 16 Cleaning Re Processing 18 Ground Mulch 15 Stump Cut 17 Vertical Mulch 14 Owner Registration 4 P Produ...

Page 42: ...This Page Is Intentionally Left Blank...

Page 43: ...This Page Is Intentionally Left Blank...

Page 44: ...DIAMONDMOWERS COM DIAMONDMOWERS COM 15 1199 ODS MANUAL 211111...

Reviews: