MAINTENANCE
Battery Type
12 Volt, Group Size 24
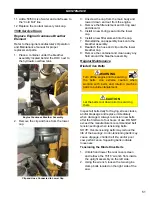
Servicing the Battery
1. Disconnect the negative cable lead from
the negative terminal.
NOTE: Always disconnect the negative cable
first
.
2. Disconnect the positive cable lead from the
positive terminal.
3. Unsecure the battery from the hold-down
bracket by removing the two ratchet knobs
from the battery hold-down tie rods and lift
the hold-down bracket lid off.
4. Carefully remove the battery from the
battery box.
5. When replacing the battery, carefully place
a new battery into the battery box. Bring
the old battery to a recycling facility; many
battery retailers also accept old batteries.
6. When cleaning the battery, inspect the
terminals, clamps, and cables for damages
and corrosion. Clean the terminals and
clamps using a wire brush, or use another
approved technique for cleaning. Use acid-
free, acid-resistant grease to grease the
battery clamps and terminals. Carefully
place the battery back into the battery box.
7. Re-secure the battery to the hold-down
bracket by removing the hold-down battery
lid over the two tie rod bolts and tighten it
using the two ratchet knobs.
8. Reconnect the positive cable lead to the
positive battery terminal.
NOTE: Always reconnect the positive cable
first
.
9. Reconnect the negative cable lead to the
negative battery terminal.
Electrical System
WARNING
Disconnect the battery when
servicing the electrical system
unless stated otherwise.
Always use the correct size fuses
(amps) to prevent fires.
Fuses
The fuses are located in the power block
assembly which can be accessed by removing
the right hand panel on the display dash
assembly.
Inspect all fuses if switches or controls are
not working properly and replace as
necessary. If fuses are failing frequently,
determine the cause and repair
immediately.
Replacing Fuses
The fuses used on this machine are smart
glow fuses. They have an LED indicator light
that will illuminate if the fuse is blown.
1. Ensure the ignition switch is in the
STOP
position.
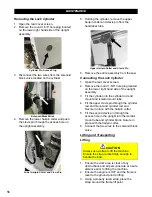
2. Remove the dash plate from the switch box
assembly (top right hand side of control
panel).
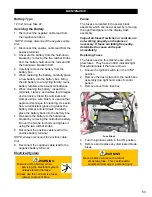
3. Remove cover from fuse box.
Fuse Block
4. Turn the ignition switch to the
ON
position.
5. Remove and replace any illuminated blown
fuses.
WARNING
Never replace a fuse with a larger
amperage fuse. This could lead to
equipment damage or personal injury.
53
Summary of Contents for CC5049D
Page 1: ...CORE CUT OPERATOR S MANUAL CC5049D Rev 21 00 Part 1802721...
Page 2: ......
Page 8: ...INTRODUCTION CC5049D Controls 8...
Page 11: ...INTRODUCTION CC5049D Specifications 11...
Page 58: ...REFERENCES 58...
Page 59: ...REFERENCES 59...
Page 60: ...REFERENCES 60...
Page 67: ......


