background image

71

NL

A

B

C

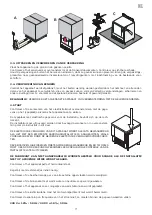
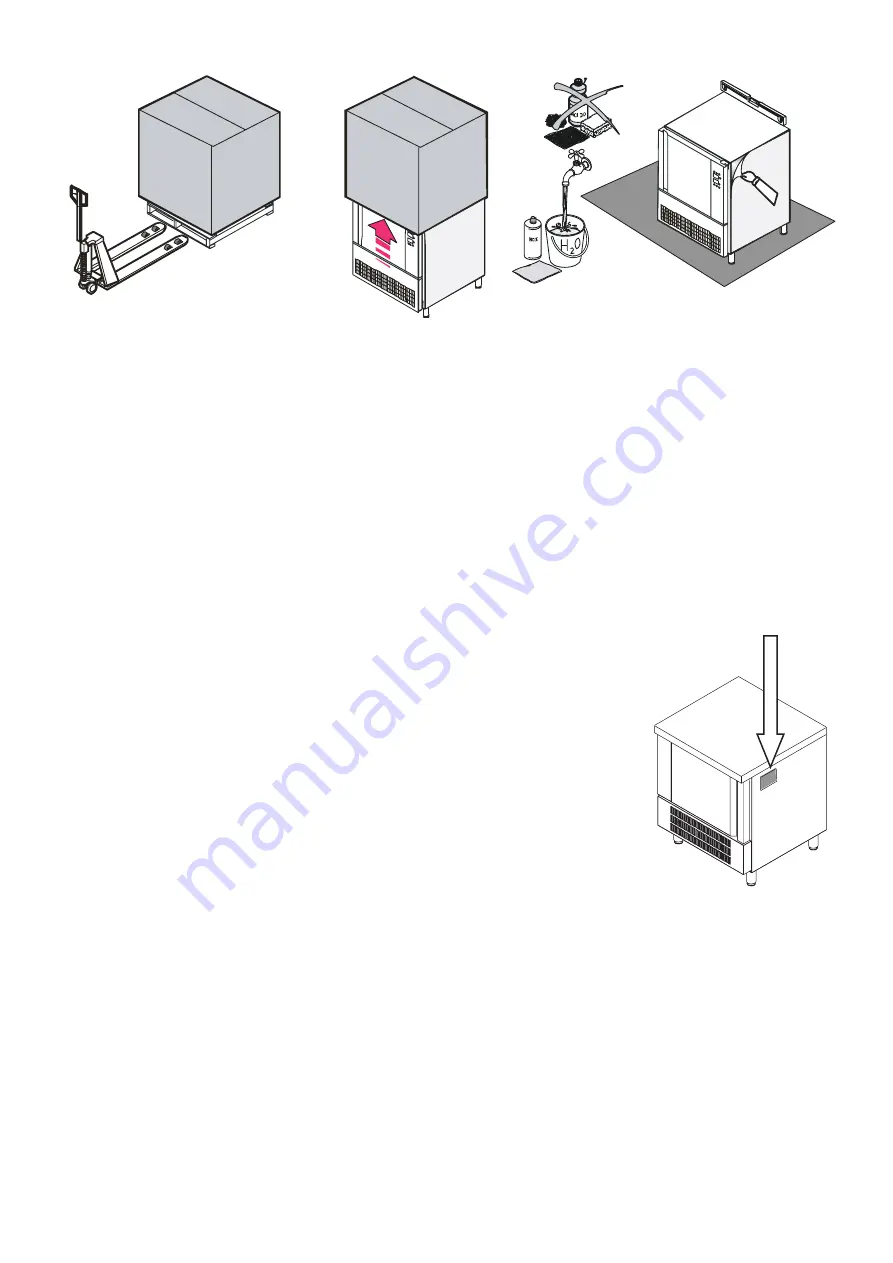
3.3. UITPAKKEN EN VERWIJDEREN VAN DE VERPAKKING

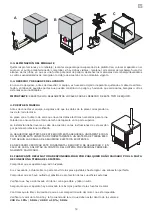
Plaat het apparaat op de grond in de gekozen positie.

Controleer of het serienummer overeenstemt met de transportdocumenten. Controleer op zichtbare schade.

Houd de verpakkingen buiten het bereik van kinderen, daar ze gevaar kunnen opleveren. Breng de verpakkings-

producten naar gespecialiseerde inzamelpunten of recyclingpunten, met inachtneming van de bestaande voor-

schriften.

3.4. VERWIJDERING VAN EENHEID

Voordat het apparaat wordt afgedankt, moet het buiten werking worden gesteld door het netsnoer en alle onder-

delen van het apparaat te verwijderen, die een gevaar kunnen vormen.Vernietig vergrendelingen, scharnieren en 

andere sluitingen om te voorkomen dat spelende kinderen bekneld of gewond geraken.

BELANGRIJK

: VERWIJDER HET AFGEDANKTE APPARAAT IN OVEREENSTEMMING MET DE GELDENDE NORMEN.

4. START

Controleer of de kenmerken van het elektriciteitsnet overeenstemmen met de gege-

vens op het typeplaatje alvorens het apparaat aan te sluiten.

De typeplaat met elektrische gegevens voor de installatie, bevindt zich op de rech-

terkant.

De installatie moet uitgevoerd worden door bevoegd personeel en in overeenstem-

ming met de instructies in dit deel. 

DE ELEKTRISCHE VEILIGHEID VAN DIT APPARAAT WORDT SLECHTS GEWAARBORGD 

ALS HET MET EEN EFFICIËNTE AARDINGSINSTALLATIE IS AANGESLOTEN, ZOALS 

VOORGESCHREVEN DOOR DE GELDENDE ELEKTRISCHE VEILIGHEIDSVOORSCHRIF-

TEN

DEZE BASISVEILIGHEIDSEISEN MOETEN WORDEN GEWAARBORGD EN BIJ TWIJFELS 

MOET U EEN DOOR DESKUNDIG PERSONEEL EEN ZORGVULDIGE CONTROLE VAN DE 

INSTALLATIE LATEN UITVOEREN.

DE FABRIKANT KAN NIET AANSPRAKELIJK WORDEN GESTELD VOOR SCHADE ALS DE INSTALLATIE 

NIET OP AFDOENDE WIJZE WORDT GEAARD.

Controleer of het apparaat perfect horizontaal staat.

Regel bij met de stelvoetjes indien nodig.

Controleer of de beschermende pvc van alle externe oppervlakken werd verwijderd.

Controleer of de binnenkant met warm water en neutrale zeep werd gewassen.

Controleer of het apparaat zo ver mogelijk van warmtebronnen wordt geplaatst.

Controleer of de luchtcirculatie rond het motorcompartiment niet wordt belemmerd.

Controleer de spanning en frequentie van het stroomnet, ze moeten binnen de gegeven waarden vallen:

230 V ± 10% ; 50 Hz / 400 V ± 10% ; 50 Hz

Summary of Contents for BE-910C-DP/DI

Page 1: ...Mod CBT101 NT Production code BE 910C DP DI 09 2019 ...

Page 2: ...INSTRUCTIONS FOR THE INSTALLATION USE AND MAINTENANCE DE SCHNELLKÜHLER ANLEITUNGEN FÜR DEN INSTALLATEUR BEDIENUNGS UND WARTUNG FR CELLULES DE REFROIDISSEMENT INSTRUCTIONS POUR L INSTALLATION L EMPLOI ET LA MAINTENANCE ES ABATIDORES INSTRUCCIONES PARA LA INSTALACIÓN USO Y MANTENIMIENTO NL SNELKOELERS INSTALLATIE GEBRUIKS EN ONDERHOUDSINSTRUCTIES ...

Page 3: ...2 ...

Page 4: ... weight Abmessungen Kapazität Einschubabstand Leergewicht Dimensions Capacité Ecartement grilles Poids à vide Dimensiones Capacidad Distancia bandejas Peso en vacío Afmetingen Capaciteit Afstand dienbladen Leeggewicht mm 620 x 650 x h 670 3 x 1 1 GN 60x40 67 mm 75 kg Pi Li 620 650 280 L 2500 ...

Page 5: ... distance Empty weight Abmessungen Kapazität Einschubabstand Leergewicht Dimensions Capacité Ecartement grilles Poids à vide Dimensiones Capacidad Distancia bandejas Peso en vacío Afmetingen Capaciteit Afstand dienbladen Leeggewicht mm 790 x 730 x h 880 5 x 1 1 GN 67 mm 113 kg ...

Page 6: ...stance Empty weight Abmessungen Kapazität Einschubabstand Leergewicht Dimensions Capacité Ecartement grilles Poids à vide Dimensiones Capacidad Distancia bandejas Peso en vacío Afmetingen Capaciteit Afstand dienbladen Leeggewicht mm 790 x 830 x h 880 5 x 1 1 GN 60x40 67 mm 128 kg ...

Page 7: ...tance Empty weight Abmessungen Kapazität Einschubabstand Leergewicht Dimensions Capacité Ecartement grilles Poids à vide Dimensiones Capacidad Distancia bandejas Peso en vacío Afmetingen Capaciteit Afstand dienbladen Leeggewicht mm 790 x 830 x h 1450 10 x 1 1 GN 60x40 67 mm 193 kg ...

Page 8: ...tance Empty weight Abmessungen Kapazität Einschubabstand Leergewicht Dimensions Capacité Ecartement grilles Poids à vide Dimensiones Capacidad Distancia bandejas Peso en vacío Afmetingen Capaciteit Afstand dienbladen Leeggewicht mm 790 x 830 x h 1790 15 x 1 1 GN 60x40 67 mm 210 kg ...

Page 9: ...ore 10 3 2 Movimentazione e posizionamento 10 3 3 Smaltimento dell imballo 11 3 4 Dismissione e rottamazione dell apparecchiatura 11 4 Messa in funzione 11 5 Pannello di controllo 12 5 1 Schermata iniziale 12 5 2 Abbattimento e conservazione 12 5 3 Surgelazione e conservazione 13 5 4 Avvio di un ciclo di abbattimento o surgelazione 14 5 5 Sanificazione pesce 15 5 6 Indurimento gelato 16 5 8 Funzio...

Page 10: ...e qualificato in possesso dei requisiti di legge L apparecchiatura è stata progettata e realizzata per l abbattimento e la conservazione di prodotti alimentari e dovrà pertanto essere destinata solo all uso per il quale è stata espres samente concepita Qualsiasi impiego diverso da quello specificato non comporta per il costruttore impegno o vincolo d alcun genere Viene declinata ogni responsabilit...

Page 11: ... carrello elevatore o similare sia adeguata al peso dell apparecchiatura in questione Movimentare l apparecchiatura con carrello elevatore o similare fig A inserire le forche sul lato anteriore o po steriore della pedana di legno a corredo dell apparecchiatura Dar corso al sollevamento assicurandosi che l apparecchiatura sia in equilibrio stabile ATTENZIONE nel corso della movimentazione non capov...

Page 12: ...l fianco destro dell apparecchiatura in alto L installazione deve essere effettuata secondo le istruzioni riportate alla presente se zione da personale professionalmente qualificato LA SICUREZZA ELETTRICA DI QUESTA APPARECCHIATURA È ASSICURATA SOLTANTO QUANDO LA STESSA È CORRETTAMENTE COLLEGATA AD UN EFFICACE IMPIANTO DI MESSA A TERRA COME PREVISTO DALLE VIGENTI NORME DI SICUREZZA ELETTRICA È NECE...

Page 13: ... questa icona si accede a delle funzioni comple mentari sbrinamento e preraffreddamento o specifiche raffreddamento bottiglie o sterilizzazione camera 5 2 ABBATTIMENTO E CONSERVAZIONE Premendo l icona ABBATTIMENTO nella schermata inizia le lo schermo visualizza la schermata a lato In questa schermata è possibile selezionare il tipo di con trollo dell abbattimento tra Abbattimento con sonda Abbatti...

Page 14: ...l icona sonda e si attiva l icona tempo 5 3 SURGELAZIONE E CONSERVAZIONE Premendo l icona SURGELAZIONE nella schermata iniziale lo schermo visualizza la schermata a lato Le opzioni sono le stesse della schermata ABBATTIMEN TO ossia Surgelazione con sonda Surgelazione a tempo In entrambi i casi al termine della fase di surgelazione l ab battitore passa automaticamente a una fase di conservazio ne a...

Page 15: ...rilevato dalla sonda 28 in grande a centro schermo Valore di fine ciclo 3 in piccolo Il valore di set può essere modificato premendo l icona sonda Tasto TERMINA per interrompere il ciclo In quest altro esempio le indicazioni sono Tipo di ciclo surgelazione icona hard Controllo sonda icona Fase attiva ricordiamo che un ciclo hard si compone di fase surgela zione hard fase surgelazione e fase conser...

Page 16: ...stati sottoposti a una cottura in cui il cuore del prodotto rag giunga una temperatura di 60 C per almeno un minuto debbano essere sottoposti a un congelamento preventivo che garantisca una temperatura di 20 C al cuore del prodotto per 24 ore Il programma SANIFICAZIONE PESCE è suddiviso nelle seguenti fasi Surgelazione con sonda cella 40 C e sonda 20 C max di 5 ore Surgelazione a tempo 20 C tempo ...

Page 17: ...ella fase di preraffredda mento prima di introdurre il gelato nell abbattitore La richiusura della porta da inizio alla fase di surgelazione IT 5 8 FUNZIONI EXTRA Premendo l icona EXTRA nella schermata iniziale si accede a delle funzioni complementari sbrinamento e preraffred damento o specifiche raffreddamento bottiglie o steriliz zazione camera Funzione SBRINAMENTO Questa funzione che serve a sb...

Page 18: ...nza attivare raffreddamento o ventilazione SERVIZIO TECNICO Questa icona consente l accesso protetto da password all a rea riservata al servizio tecnico AGGIORNAMENTO Permette di installare aggiornamenti del software utilizzando la connessione USB ALLARMI In questa cartella vengono salvate tutte le schermate di attivazione degli allarmi con data e ora di attivazione È possibile inviare le immagini...

Page 19: ...n acqua e detergenti neutri o sapone neutro Asciugarla con cura e una volta ben asciutta stendere un velo d olio di vaselina con un panno morbido Lasciare aperta la porta dell abbattitore in questo modo circolerà l aria non si formeranno condense o odori spiacevoli SONDA SPILLONE Dopo ogni utilizzo della sonda spillone si raccomanda di pulirla bene e tra un utilizzo e l altro in fase di stand by a...

Page 20: ...19 IT ...

Page 21: ...ler 22 3 1 Controls at reception 22 3 2 Handling and placing 22 3 3 Unpacking and disposal of it 23 3 4 Disposal of unit 23 4 Start up 23 5 Control panel 24 5 1 Main screen 24 5 2 Blast chilling and conservation 24 5 3 Deep freezing and conservation 25 5 4 Starting a blast chilling or deep freezing cycle 26 5 5 Fish sanification 27 5 6 Ice cream hardening 28 5 8 Extra functions 28 5 9 Sterilizatio...

Page 22: ...must be installed tested and serviced by qualified personnel in possession of the legal qualifications The constructor declines all responsibility with invalidity of the warranty in the event of electrical and or mechanical modifications Any adjustment whatsoever not expressly authorised and in disrespect of this manual invalidate the warranty Observe all existing local regulations at the time of ...

Page 23: ...inning handling operations ensure that the lifting capacity is enough for the appliance in question Handling with fork lift or similar A Insert the forks into the side or back of the wooden pallet supplied with the appliance begin lifting checking that the appliance is in stable equilibrium When insert the lifting device pay attention to the power supply cable and the position of the feet ATTENTIO...

Page 24: ... electrical data required in the installation is placed in the right side The installation must be made according to the instructions given in this section by professionally qualified personnel THE ELECTRICAL SAFETY OF THIS APPLIANCE IS GUARANTEED ONLY WHEN IT IS CONNECTED TO AN EFFICIENT EARTHING PLANT AS PRESCRIBED BY EXISTING ELECTRICAL SAFETY REGULATIONS THIS BASIC SAFETY REQUIREMENT MUST BE V...

Page 25: ...tary defrost and pre cooling or specific functions bottle cooling or chamber sterilization 5 2 BLAST CHILLING AND CONSERVATION Pressing the BLAST CHILLING icon on the main screen the system shows the screen on the side In this screen it is possible to select the type of blast chilling control between Blast chilling with probe control Blast chilling with time control In both cases at the end of the...

Page 26: ...ctivated and the time icon is activated 5 3 DEEP FREEZING AND CONSERVATION Pressing the DEEP FREEZING icon on the main screen the system shows the screen on the side The options are the same as on the BLAST CHILL screen Deep freezing with probe control Deep freezing with time control In both cases at the end of the deep freezing phase the blast chiller automatically switches to a conservation phas...

Page 27: ...by the probe 28 large in the middle of the screen End of cycle value 3 smaller The set value can be changed by pressing the probe icon STOP button to interrupt the cycle In this other example the indications are Type of cycle deep freezing icon hard Control probe icon Active phase we remind you that a hard cycle consists of a hard deep freezing phase a deep freezing phase and a conservation phase ...

Page 28: ...hout having undergone a cooking in which the heart of the product reaches a temperature of 60 C for at least one minute must be subjected to a preventive freezing which guarantees a temperature of 20 C at the heart of the product for 24 hours The FISH SANIFICATION program is divided into the following phases Deep freezing with probe chamber 40 C and probe 20 C max 5 hours Timed deep freezing 20 C ...

Page 29: ... es Pre cooling Timed deep freezing Conservation After pressing START wait for the pre cooling end before introducing the ice cream into the blast chiller Door re closure starts the freezing phase 5 8 EXTRA FUNCTIONS Pressing the EXTRA icon gives access to complementary defrost and pre cooling or specific functions bottle cool ing or chamber sterilization DEFROST function This function which serve...

Page 30: ...oftware without activating cooling or ven tilation TECHNICAL SERVICE This icon allows access password protected to the area re served for the technical service UPDATE It allows you to install software updates using the USB con nection ALARMS In this folder all the alarm activation screens are saved with activation date and time Images can be sent to the technical service or the manufacturer to pro...

Page 31: ...tch to the OFF position Remove the plug from its socket Empty the appliance and clean Leave the door half open to avoid creation of bad smells Protect the compressor group from dust CORE PROBE Clean well the edge for the first use of it and after every use If it s not in use after cleaning cover with its rubber cap and place it in the proper side within the appliance s chamber CONDENSING COIL It i...

Page 32: ...31 EN ...

Page 33: ...eur 34 3 1 Erhalt 34 3 2 Handling und Aufstellung 34 3 3 Entsorgen der Verpackung 35 3 4 Beseitigung und Verschrottung des Gerätes 35 4 Inbetriebnahme 35 5 Bedienungspaneel 36 5 1 Startbildschirm 36 5 2 Schnellkühlung und erhaltung 36 5 3 Gefrierung und erhaltung 37 5 4 Schnellkühlungs oder gerfrierungszyklus start 38 5 5 Fisch hygiene 39 5 6 Eishärterung 40 5 8 Extra Funktionen 40 5 9 Sterilisati...

Page 34: ...hen An forderungen verfügt installiert endgeprüft und kontrolliert werden Das Gerät wurde zur Schnellkühlung und Konservierung von Lebensmitteln geplant und hergestellt es darf nur zu dem Zweck verwendet werden für den es ausdrücklich konzipiert wurde Der Hersteller haftet in keiner Weise für einen anderweitigen Einsatz des Gerätes Der Hersteller haftet auf keine Weise für elektrische und oder mec...

Page 35: ...r Vorder oder Rückseite der Holzpalette des Gerätes einführen Das Gerät anheben und prüfen dass es sich in einem stabilen Gleich gewicht befindet ACHTUNG WÄHREND DES HANDLINGS NICHT UMDREHEN ODER UMKIPPEN HINWEISE DIE BEACHTUNG DER AUSSEN AN DER PACKUNG ANGEBRACHTEN EMPFEHLUNGEN GARAN TIERT ZUM VOLLEN VORTEIL DES ENDBENUTZERS DIE UNVERSEHRTHEIT UND FUNKTIONSTÜCHTIGKEIT DES GERÄTES FOLGENDES WIRD E...

Page 36: ...schen daten befin det sich oben an der rechten geräteseite siehe Abbildung auf dieser seite Die ins tallation muss durch beruflich erfahrenes peronsal gemäss den anweisungen dieses abschnitts Ausgeführt werden DIE ELEKTRISCHE SICHERHEIT DES GERÄTES IST NUR DANN GEWÄHRLEISTET WENN ES WIE VON DEN GELTENDEN BESTIMMUNGEN ZUR ELEKTRISCHEN SI CHERHEIT VORGESCHRIEBEN SACHGERECHT AN EINE WIRKSAME ERDUNGSA...

Page 37: ...ten Sie Zugriff auf die komplementäre Funktionen Auftauen und Vorkühlen oder spezifisch Flaschenkühlung oder Kammersterilisation 5 2 SCHNELLKÜHLUNG UND ERHALTUNG Durch Drücken Symbol SCHNELLKÜHLUNG auf dem Star tbildschirm wird der Bildschirm auf dem Display auf der Seite angezeigt Auf diesem Bildschirm ist es möglich zwischen folgenden Optionen auszuwählen Kerntemperaturfühlerschnellkühlung Zeits...

Page 38: ...ühlersymbol deaktiviert und das Zeitsymbol aktiviert 5 3 GEFRIERUNG UND ERHALTUNG Durch Drücken Symbol GEFRIERUNG auf dem Startbild schirm wird der Bildschirm auf dem Display auf der Seite angezeigt Die Optionen sind die selben des SCHNELLKÜH LUNGSSCHIRM so Kerntemperaturfühlergefrierung Zeitgefrierung Auf beiden Fällen wechselt der Schnellkühler am Ende der Gefrierungsphase automatisch auf unendl...

Page 39: ...t 28 C groß in der Mitte des Bildschirms Zyklusendewert 3 C klein Der eingestellte Wert kann durch Drücken des Kerntemperaturfühlersym bols geändert werden STOP Taste zum Unterbrechen des Zyklus In diesem Beispiel die Anzeigen sind Art des Zyklus Gefrierung Symbol Hard Kontrolle Kerntemperaturfühler Symbol Aktive Phase ein Hard Zyklus besteht aus einer Hard Gefrierungspha se einer Gefrierungsphase...

Page 40: ...ne Mi nute lang eine Temperatur von 60 C erreicht hat einem vorbeugenden Einfrieren unterzogen werden müssen das eine Temperatur von 100 C garantiert 20 C im Herzen des Produkts für 24 Stunden Das Programm FISCH HYGIENE gliedert sich in folgende Phasen Kerntemperaturfühler Gefrierung Zell 40 C und Kerntemperaturfühler 20 C max 5 Stunden Zeit Gefrierung 20 C Zeit 24 H Erhaltung 20 C SEHR WICHTIG Na...

Page 41: ... gedrückt haben warten Sie bis die Vorkühlungspha se beendet ist bevor Sie das Eis in den Schnellkühler einfüllen Wenn die Tür sich schließt die Gefrierungsphase beginnt 5 8 EXTRA FUNKTIONEN Durch Drücken Symbol EXTRA auf dem Startbildschirm erhalten Sie Zugriff auf ergänzende Funktionen Auftauen und Vorkühlung oder spezifische Funktionen Flaschen kühlung oder Kammersterilisation AUFTAUENSFUNKTION...

Page 42: ...ng oder Lüftung zu aktivieren SERVICE Dieses Symbol ermöglicht den Zugang passwortgeschützt zu dem Service reservierten Bereich UPDATE Hier können Sie Software Updates über die USB Verbindung installieren ALARME In diesem Ordner werden alle Alarmaktivierungsbildschirme mit Datum und Uhrzeit der Aktivierung ge speichert Bilder können an den technischen Kundendienst oder den Hersteller gesendet werd...

Page 43: ...cknen und wenn es vollkommen trocken ist mit einem weichen Tuch einen Vaselineölfilm auftra gen Die Tür des Schnellkühlers offen lassen auf diese Weise kann die Luft zirkulieren und es bilden sich kein Konden sat oder unangenehmer Geruch KERNFÜHLER Nach jedem Gebrauch muss er gut gereinigt werden und zwischen seinen Verwendungen ist er im Standby mit seiner Gummiabdeckung in der entsprechenden Auf...

Page 44: ...43 DE ...

Page 45: ...3 1 Réception 46 3 2 Déplacement et positionnement 46 3 3 Élimination de l emballage 47 3 4 Élimination et mise au rebut de l appareil 47 4 Mise en fonction 47 5 Panneau de commande 48 5 1 Écran d accueil 48 5 2 Refroidissement rapide et conservation 48 5 3 Surgélation et conservation 49 5 4 Démarrage d un cycle de refroidissement rapide ou de surgélation 50 5 5 Assainissement du poisson 51 5 6 Du...

Page 46: ...tre installé testé et assisté par un personnel qualifié conformément aux normes en vigueur L appareil a été conçu et réalisé pour le refroidissement et la conservation de produits alimentaires et il devra donc être destiné uniquement à l utilisation pour laquelle il a expressément été conçu Toute utilisation différente de celle qui est spécifiée ne comporte pour le fabricant aucun engagement ou li...

Page 47: ...anutention s assurer que la capacité de levage du chariot élévateur ou de tout appareil semblable est adaptée au poids de l appareil en question Déplacer l appareil avec un chariot élévateur ou un appareil semblable A insérer les fourches sur le côté avant ou arrière de la plateforme en bois qui accompagne l appareil Effectuer le levage en s assurant que l appareil est en équilibre stable ATTENTIO...

Page 48: ...eil en haut voir la figure de cette page L installation doit être effectuée selon les instructions reportées dans la section pré sente par un personnel professionnellement qualifié LA SÉCURITÉ ÉLECTRIQUE DE CET APPAREIL EST ASSURÉE UNIQUEMENT QUAND IL EST CORRECTEMENT BRANCHÉ À UNE INSTALLATION EFFICACE DE MISE À TERRE CONFORMÉMENT AUX NORMES DE SÉCURITÉ ÉLECTRIQUE EN VIGUEUR IL EST NÉCESSAIRE DE ...

Page 49: ...ne on peut acceder aux fonctions com plémentaires dégivrage et pré refroidissement ou spéci fiques refroidissement des bouteilles ou stérilisation de la chambre 5 2 REFROIDISSEMENT RAPIDE ET CONSERVATION En appuyant l icône REFROIDISSEMENT RAPIDE sur l écran d accueil l affichage affiche l écran à côté Dans cette écran il est possible de sélectionner la modalité de contrôle de refroidissement rapi...

Page 50: ...dans ce cas l icône de la sonde est désactivée et l icône du temps est activée 5 3 SURGÉLATION ET CONSERVATION En appuyant sur l icône SURGÉLATION de l écran d accueil l affichage affiche l écran à côté Les options sont les mêmes que sur l écran REFROIDISSE MENT RAPIDE c est à dire Surgélation avec sonde Surgélation à temps Dans les deux cas à la fin de la phase de surgélation la cel lule de refro...

Page 51: ...Valeur détectée par la sonde 28 large au centre de l écran Valeur de fin de cycle 3 petit La valeur définie peut être modifiée en appuyant sur l icône de la sonde Touche STOP pour arrêter le cycle Dans l autre example les indications sont Type de cycle surgélation icône hard Contrôle sonde icône Phase active nous vous rappelons qu un cycle hard comprend une phase de surgélation hard une phase de s...

Page 52: ...uits à base de poisson servis sans avoir subi une cuisson dans laquelle le cœur du produit atteint une température de 60 C pour au moins un minute doivent être surgélés pour garantir une température de 20 C au cœur du produit pendant 24 heures Le programme d ASSAINISSEMENT DU POISSON est divisé en phases suivantes Surgélation avec sonde cellule 40 C et sonde 20 C max 5 heures Surgélation à temps 2...

Page 53: ...é refroi dissement avant d introduire la crème glacée dans la cellule de refroidis sement La porte se ferme et fait partir la phase de surgélation 5 8 FONCTIONS EXTRA En appuyant sur l icône EXTRA dans l écran accueil on ac céde à des fonctions complémentaires dégivrage et pré re froidissement ou spécifiques refroidissement de bouteilles ou stérilisation de la chambre Fonction DÉGIVRAGE Cette func...

Page 54: ...iver le refroidissement ou la ventilation SERVICE TECHNIQUE Cette icône permet d accéder protégé par mot de passe à la zone réservée au service technique MISE À JOUR Il vous permet d installer des mises à jour logicielles à l aide de la connexion USB ALARMES Dans ce dossier tous les écrans d activation d alarme sont enregistrés avec la date et l heure d activa tion Les images peuvent être envoyées...

Page 55: ... avec soin et une fois qu il est bien sec étaler une couche d huile de vaseline avec un chiffon souple Laisser ouverte la porte de la cellule de refroidissement de cette manière l air pourra circuler et il n y aura pas de formation de condensation ou d odeurs désagréables SONDE À COEUR Après chaque utilisation de la sonde à coeur on recommande de bien la nettoyer et entre une utilisation et l autr...

Page 56: ...55 FR ...

Page 57: ... 3 1 Entrega del abatidor 58 3 2 Traslado y posicionamiento 58 3 3 Eliminación del embalaje 59 3 4 Desecho y desguace del aparato 59 4 Puesta en marcha 59 5 Panel de control 60 5 1 Pantalla de inicio 60 5 2 Abatimiento y conservación 60 5 3 Congelación y conservación 61 5 4 Inicio de un ciclo de abatimiento o congelación 62 5 5 Esterilización pescado 63 5 6 Endurecimiento helado 64 5 8 Funciones e...

Page 58: ...onales El equipo debe ser instalado probado y asistido por personal calificado en posesión de los requisitos legales El equipo ha sido diseñado y fabricado para abatir y conservar productos alimenticios y por lo tanto debe utilizarse únicamente para el uso para el cual fue expresamente diseñado Cualquier uso distinto al especificado no implica ningún compromiso o obligación de ningún tipo para el ...

Page 59: ...e que la capacidad de elevación de la carretilla elevadora o similar sea adecuada para el peso del equipo en cuestión Trasladar el equipo con una carretilla elevadora o similar fig A introducir las horquillas en la parte delantera o trasera de la plataforma de madera sobre la que apoya el equipo Realizar el levantamiento asegurándose de que el equipo se encuentre en un equilibrio estable ATENCIÓN ...

Page 60: ...uentra en el lado derecho del aparato en la parte superior La instalación debe llevarse a cabo de acuerdo con las instrucciones de esta sección por personal profesional calificado LA SEGURIDAD ELÉCTRICA DE ESTE EQUIPO ESTÁ ASEGURADA ÚNICAMENTE CUAN DO EL MISMO ESTÁ CONECTADO CORRECTAMENTE A UN SISTEMA DE TIERRA EFEC TIVO SEGÚN LAS REGLAS DE SEGURIDAD ELÉCTRICA EXISTENTES ES NECESARIO VERIFICAR EST...

Page 61: ...o EXTRA Al pulsar este icono se accede a funciones complementarias desescarche y preenfriamiento o específicas enfriamiento botellas o esterilización cámara 5 2 ABATIMIENTO Y CONSERVACIÓN Al pulsar el icono ABATIMIENTO en la pantalla de inicio el sistema muestra la pantalla al lado En esta pantalla es posible seleccionar el tipo de control entre Abatimiento a temperatura sonda al corazón Abatimien...

Page 62: ... icono sonda y se enciende el icono tiempo 5 3 CONGELACIÓN Y CONSERVACIÓN Al pulsar el icono CONGELACIÓN en la pantalla de inicio el sistema muestra la pantalla al lado Las opciones son las mismas que en la pantalla de ABATI MIENTO es decir Congelación a temperatura sonda al corazón Congelación a tiempo En ambos casos al final de la fase de congelación el abati dor pasa automáticamente a una fase ...

Page 63: ...en grande en el medio de la pantalla Valor de fin de ciclo 3 en pequeño El valor configurado se puede cambiar presionando el icono de la sonda Tecla STOP para interrumpir el ciclo En este otro ejemplo las indicaciones son Tipo de ciclo congelación icono hard Control sonda icono Fase activa recordamos que un ciclo hard consiste en una fase de congelación hard una fase de congelación y una fase de c...

Page 64: ...dmini strados sin haber sido cocinados de manera que el corazón del producto alcanze una temperatura de 60 C por al menos un minuto deben ser sometidos a un congelamiento preventivo que garantize una temperatura de 20 C en el corazón del producto durante 24 horas El programa ESTERILIZACIÓN PESCADO consta de las siguientes fases Congelación con sonda celda 40 C y sonda 20 C max de 5 horas Congelaci...

Page 65: ...pués de presionar START espere al final de la fase de preenfriamiento antes de introducir el helado en el abatidor El cierre de la puerta hace empezar la fase di congelación 5 8 FUNCIONES EXTRA Al pulsar el icono EXTRA en la pantalla de inicio se acce de a funciones complementarias desescarche y preenfria miento o específicas enfriamiento botellas y esterilización cámara Función DESESCARCHE Esta f...

Page 66: ... sin activar el enfria miento o la ventilación SERVICIO TECNICO Este icono permite el acceso protegido con contraseña al área reservada para el servicio técnico ACTUALIZACIÓN Permite instalar las actualizaciones del software utilizando la conexión USB ALARMAS En esta carpeta se guardan todas las pantallas de activación de alarma con fecha y hora de activación Las imágenes se pueden enviar al servi...

Page 67: ...rgentes o jabón neutros Secar con cuidado y cuando esté seco aplicar una capa de aceite de vaselina con un paño suave Dejar abierta la puerta del abatidor de esta manera el aire circulará no se formará condensación ni olores des agradables SONDA DE AGUJA Después de cada uso de la sonda de aguja se recomienda limpiarla bien y entre un uso y otro durante el modo de stand by colocarla en el sitio apr...

Page 68: ...67 ES ...

Page 69: ...s voor de installateur 70 3 1 Ontvangst en controles 70 3 2 Verplaatsing en plaatsing 70 3 3 Uitpakken en verwijderen van de verpakking 71 3 4 Verwijdering van eenheid 71 4 Start 71 5 Bedieningspaneel 72 5 1 Hoofdscherm 72 5 2 Snelkoeling en conservatie 72 5 3 Zacht diepvriezen en conservatie 73 5 4 Het starten van een snelkoel of diepvriescyclus 74 5 5 Vis schoonmaken 75 5 6 Roomijs verharden 76 ...

Page 70: ...gen Dit apparaat moet worden geïnstalleerd getest en onderhouden door bevoegd personeel dat over de wettelijke kwalificaties beschikt De fabrikant wijst elke ver antwoordelijkheid af als elektrische en of mechanische wijzigingen worden aangebracht waardoor de garantie vervalt Elke uitgevoerde afstelling niet uitdrukkelijk door de fabrikant geautoriseerd en niet in deze handleiding omschreven maakt...

Page 71: ...het apparaat te hijsen controleren of het vermogen van het hefmiddel voldoende is Hijs met een vorkheftruck of iets dergelijks A Plaats de vorken aan de zijkant of achterkant van de houten pallet geleverd met het apparaat Controleer of het apparaat stabiel in evenwicht is alvorens het te hijsen Let op voor de voedingskabel en de positie van de voeten bij het plaatsen van de vorken LET OP voor kant...

Page 72: ... elektrische gegevens voor de installatie bevindt zich op de rech terkant De installatie moet uitgevoerd worden door bevoegd personeel en in overeenstem ming met de instructies in dit deel DE ELEKTRISCHE VEILIGHEID VAN DIT APPARAAT WORDT SLECHTS GEWAARBORGD ALS HET MET EEN EFFICIËNTE AARDINGSINSTALLATIE IS AANGESLOTEN ZOALS VOORGESCHREVEN DOOR DE GELDENDE ELEKTRISCHE VEILIGHEIDSVOORSCHRIF TEN DEZE...

Page 73: ...HARD Pictogram EXTRA Als u dit pictogram drukt dan krijgt u toegang tot aanvullen de ontdooien en voorkoelen of specifieke functies flessen koelen of kamer steriliseren 5 2 SNELKOELING EN CONSERVATIE Het systeem toont het scherm aan de zijkant als u op het pictogram SNELKOELEN in het hoofdscherm drukt In dit scherm kunt u het type snelkoelbediening selecteren Snelkoelen met sondebediening Snelkoel...

Page 74: ...wordt het pictogram van de tijd geactiveerd 5 3 ZACHT DIEPVRIEZEN EN CONSERVATIE Het systeem toont het pictogram DIEPVRIEZEN aan de zijkant als u op het pictogram SNELKOELEN in het hoofd scherm drukt De opties zijn hetzelfde als die op het scherm SNELKOELEN Diepvriezen met sondebediening Diepvriezen met tijdbediening In beide gevallen zal de snelkoeler aan het einde van de diepvriesfase voor een o...

Page 75: ... scherm Einde van de cycluswaarde 3 kleiner De ingestelde waarde kan worden veranderd door op het pictogram van de sonde te drukken STOPPEN voor het onderbreken van de cyclus In dit andere voorbeeld zijn de indicaties Type cyclus diepvriezen pictogram hard Bediening sonde pictogram Actieve fase wij herinneren u eraan dat een harde cyclus bestaat uit een harde diepvriesfase een diepvriesfase en een...

Page 76: ...okt waarbij het midden van het product ten minste één minuut lang een temperatuur bereikt van 60 C moeten worden bloot gesteld aan preventief vriezen waarbij wordt gegarandeerd dat er een temperatuur van 20 C wordt bereikt voor 24 uur in het midden van het product Het VIS SCHOONMAKEN programma bestaat uit de volgende fasen Diepvriezen met sonde kamer 40 C en sonde 20 C max 5 uren Getimed diepvriez...

Page 77: ... Getimed diepvriezen Conservatie Nadat u op STARTEN hebt gedrukt moet u wachten totdat het voorkoelen is afgelopen voordat u het roomijs overbrengt naar de snelkoeler Het opnieuw sluiten van de deur start de vriesfase 5 8 EXTRA FUNCTIES Als u op het pictogram EXTRA drukt dan krijgt u toegang tot aanvullende ontdooien en voorkoelen of specifieke functies flessen koelen of kamer steriliseren Functie...

Page 78: ...TECHNISCH ONDERHOUD Dit pictogram geeft met een wachtwoord beveiligde toe gang tot het deel dat is gereserveerd voor de Technische Dienst UPDATEN Deze functie stelt u in staat om software updates via de USB verbinding te installeren ALARMERINGEN In deze map worden alle schermen met alarmactiveringen opgeslagen met daarbij de datum en tijd van activering Afbeeldingen kunnen worden verzonden naar de...

Page 79: ... in de OFF stand Verwijder de stekker uit het stopcontact Leeg het apparaat en reinig het Laat de deur halfopen om te vermijden dat geurtjes ontstaan Bescherm de compressor tegen stof KERNSONDE Maak voor het eerste gebruik en na elk gebruik de rand goed schoon Als de kernsonde niet wordt gebruikt ze met de rubberen kap afdekken en op haar plaats zetten in de kamer van het apparaat CONDENSSPOEL Het...

Page 80: ...79 NL ...

Page 81: ...80 ...

Reviews: