11
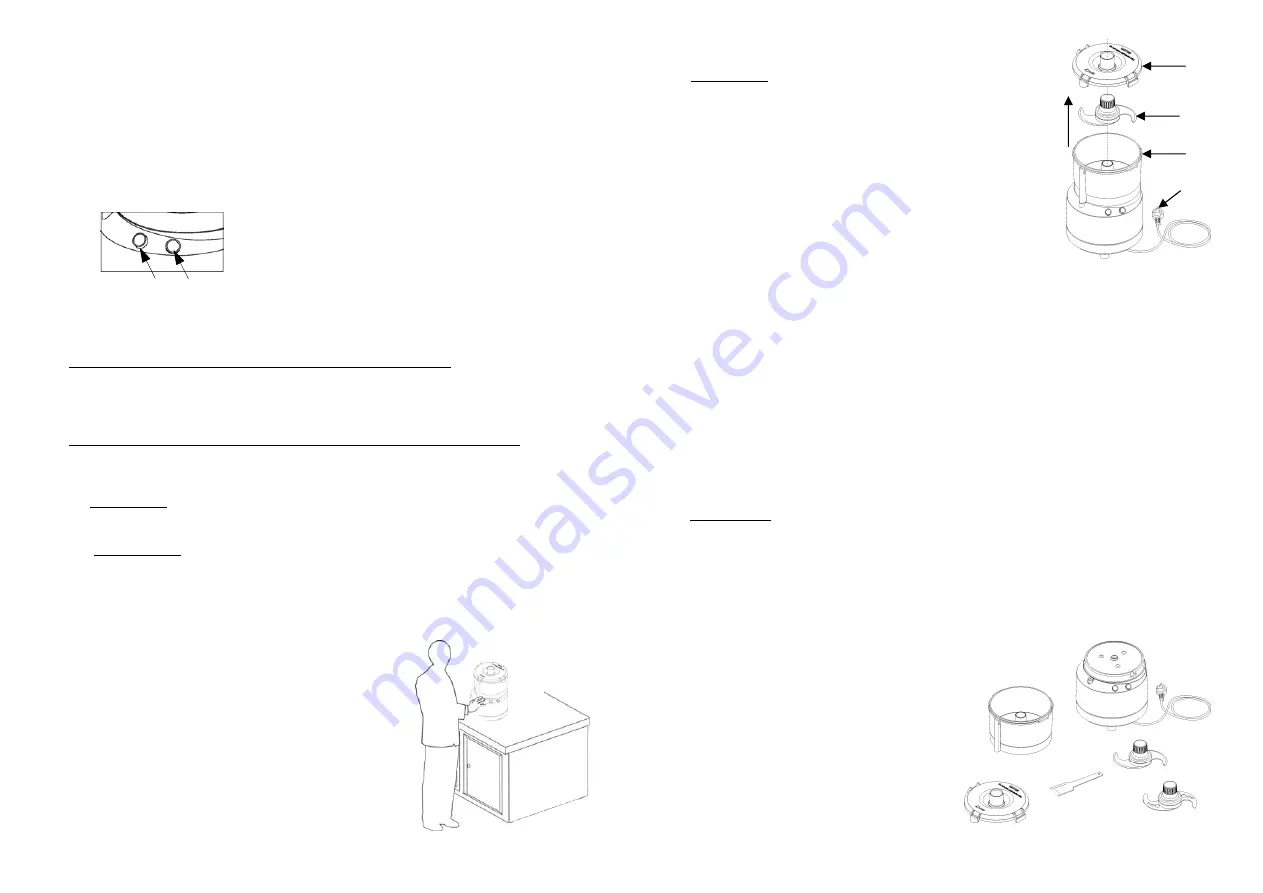
5.3 - SHARPENING THE CUTTERS
ATTENTION
: follow the instructions below to sharpen the two
cutters; to be performed as soon as reduced cutting is detected:
1.
disconnect the plug from the socket
(1)
2. turn the lid (4) clockwise and remove it;
3. extract the steel cutters holder (3) with great caution, gripping
it at the top;
4. take the whetstone and pass it evenly over the cutting edge
from the inside towards the outside until the blade is sharp.
FIG. n°8 - Removing the cutters holder
CHAP. 6 – ROUTINE CLEANING
6.1 - GENERALITIES
The machine must be cleaned at least once a day or more frequently, if necessary.
All parts of the cutter, which come into direct or indirect contact with the foodstuff to be cut,
must be cleaned thoroughly.
The cutter must not be cleaned using high-pressure water jet cleaners, high-pressure water
jets; tools, brushes and anything else that may damage the surface of the machine must not be
used.
Before performing any cleaning intervention:
a) disconnect the plug from the socket in order to isolate the machine completely from the rest
of the plant.
6.2 – MACHINE CLEANING PROCEDURE
6.2.1 – cleaning the lid, cutters holder and tank (see FIG.n°8/9
)
ATTENTION:
turn the lid (4) clockwise and remove it.
At this point, the cutters holder (3) and the tank (2) can be removed easily by turning clockwise,
by pulling them upwards (a).
ATTENTION! do not wash the stainless steel cutters in the dishwasher
Once removed, clean these parts with water and neutral detergent.
NB.: carry out these operations wearing protective gloves.
6.2.2 - general cleaning (see FIG.n°9
)
NB.: disconnect the plug from the socket
The machine body must be washed in the work
place, using neutral detergent and a damp cloth
rinsed frequently in water.
ATTENTION! do not wash the machine body
with jets of water or in the dishwasher.
On completion, dry all parts thoroughly.
1
3
4
2
(a)
FIG. n°9 - Cutter removed for cleaning
10
1.
“OFF” button.
2.
“ON” button.
FIG. n°6 - Commands position
5.2 - CARICAMENTO DEL PRODOTTO
ATTENZIONE!
Lavorare solo prodotti alimentari, con grandezza non superiore a 5 cm
3
, de-
vono essere privi di ossa e non presentare parti dure.
La merce da tagliare va caricata sulla vasca solamente a motore fermo.
La procedura è la seguente:
5.2 – LOADING THE PRODUCT
ATTENTION!
only work food products measuring no more than 5 cm
3
; they must not contain
bones or hard parts.
The goods to be cut must be loaded into the tank only with the motor at a standstill.
The procedure is the following:
1. turn the lid clockwise (
ref.1 - FIG.n°1
) and remove it from the machine;
2. insert the type of cutter holder suitable for the job to be performed;
ATTENTION
! put the product into the tank (
ref.2 - FIG.n°1)
paying great attention to the
two stainless steel cutters. In the event of very large products, shred them manually before
putting them into the tank.
ATTENTION!! Do not fill the tank more than the ½ way level
;
3. assume a correct position in order to prevent accidents (
see FIG.n°7
): the body must be
perpendicular to the work surface.
In all cases, do not lean on the machine and do not
assume positions that lead to direct contact with the machine;
4. re-position the lid and turn it anti-clockwise to the closed position;
5. start the cutter by pressing the “ON” button (
ref.2 - FIG.n°6
);
6.
do not
use the cutter for long periods of time at slow
speed;
7.
do not
operate the cutter without product.
8.
do not
use the cutter for more than 10 minutes consecu-
tively; every 10 minutes leave it off for 5 minutes.
9. introduce additional product during processing through
the hole in the lid (
ref.1 - FIG.n°1
);
10. on termination, stop the cutter by pressing the “OFF”
button (
ref.1 - FIG .n°6
) and wait for the blades to be at
a complete standstill before opening the lid.
11. before using the preparation contained in the tank, care-
fully remove the cutter holder by gripping it at the top.
2
1
FIG.n°7 - Posizione corretta
the lid correspond to the relative latches on the tank
3. At this point, activate the “ON” and “OFF” buttons
4. Switch the cutter on by pressing the “ON” button and check that the machine stops
operating by turning the lid clockwise.
CHAP. 5 - USING THE MACHINE
5.1 - COMMANDS
The commands are positioned on the body of the cutter, as represented in the figure below.


