background image

18

19

Console Layout (Continued)

Console Layout

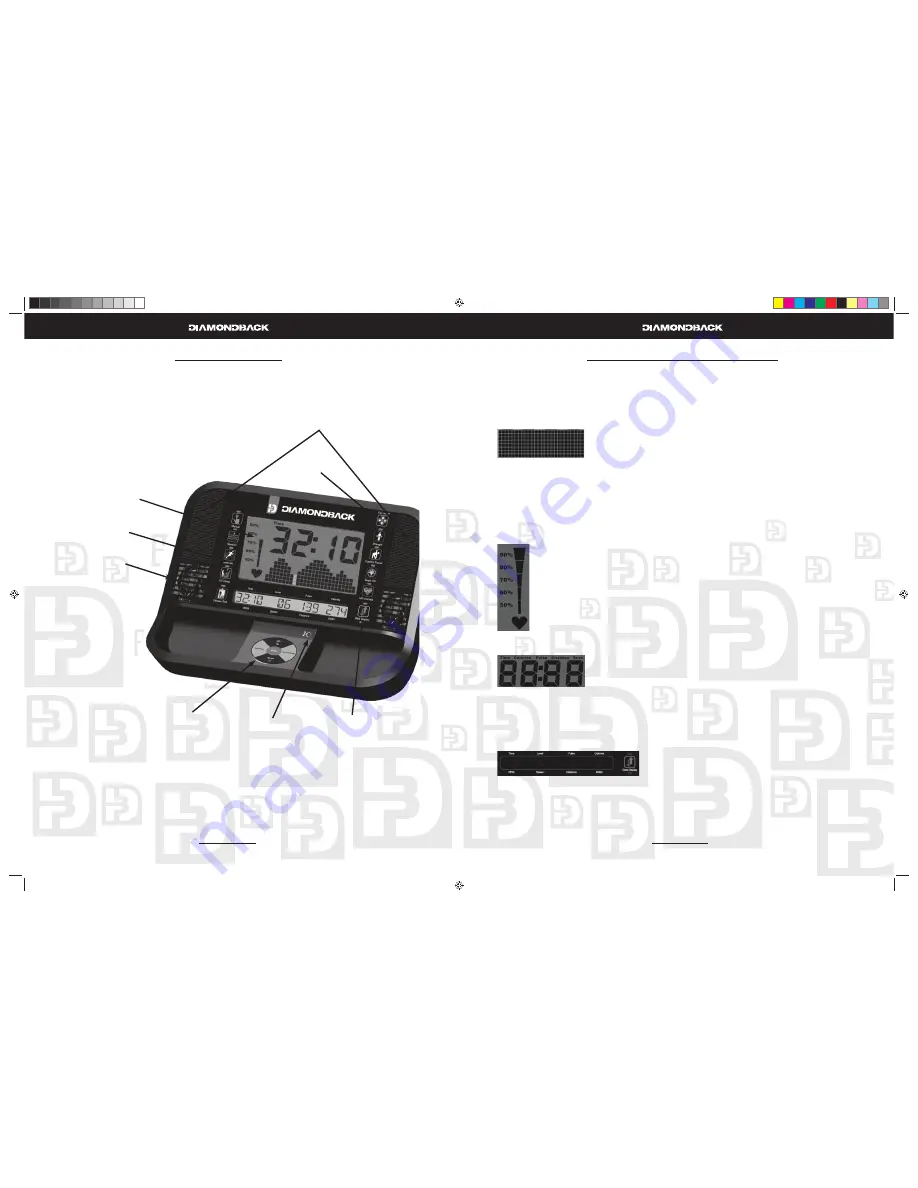
Displays

Main Display

 - The Main Display is divided into three parts, each part is described below:

Dot  Matrix Display 

1. 


It displays the program profi le during the program setup and executing 

a. 

modes.

Displays the Intensity profi le during the Classic Program and Custom 

• 

Training program.  
Displays the % Max HR profi le during HR interactive programs

• 

Profi le defi nitions:

b. 

Intensity profi le – The Dots represent the resistance level, L1- L16; the higher Dots lit up, the higher 

• 

resistance it is on. The a column of Dots will blink to indicate the current workout segment. 
% Max HR profi le – The Dots represents the % Max HR: 0-100% 

• 

Heart Rate Graph Bar

2. 


The heart shape will light up and blink once there is a valid pulse detected.

a. 

It will light up the % Max HR during a program, if there is a valid pulse detected.

b. 

It will use the default age for % calculation unless there is an age entry during setup.

c. 

Data Display

3. 


During a program it will display Time, Calories, Pulse or Distance.

a. 

It can scan through Time, Calories, Pulse and Distance.

b. 

To indicate what data is being displayed a message right about the data 

c. 

will light up.  If the scan function is on, both the data that is being displayed 
and the Scan message will light up.

Use the “DISPLAY” key to toggle through the data and to choose the data you prefer to have on the 

d. 

display and to turn on and off the scan function.

Message/Workout data Display

During a program setup, this display will scroll the messages to guide you through the setup process.

a. 

In the Custom Trainer program, it will display additional messages to take better advantage of your 

b. 

workout.
During workout, it also acts as data display window and display four types of workout data at the 

c. 

same time. As soon as the program is started it will display Time, Resistance Level, Pulse and Calo-

Main Display

Stereo Speakers

Program Keys

Smart Fan™

Fan ON/OFF 
Switch

Data Display 
Select key

MP3 Plug-in

Function Keys

900Ub.Sr OM.R1.indd   18-19

900Ub.Sr OM.R1.indd   18-19

6/11/2008   9:56:23 AM

6/11/2008   9:56:23 AM

Summary of Contents for 900Sr

Page 1: ...______________________________ Date Purchased ______________________________________________________________________________________ Shipping Materials Diamondback recommends that you retain the original packing materials box and packing items for future shipping needs Serial Number Sticker Serial Number Sticker Purchaser s Reference Information 2 Introduction 4 Safety Instructions and Warnings 5 ...

Page 2: ...rculate 6 freely around the units keep all air openings free of dirt and dust never insert anything into open ings The 900 model units are intended for indoor use in home environment they are not intended for 7 outdoor use Place your 900 model unit on a solid level surface when in use 8 Make sure all knobs for adjustments are fastened securely before getting on the unit and after mak 9 ing an adju...

Page 3: ... found Assemble saddle onto seatpost 2 Tighten the affixing nut and washer using a 17mm open end wrench 3 SADDLE ANGLE ADJUSTMENT HINT Hold the rear of saddle in the optimum comfort position and tighten the nut at the same time Step 4 Console Mast Assembly Remove the console mast plastic cover from the unit s body 1 by un smapping it Install console mast cover onto console mast 2 Connect the main w...

Page 4: ...the main wiring harness and hand pulse 2 wiring harness to the plug receptors on the backside of the con sole taking care to install correctly see plug alignment marks WIRING HARNESS INSTALLATION HINT Any excess wiring must be carefully inserted stored back into the console mast before installing the console onto the console mounting plate Attach the console to the console mounting plate with the ...

Page 5: ...river The hood should sit above the plastic handlebar cover and below the mounting backet for the console Attach the left console mount cover to console mast using one M5 x 14mm bolt then to the right 6 cover using three M3 x 14mm screws and a Phillips screwdriver Step 7 Transformer Assembly Plug transformer into plug receptor located on the front of the unit 1 Plug the transformer into power outl...

Page 6: ...It indicates that 61 of American adults are either overweight or obese The study states that overweight increases the risk of health problems such as heart disease certain type of cancer type 2 diabetes etc It further points out that overweight needs to be regarded primarily as a Health rather than as an Appearance issue The Surgeon General s Healthy weight advice for consumers is Aim for a health...

Page 7: ...uctive electrode strips located 5 next to the buckles with water Note The transmitter is on automatically when being worn It is off when it is not connected to your body How ever as moisture may activate the transmitter thoroughly dry the transmitter to prolong battery life Glossary of Terms Idle mode Console is reset and waiting for an entry The message display window will scroll DIA MONDBACK FIT...

Page 8: ...nit it automatically turns on In the power save mode press any key or start pedaling to wake up the console and start operation Reset To reset a program during its operation press and hold the Stop key for 2 seconds When the program resets the console returns to idle mode Pause and Resume You may interrupt or pause a program for up to 5 minutes during a work out before the console resets To pause ...

Page 9: ...ata Display 3 During a program it will display Time Calories Pulse or Distance a It can scan through Time Calories Pulse and Distance b To indicate what data is being displayed a message right about the data c will light up If the scan function is on both the data that is being displayed and the Scan message will light up Use the DISPLAY key to toggle through the data and to choose the data you pr...

Page 10: ...e program and enter its setup mode Adjusting age weight press Enter key to accept your entry Display Key Press the DISPLAY key to toggle through the data that can be displayed in the main display Press the DIPLAY until the message SCAN lighs up in the main display to enable this function Once the SCAN message lights up press the key again to turn it off and disable this function Start Stop Key Pre...

Page 11: ...onsole Operating Tips section for details page 16 Warm Up Getting Started Your unit will automatically initiate a Warm Up mode for 3 minutes at the beginning of each program This mode is design to prepare your body for an intensive workout and to reduce the possibility of injury dur ing workout Note Warm Up is skipped for the Quick Start program Beginning the Program Warm Up is active as soon as a...

Page 12: ...ressed to re start the Quick Start program START STOP key could be pressed and held for 2 seconds to reset the console Pause Reset or Switch programs See Console Operating Tips section for details page 16 Workout Summary Getting Started For your convenience your unit incorporates a Workout Summary right after the completion of the Cool Down It will display the total workout data for your review an...

Page 13: ...Classic Programs Manual Getting Started The Manual program has no profile built into it This allows you to build your own exer cise profile while you workout Beginning the Program During idle mode the message window displays a message SELECT A PROGRAM To begin this program press the MANUAL program key the LED indicator above it will light up Entering the program When the message display flashes MANUA...

Page 14: ...rogram will begins the Dot Matrix will activate and the 1st segment of the program s profile will start blinking If there is a valid Heart rate signal being detected heart shape will start blinking and the Heart rate graph will light up with the percentage of maximum heart rate The message Time will light up in the date display and the Time will start counting down To switch the data being displaye...

Page 15: ... function Message Data Display As soon as the program begins The message display will turn into workout data display and display four default data Time Level Pulse Calories and the LED on top of the Data Display key will be lit Press the DATA DISPLAY buttons to switch the display to RPM Speed Distance Watts The LED on the bottom of the key will light up Adjustment Press UP or DOWN key to adjust th...

Page 16: ...t the Hill Climb program again START STOP key could be pressed and held for 2 seconds to skip the Cool Down and activate the Workout Summary immediately Pause Reset Switch or Save a program See Console Operating Tips section for details page 16 Fitness Test Getting Started The Fitness Test is based on YMCA protocol Standards is provided as a tool to evaluate your fitness level During exercise the m...

Page 17: ...key will do nothing there are no adjust intensity level adjustments during this program The console will control the resistance Ending the Program Program will end when in two stages the HR readings are higher than 110BPM The message display will display MAX METS X X START STOP key is pressed this program will end and Cool Down will be active but the test will not be completed and depending on how...

Page 18: ...kout Default time 30 minutes Default Intensity level preset level as shown in dot matrix profile Age and weight will be what was enter and saved in a previous workout During the Program Once the Enter or Start key is pressed the Warm Up will be active See Warm Up mode section for de tails Main Display As soon as the program will begins the Dot Matrix will activate and the 1st segment of the program...

Page 19: ...ER OR START will be displayed during the modification of the 4 profile indicating that you can press the ENTER key to continue modifying the Profile or the START STOP key to skip the modification process and go in to the program Or press the START STOP key to accept current default values and begin the workout Default time 30 minutes Default Intensity preset level as shown in dot matrix profile Age and...

Page 20: ...kout time The message window will flash a message of ENTER TIME then TIME 30 MIN and the 30 1 will be blinking You may press 2 UP or DOWN keys to adjust the time When the time setting reaches 60 min utes the display will show TIME 1HR 00MIN instead After time adjustment the message display will switch to display SET UP COMPLETED then 3 PESS START to indicate next step You may press the ENTER or STA...

Page 21: ...g You may press 2 UP or DOWN keys to adjust the time When the time setting reaches 60 min utes the display will show TIME 1HR 00MIN instead After time adjustment the message display will switch to display SET UP COMPLETED then 3 PESS START to indicate next step You may press the ENTER or START STOP key to begin this program Or press the START STOP key to accept current default values and begin the...

Page 22: ...any damaged or worn parts tighten all loose hardware As part of Diamondback Fitness normal installation and set up process all pedal cranks must be tight ened after 8 to 10 hours of initial riding to ensure parts are properly seated to axle This is standard initial break in service which must be performed after the first 8 to 10 hours of use Un tightened pedal cranks may become loose causing damage...

Page 23: ...rkmanship Brake Lifetime limited Warranty Parts Electronics 3 Years Labor 1 Year Warranty voided if The Warranty does not apply to any failure of the product or any parts of the product due to assembly errors alterations modifications misuse abuse accident improper maintenance or if the serial number on the product has been removed altered or defaced Assembly errors include but are not limited to D...

Page 24: ...48 49 Notes Notes 900Ub Sr OM R1 indd 48 49 900Ub Sr OM R1 indd 48 49 6 11 2008 9 56 28 AM 6 11 2008 9 56 28 AM ...

Page 25: ... phone No _____________________ Dealer Store Name ____________________________________________________________ Address _______________________________________________________________________ City ___________________________________State ________________ Zip _______________ Model _________________________________Serial No ______________________________ Purchase Date ________________________________...

Reviews: