KT800/802/803/804/809/856
Remote Sensing
Temperature Recorder
www.DicksonData.com • 1-800-323-2448 • Fax 1-800-676-0498
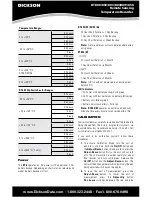
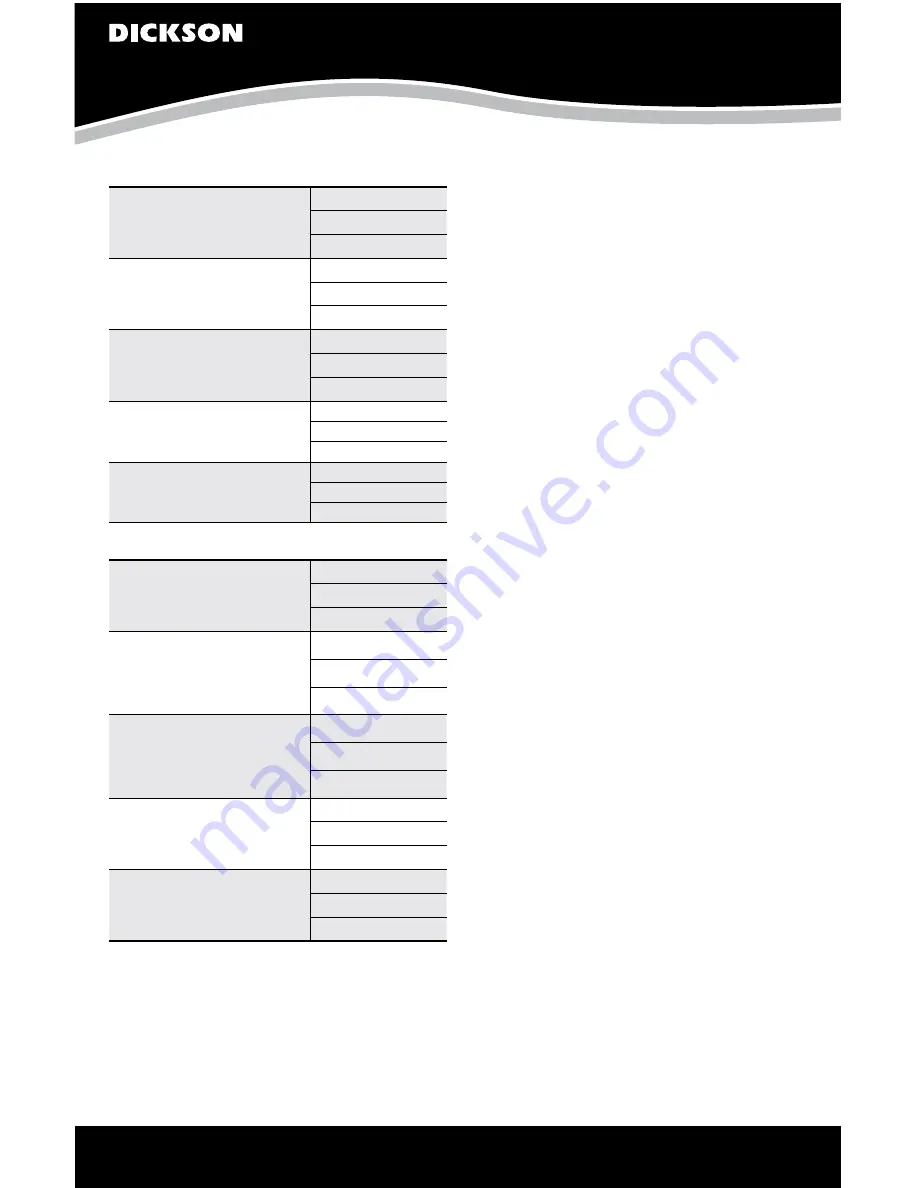
Temperature Ranges
0 to +100°F
#4 down
#5 down
#6 down
-50 to +50°F/C
#4 down
#5 down
#6 up
0 to +250°F/C
#4 down
#5 up
#6 up
0 to +500°F/C
KT802/03/56
#4 up
#5 down
#6 down
0 to +150°F/C
#4 down
#5 up
#6 down
KT804 Dip Switches for Ranges
-20 to +20°F/C
#4 down
#5 up
#6 down
+20 to +100°F/C
#4 down
#5 up
#6 up
+50 to +150°F/C
#4 up
#5 down
#6 down
0 to +1000°F/C
#4 down
#5 down
#6 down
0 to +2000°F (°F only)
#4 down
#5 down
#6 up
Power
The
KT8
operates on AC power with an optional 4 AA
battery backup. Depending on chart rotation selected and
model; battery backup will last
KT802/03/05/55/56
24 Hour Chart Rotation = 1 Day Backup
7 Day Chart Rotation = 2 Day Backup
31 Day Chart Rotation = 1 Week Backup
Note:
Alarm and relays will not operate under battery
only power.
KT800/09
At 70°F
24-Hour Chart Rotation = 1 Month
7-Day Chart Rotation = 6 Months
At 32°F
24-Hour Chart Rotation = 3 Weeks
7-Day Chart Rotation = 4 Months
Note:
(Unit should not be placed in an environment
below 32°F)
LED Indicators
• AC Power with battery backup–Solid green
• AC Power with low battery or no battery–Blinks red
• Battery only–Blinks green
• Battery only (Low battery)–Solid red
Note:
KT800/09
operates on battery only and will
blink one time every minute to conserve battery life.
CALIBRATION
Your instrument was carefully tested and calibrated before
being shipped from the factory. For greatest accuracy, we
recommend factory re-calibration every 6–12 months. Call
customer service at (630) 543-3747.
If you wish to do calibration yourself, follow these
procedures.
1.
To activate Calibration Mode, turn the unit on
and press and hold both the
On/Off
button and
the
Adjust-Down
button (making sure to press the
Adjust-Down
button first so the unit will not turn
off). The LED will blink in amber rapidly for about
five seconds, and turn solid green. Release the
On/Off
button and the
Adjust-Down
button. The
LED will then blink amber at which point only the pen
being adjusted will show on the display.
2.
To raise the unit of measurement, press the
Adjust-Down
button. To lower the unit of
measurement, press the
Adjust-Up
button.
Pen home
switches between the red and blue


