background image


9


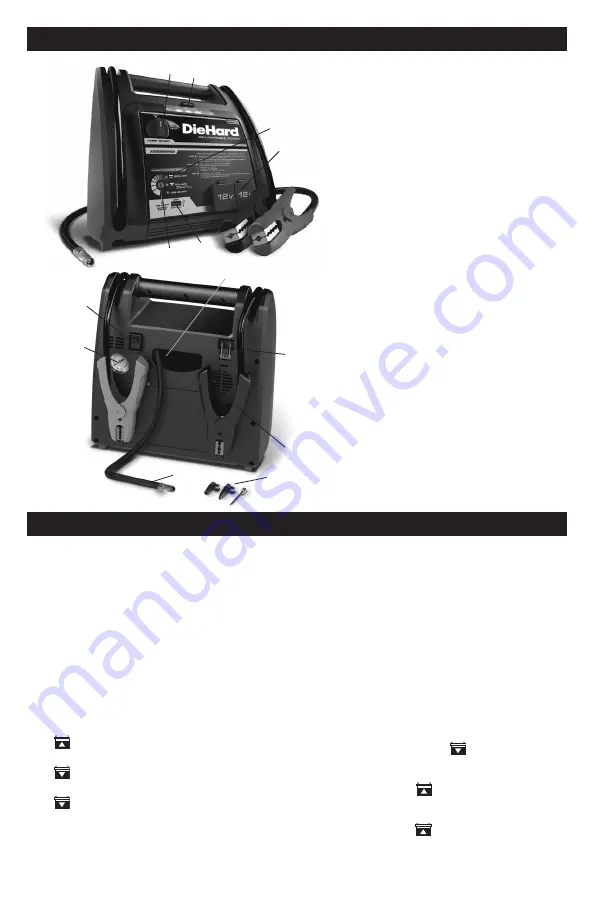
3.  CARACTERÍSTICAS

1. 

Interruptor de arrancador  

de encendido / apagado

2. 

Lámpara integrada y 

interruptor

3. 

Indicadores LED

4. 

Tomas de corriente  

de 12 V CC (2)

5. 

Puerto USB

6. 

Estado de la batería  

y USB botón ON / OFF

7. 

Medidor del compresor

8. 

Interruptor de compresor 

de encendido / apagado

9. 

Compartimiento de 

almacenamiento para la 

manguera del compresor

10. 

Puerto de carga

11. 

Cables con pinzas

12. 

Adaptadores para 

compresor de aire (3)

13. 

Manguera del compresor

2

3

5

7

8

9

10

11

12

13

6

4

1

4.  CARGA DE LA BATERÍA INTERNA DE LA ENERGÍA PORTÁTIL

IMPORTANTE:

 CARGUE LA UNIDAD 

INMEDIATAMENTE DESPUÉS 

DE ADQUIRIRLA, AL TÉRMINO 

DE CADA USO Y CADA 30 DÍAS 

PARA MANTENER LA BATERÍA 

INTERNA DE LA ENERGÍA PORTÁTIL 

COMPLETAMENTE CARGADA Y 

PROLONGARÁ SU VIDA ÚTIL.

COMPROBACIÓN DEL NIVEL DE 

CARGA DE LA BATERÍA INTERNA

Pulse el botón 

Battery Status

 en la parte 

frontal de la unidad. Las luces de LED 

indican el nivel de carga de la siguiente 

manera:

  (verde) sólido –  


100%-70% de carga completa.

  (amarillo/naranja) sólido –  


70-30% de carga completa.

  (amarillo/naranja) parpadeante –  


Menos del 30% de carga completa.

LA CARGA DE LA BATERÍA INTERNA

Para cargar la batería interna de la 

energía portátil, utilice un cable de 

extensión (no incluido).

NOTA:

 Al utilizar una extensión 

inadecuada, se corre el riesgo de ocasionar 

un incendio o descargas eléctricas. 

1. 

Para cargar, conectar un cable de  

18 AWG o mayor extensión en el 

enchufe del cargador en el lado de la 

energía portátil.

2. 

Conecte el cable de extensión en un 

tomacorriente eléctrico de 120V CA.

3. 

Mientras que el Arrancador Portátil 

está cargando, el   (amarillo/

naranja) LED se encenderá hasta que 

el nivel alcanza el 70% de la carga, 

entonces el   (verde) LED será 

sólido hasta que esté completamente 

cargada. Cuando esté completamente 

cargada, el   (verde) LED pulsara. 

Una carga completa se puede tardar 

hasta 72 horas. 

Summary of Contents for Portable Power 950 28.71687

Page 1: ...ador OPERATOR S MANUAL MANUAL DEL USUARIO CAUTION Read and follow all safety rules and operating instructions before every use of this product SAVE THESE INSTRUCTIONS ATENCI N Lea y siga todas las reg...

Page 2: ...lso have other rights which vary from state to state Schumacher Electric Corporation Mount Prospect IL 60056 FOR CUSTOMER ASSISTANCE OR REPLACEMENT PARTS CALL 1 800 732 7764 TOLL FREE DieHard is a reg...

Page 3: ...attachment not recommended or sold by the jump starter s manufacturer may result in damage to the unit or personal injury Never operate the Portable Power if it is damaged If someone else uses the por...

Page 4: ...ull charge yellow orange flashing Less than 30 of full charge CHARGING THE INTERNAL BATTERY Charge the internal battery for the Portable Power using an extension cord not included NOTE Use of an impro...

Page 5: ...ock away from the battery 5 Turn the rotary switch to the ON position 6 Crank the engine for no more than 8 seconds If the engine does not start wait 2 minutes before cranking again 7 After the engine...

Page 6: ...r more than 10 minutes maximum at a time Allow the Portable Power to cool down for 10 minutes before using again NOTE To prevent overheating the compressor has built in thermal protection that will tu...

Page 7: ...a charge The battery is bad will not accept a charge Replace the battery The compressor shuts off before reaching the set pressure The compressor has a thermal cutoff to protect it from overheating W...

Page 8: ...esorio no recomendado ni vendido por el fabricante del arrancador puede causar da o en la unidad o lesiones corporales Nunca opere la energ a port til si est da ado Si otra persona usa la energ a port...

Page 9: ...el bot n Battery Status en la parte frontal de la unidad Las luces de LED indican el nivel de carga de la siguiente manera verde s lido 100 70 de carga completa amarillo naranja s lido 70 30 de carga...

Page 10: ...s u otras partes m viles 3 En los veh culos con carga negativa a tierra como en la mayor a de los veh culos conecte la pinza con el polo POSITIVO ROJO de la energ a port til al borne POSITIVO POS P de...

Page 11: ...tiempo real de funcionamiento puede variar Los tiempos est n basados en una bater a interna completamente cargada USO DEL COMPRESOR DE AIRE ADVERTENCIA Antes de usar el compresor lea las instruccione...

Page 12: ...al Haga un chequeo de la bater a Gire el interruptor de arrancador ON OFF a la posici n de encendido La fenerg a port til no pone a funcionar mi aparato de 12V El aparato de 12V no enciende La bater a...

Reviews: