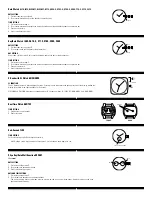
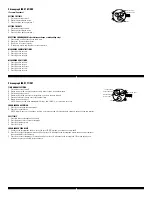
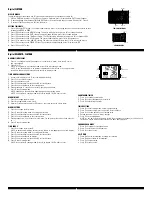
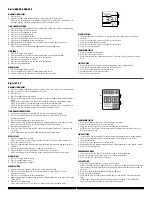
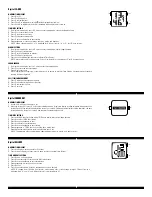
background image

Digital FL291

OVERVIEW

Features include TIME/DATE, CHRONO, TIMER, ALARM, and LIGHT-UP EL.

LIGHT-UP EL

Press (A) to activate light-up function for 3 seconds.

TIME OF DAY MODE

-  To set Time, press (B) until hour flashes. Use (C) and (D) buttons to select hour. Press (B) to advance. Press and hold (B) to 

complete set mode.

-  Press (C) to view the Time and Date Display.
-  Press and hold (C) to change the time from 12 hour to 24 hour.
-  Press (D) to toggle hourly chime.

CHRONO MODE

-  Press (C) to start time. Press (D) to stop time. Press (C) twice to enable split time. Press (D) to stop time.
-  Press and hold (D) to reset CHRONO mode.

TIMER MODE

-  To set TIMER, press and hold (B) until hour flashes. Use (C) and (D) Buttons to select hour. Press (B) to advance to minutes/

seconds. Press and hold (B) to complete TIMER mode.

-  Press (C) to start TIMER.
-  10 Beeps will be sounded when timer value reaches zero.

ALARM MODE

-  To set ALARM, press and hold (B) until hour flashes. Use (C) and (D) Buttons to select hour. Press (B) to advance to minutes. 

Press and hold (B) to set ALARM mode.

-  Press (D) to toggle alarm.
-  ALARM will sound for 20 seconds.
-  Press any button to stop ALARM.
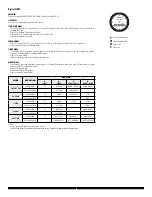
MODE

OPERATION

BUTTONS

A

LIGHT

B

MODE

C

START/SPLIT

D

RESET/STOP

TIME OF DAY

PRESS ONCE

EL

CHRONO

TOGGLE TIME/DATE

CHIME ON/OFF

PRESS AND HOLD

SETTING

TIME FORMAT

CHRONO

PRESS ONCE

EL

TIMER

START/SPLIT

STOP

PRESS AND HOLD

RESET

TIMER

PRESS ONCE

EL

ALARM

START

STOP

PRESS AND HOLD

SETTING

RESET

ALARM

PRESS ONCE

EL

TIME OF DAY

ALARM ON/OFF

PRESS AND HOLD

SETTING

SETTING

PRESS ONCE

EL

NEXT FIELD

INCREMENT

DECREMENT

PRESS AND HOLD

CONFIRM/EXIT

FAST INCREMENT

FAST DECREMENT

NOTE:

-  Analog time and digital time may not be in sync.

-  The key tone enable/disable will be dependent on the HOURLY CHIME enable/disable status.
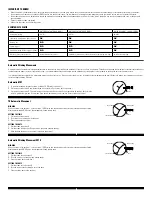
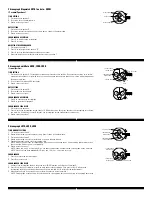
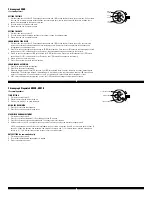
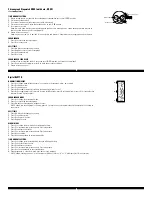
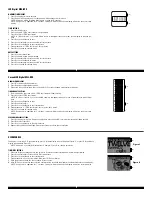
(A)

(D)

(B)

(C)

Hourly chime/Key tone

Alarm enable/disable

Chrono icon

Timer icon

Summary of Contents for DZ1067

Page 1: ...1 DZ7087 DZ7117 DIGITAL MOVEMENT GUIDE MLL033 DZ5145 DZ5146 FDT003 DZ7006 DZ7043 DZ7046 DZ7142 DZ7143 DZ7144 FL0521 DZ7099 DZ7100 FL075AB DZ7033 DZ7034 DZ7066 DZ7068 DZ7089 DZ7137 DZ7138 DZ7139 DZ7140 DZ7141 DZ7147 DZ7148 FL137EA DZ5175 DZ5176 FL610AB MLG367D DZ7118 DZ7119 DZ7120 DZ7121 DZ7169 DZ7172 FL137AX DZ7101 DZ7102 DZ7103 DZ7125 DZ7126 DZ7127 for digital display only ENGLISH G3 G1 DZ7122 DZ...

Page 2: ... the size of your wrist A loose fit may result in a loss in capacity of the timepiece to wind itself When fully wound your timepiece has a power reserve of approximately 38 hours Automatic 6T51 1 To start time keeping rotate the crown clockwise 15 20 times in position 1 2 Pull crown out to position 2 and rotate clockwise to set time Push crown back to position 1 3 Pull crown out to position 2 Then...

Page 3: ... 2 3 DATE 1 2 3 DATE DAY FRONT BACK buttonS CROWN EL BUTTON 3 Hand with EL Watch 6N30 OU30 EL FUNCTION The EL light up button is located above the crown Pressing it once will activate the light up function of the display making the display face visible in low light situations for 3 seconds DZ1065 and DZ1066 hold rights covered under U S Patent numbers 6 106 127 6 299 321 and 6 486 561 Dual Time Wa...

Page 4: ...chronograph hands will return to zero position Do not return the crown to its normal position while the hand is returning to zero or else the position the hand is in when this is done will be recognized as the new zero position 4 Turn crown clockwise until correct date is displayed in date window 5 Turn crown to set the time 6 Return crown to position 1 CHRONOGRAPH OPERATION 1 Push A to start stop...

Page 5: ...nd one mark If A is held down for over 2 seconds the chronograph second hand advances continuously 3 Return crown to position 1 B A 1 2 3 CHRONOGRAPH SECOND HAND CHRONOGRAPH MINUTE HAND 24 HOUR HAND DATE SECOND HAND B A 1 2 3 Chronograph JS15 JS25 JS26 TIME AND DATE SETTING 1 Pull crown out to position 2 2 Rotate crown clockwise until the previous day s date is shown in the date window 3 Pull crow...

Page 6: ...own to set the desired time 3 Return the crown to its normal position SETTING THE DATE 1 Pull the crown out to position 2 2 Turn the crown counter clockwise until the correct date is shown in the date window 3 Return the crown to its normal position CHRONOGRAPH ZERO RESET 1 Pull the crown out to position 3 Chronograph second hand and 1 20 second hand will return to zero Do not return the crown to ...

Page 7: ...in the date window 3 Pull crown out to position 3 4 Rotate crown clockwise until the correct date is shown in the date window 5 Continue to rotate crown to set correct am pm time 6 Return crown to position 1 Note Do not set the date between 9 00 p m and 12 30 a m to ensure accuracy Chronograph operation 1 Press A to start stop the chronograph 2 Press B to restart reset Note After 2 hours of contin...

Page 8: ...advance to minutes 4 Press C to increase digits press and hold C for fast advance 5 Press B to set and advance to next setting value 6 Setting sequence is seconds minute hour date month weekday Note When setting the hour H will display for 24 hour format A or P will display for 12 hour format A B C Chronograph Stopwatch VD54 with date VD53 1 crown 2 pushers Time and Date Setting 1 Before setting t...

Page 9: ...nd hold B for 2 seconds to enter setting mode minutes will begin flashing 2 Press C to increase the digit press D to decrease the digit 3 Press A to set and advance to hour 4 Press C to increase the digit press D to decrease the digit 5 Press B to exit setting mode Note Alarm is automatically turned on when setting is changed CHRONOGRAPH MODE 1 Press A to change to chronograph mode 2 Press C to st...

Page 10: ...ps will be sounded when timer value reaches zero ALARM MODE To set ALARM press and hold B until hour flashes Use C and D Buttons to select hour Press B to advance to minutes Press and hold B to set ALARM mode Press D to toggle alarm ALARM will sound for 20 seconds Press any button to stop ALARM MODE OPERATION BUTTONS A LIGHT B MODE C START SPLIT D RESET STOP TIME OF DAY PRESS ONCE EL CHRONO TOGGLE...

Page 11: ...dition to the preset timers there is one FREE space for the user to set and store a custom timer setting The timer will measure in increments of 1 second Set the countdown timer anywhere between 5 seconds and 9 hours 59 minutes and 59 seconds Upon reaching 0 the countdown timer will reset and begin counting down again automatically keeping track of the number of times it does so with the repeat co...

Page 12: ...nd you may go through and change any of the settings again or press B to EXIT and return to the Options menu REMEMBER if you press and hold B at anytime during the above operation any settings you have made will be saved and you will go back to TIME mode VIEWS Views This module allows for different display views while in TIME mode There are 5 five views total to choose from and once set they will ...

Page 13: ... to next setting value 6 Setting sequence is seconds hour minute year month and date 7 Press D to exit setting mode Note Weekday is automatically updated upon exiting setting mode Note At any point in setting mode press B to toggle 12 24 hour format ALARM MODE 1 Press A to change to alarm mode 2 Press B to toggle alarm chime on off 3 Alarm will sound at preset time for 20 seconds press any pusher ...

Page 14: ... up to 100 laps 3 Press D to display current set press D again to scroll to next set 4 Press and hold D 3 seconds to delete all stored data in the current set Note At any point in recall displays press A to exit and change to alarm mode Alarm Mode 1 Press A to change to alarm mode 2 Press C to toggle alarm on off 3 Press D to toggle alarm 1 alarm 2 Alarm Setting 1 In alarm mode press and hold B 3 ...

Page 15: ...ifference between Time 1 and Time 2 is 23 hours CHRONO MODE Press C to start and stop chronograph Press D to Split Reset the chronograph Press A to recall the memory if Chronograph is stopped Press A again to view the next lap Press C or D to exit Recall mode and go back to Chronograph mode There are a total of 10 lap memories TIMER MODE There are 3 different modes of timer Count Down Stop Count D...

Page 16: ... Setting sequence is seconds minutes hour day month and weekday NOTE When setting the hour H is displayed for 24 hour format A or P for 12 hour format ALARM SETTING 1 From normal time display press A 2 times to enter setting mode hour will begin flashing 2 Press C to adjust setting value 3 Press D to set and advance to minutes 4 Press C to adjust setting value 5 Press A to exit setting mode and re...

Page 17: ...ting mode Hour will begin flashing 2 Press B to advance digit Press and hold B for fast advance 3 Press A to set and advance to next setting value 4 Setting sequence is hour minute month date year 12 24 hour format 5 After the minute has been set the seconds will reset to zero 6 After 12 24 hour format has been selected settings will be saved and the display will automatically return to time displ...

Page 18: ...LAY 1 Press A to change mode Mode sequence is normal time chronograph alarm and time setting 2 Press B for EL 3 Press C to display date 4 Press D to display alarm 5 Press A D to toggle chime on off all days of week will display for on 6 Press C D to toggle alarm on off CHRONOGRAPH MODE 1 Press A to change to chronograph mode 2 Press C to start stop the chronograph 3 Press D to reset to zero NOTE P...

Reviews: