background image

Digi-Pas

®

© 2022 Digipas Technologies Inc. All Rights Reserved.  

www.digipas.com

DWL-1900XY Instruction Manual

 5

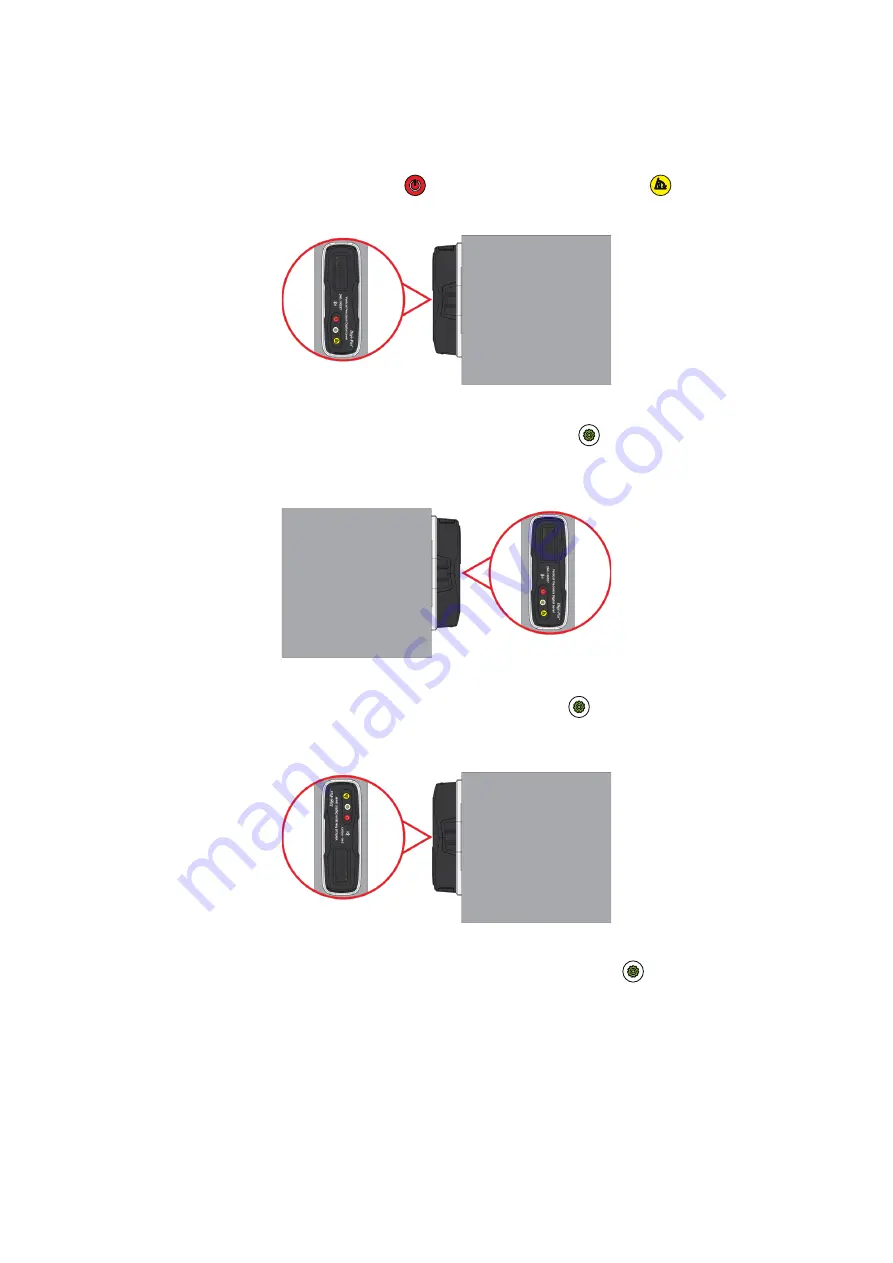
2.5.  Calibration Mode

1.  Turn Off device. Next, Press & Hold   “ON/OFF” button & then   “ALTERNATE ZERO” 

button simultaneously, release both buttons when displays flashing “01”.


2.  Place the device to 

position  1

 (screen upward). Press    “MODE” button once and 

wait until countdown reaches “0”, LCD screen displays flashing “02”.


3.  Place the device to 

position 2

 (screen upward). Press   “MODE” button once again 

and wait until countdown reaches “0”, LCD screen displays flashing “03”.


4.  Turn the device 180° (screen downward) to 

position 3

. Press   “MODE” button once 

again and wait until countdown reaches “0”, LCD screen displays flashing “04”.


Figure 7.  Position 1

Figure 8.  Position 2

Figure 9.  Position 3

Summary of Contents for DWL-1900XY

Page 1: ...ecision Digital Level Model DWL 1900XY www digipas com version 1 11 Note Contents in this instruction manual are continuously updated please check Digi Pas website for the latest version Caution Device is operable on vertical positions only ...

Page 2: ...ge without the prior written consent of Digipas Technologies Inc The information in this manual was correct at the time of printing stored in CD or upload ed in the Company website However Digipas Technologies Inc will continue to improve products and reserves the rights to change specification and maintenance procedures at any time without prior notice Digi Pas Products were manufactured under IS...

Page 3: ... 1 Technical Specification 1 1 2 Device Overview 2 1 3 LED Display Overview 2 1 4 List of items 3 2 OPERATION PROCEDURE 3 2 1 Switching Axis reading 3 2 2 Absolute Level mode 3 2 3 Alternate zero mode 4 2 4 Turn Bluetooth on off 4 2 5 Calibration Mode 5 3 QUESTION AND ANSWER 7 4 WARRANTY 4 1 Limitation of Liability 8 5 FCC STATEMENTS 8 ...

Page 4: ...ntire temperature range Storage Temperature 20 C to 60 C Dimension mm 149 x 51 x 40 Nett Weight Approximate 500 gram Table 1 Technical specification Notes Product specification and appearance are subject to change for product improvement without prior notice Alternative power can be obtained from External USB Power Source Product performance to specification complies with accredited Calibration Te...

Page 5: ...indicator 4 Measurement value 5 Absolute Level mode indicator 6 Alt Zero mode indicator 7 Y Axis direction indicator 8 X Axis direction indicator Figure 2 Overview of the Machinist Level 6 Alternate Zero button Press for Alternate Zero mode Press hold for Absolute level mode 7 Battery cover screw 8 Battery cover 9 Calibration mode buttons simultaneous press 1 2 Device Overview 1 3 LED Display over...

Page 6: ...er up the de vice Take note that the device performance might be affected when a poorly regulated USB power source is used Please ensure batteries are inserted incorrect polarity direction for a device to work 2 1 Switching Axis reading To change display reading value from X to Y axis or vice versa press MODE button the green arrow head signs on left right screen indicate X axis measurement while ...

Page 7: ...oth on off user needs to press hold MODE button until BT icon turns off Figure 6 Bluetooth logo turn off on LED Display Place the device on the surface to be measured Press MODE button to start the measurement and wait until countdown number reaches zero Please ensure the contact surfaces of the device and measuring plane are clean and free from dust particles Next the screen displays 2 turn the d...

Page 8: ...e device to position 1 screen upward Press MODE button once and wait until countdown reaches 0 LCD screen displays flashing 02 3 Place the device to position 2 screen upward Press MODE button once again and wait until countdown reaches 0 LCD screen displays flashing 03 4 Turn the device 180 screen downward to position 3 Press MODE button once again and wait until countdown reaches 0 LCD screen dis...

Page 9: ...eted 6 Verify your calibration result by comparing the measurement value of current posi tion with the device after turning 180 in reverse position If displayed measurement value differs 0 001 the device has not been calibrated properly e g surface unevenness due to rough surfaces or dirt etc Please put a device on smooth sur faces to re calibrate again Figure 10 Position 4 Calibration tutorial vi...

Page 10: ...eadings when placing the device on front facing and then replacing it on the reversed facing Your precision digital level may have been subjected to extreme physical or tempera ture shocks during usage transportation or storage that affected its accuracy An offset value of reading may have been present in the device Digi Pas precision digi tal level has a smart built in feature that allows users t...

Page 11: ... any third party products that are used with the product even if the Company has been advised of the possibility of such loss or damages The Company s total cumulative liability arising from or related to the product whether in contract tort including negligence or otherwise amount ac tually the product Some states and or jurisdictions do or limitation of consequential dam ages apply to you If any...

Page 12: ...iver is connected Consult the dealer or an experienced radio TV technician for help Reorient or relocate the receiving antenna The radiated output power of this device meets the limits of FCC radio frequency expo sure limits Caution Any changes or modifications not expressly approved by the party responsible for compliance to this equipment would void the users authority to operate this device ...

Reviews: