background image

8

Setup and Operation

1.  Hold the meter by its handle grip and point it toward the surface to be  

measured.

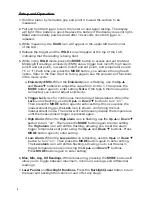
2.  Pull and hold the trigger to turn the meter on and begin testing. The display 

will light if the battery is good. Replace the battery if the display does not light. 

Meter automatically powers down after 10 seconds once the trigger is 

released.

3.  While measuring, the 

SCAN

 icon will appear in the upper left-hand corner  

of the LCD.

4.  Release the trigger and the 

HOLD

 icon will appear at the top of the LCD,  

indicating that the reading is being held.

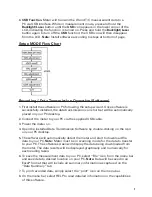
5.  While in the 

HOLD

 mode, press the 

MODE

 button to access and set the Max/

Min/Avg/Dif readings, emissivity (EMS) value, trigger lock (on/off), high alarm 

(on/off and set point), low alarm (on/off and set point), and temperature units 

(°C or °F). Each time you press the 

MODE

 button, you advance through each 

option. Refer to the flow chart on facing page to see the sequence of functions 

in the mode cycle.

a.  

Emissivity (EMS).

 When the 

Emissivity

 icon is flashing, use the 

Up


 

 

and 

Down

 

buttons to adjust the value from 0.10 to 1. Then press the 

MODE 

button again to enter setting. 

Note:

 If the type K thermocouple is 

connected, you cannot adjust emissivity.

b.  

Trigger Lock.

 Use for continuous monitoring of temperatures. When the 

Lock

 icon is flashing, use the 

Up


  or 

Down


  button to turn “on”.  

Then press the 

MODE

 button again to enter setting. Once you press the 

measurement trigger, the 

Lock

 icon is shown, confirming the lock  

measurement mode. The meter will continuously display the temperature 

until the measurement trigger is pressed again.

c.  

High Alarm.

 When the 

High alarm

 icon is flashing, use the 

Up


  or 

Down


button to turn “on”. Then press the 

MODE

 button again to enter setting. 

The 

High alarm

 icon will still be flashing, allowing you to set the alarm  

trigger temperature set point using the 

Up


  and 

Down


  buttons.  Press 

MODE

 button again to enter setting.

d. 

 Low  Alarm.

 When the 

Low alarm

 icon is flashing, use the 

Up


   or 

Down


button to turn “on”. Then press the 

MODE

 button again to enter setting. 

The 

Low alarm

 icon will still be flashing, allowing you to set the alarm  

trigger temperature set point using the 

Up


  and 

Down


  buttons.   

Press 

MODE

 button again to enter setting.

6.  

Max, Min, Avg, Dif Readings.

 While measuring, pressing the 

MODE

 button will 

allow you to toggle between maximum, minimum, average, and differential 

readings.

7.  

Laser Pointer 

and

 Backlight Functions.

 Press the

 Backlight/Laser

 button to turn 

the laser and backlight functions on and off at any stage.

Summary of Contents for 20250-07

Page 1: ...N PRECISION MEASUREMENT Professional Dual Laser Infrared Thermometer with 30 1 Distance to Sight Ratio USB Output Single Type K Input and Temperature Alarm with NIST Traceable Calibration Model 20250...

Page 2: ...ble emissivity temperature differential data Hold Max Min Avg readings and auto power off The meter also supports contact measurement through a type K thermocouple input The instrument is fully tested...

Page 3: ...ouple input Precise noncontact IR measurements Rapid detection function Adjustable emissivity from 0 10 to 1 0 User selectable C or F units Automatic data Hold MAX MIN AVG temperature displays Tempera...

Page 4: ...beam 3 Type K thermocouple input 4 USB computer interface 5 LCD 6 Up button 7 Backlight Laser button 8 Down button 9 MODE button 10 Lens cover with magnetic lock 11 Measurement trigger 12 Battery cov...

Page 5: ...6 Low alarm indicator 7 MAX MIN AVG and DIF icons 8 C and F temperature icons 9 USB icon transmit data to PC 10 Low battery indicator 11 Emissivity or type K temperature readout 12 Type K thermocouple...

Page 6: ...applications organic materials and painted or oxidized surfaces have an emissivity of 0 95 preset in the unit Inaccurate readings will result from measuring shiny or polished metal surfaces To compens...

Page 7: ...Charcoal powder 0 96 Earth 0 92 to 0 96 Lacquer 0 80 to 0 95 Water 0 92 to 0 96 Lacquer matte 0 97 Ice 0 96 to 0 98 Rubber black 0 94 Snow 0 83 Plastic 0 85 to 0 95 Glass 0 90 to 0 95 Timber 0 90 Cer...

Page 8: ...e is connected you cannot adjust emissivity b Trigger Lock Use for continuous monitoring of temperatures When the Lock icon is flashing use the Up or Down button to turn on Then press the MODE button...

Page 9: ...t the meter to your PC via the supplied USB cable 3 Power the meter on 4 Open the installed Data Transmission Software by double clicking on the icon on your PC desktop 5 The software will automatical...

Page 10: ...CD will show Operating temperature 32 to 122 F 0 to 50 C Storage temperature 14 to 140 F 10 to 60 C Weight 17 4 oz 494 g Dimensions 71 2 x 6 x 21 4 18 9 x 15 2 x 5 7 cm Power One 9 V battery Specifica...

Page 11: ...enance Recalibration and Repair Cleaning and Storage The meter should be cleaned with a damp cloth and mild detergent when necessary Do not use solvents or abrasives Store the meter in an area with mo...

Page 12: ...aintenance Recalibration and Repair continued It is recommended that Digi Sense products are calibrated annually to ensure proper function and accurate measurements however your quality system or regu...

Reviews: