background image

Create groups and assign to client IDs

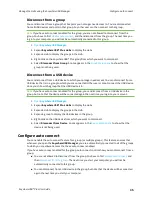
Assign a group to a client ID

AnywhereUSB® Plus User Guide

27

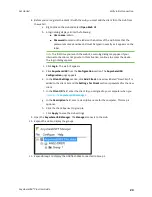
Assign a group to a client ID

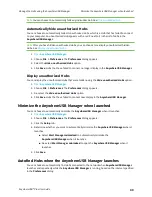
You can assign the groups to a client ID. When the client ID connects to the Hub, the computer can
access all of the ports in the specified groups.

1.

Open the web UI

.

2. Click

AnywhereUSB

from the Configuration section. The

AnywhereUSB Configuration

page

appears.

3. In the client list in the

Client Settings

section, select the client ID to which you want to assign

groups. Information about the selected client ID displays in the

Settings for Client

section.

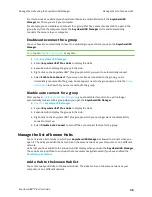
4. Click the check box next to a group to which the computer is allowed access. As you select

groups, the selected group numbers appear in the

Group Access

field in the

Settings for

Client

section.

You can also manually enter group numbers in the

Group Access

field.

5. Click

Apply

to save the changes.

Summary of Contents for AnywhereUSB 2 Plus

Page 1: ...AnywhereUSB Plus User Guide ...

Page 2: ... subject to change without notice and does not represent a commitment on the part of Digi International Digi provides this document as is without warranty of any kind expressed or implied including but not limited to the implied warranties of fitness or merchantability for a particular purpose Digi may make improvements and or changes in this manual or in the product s and or the program s describ...

Page 3: ...group 26 Assign a group to a client ID 27 Connect to a group or USB device in the AnywhereUSB Manager Connect to a group or a USB device in the AnywhereUSB Manager 29 Connect to a group 29 Connect to a USB device 30 Manage the Hubs using the AnywhereUSB Manager Start the AnywhereUSB Manager 33 Rename AnywhereUSB Plus Hubs groups and USB devices 33 Assign a local name to a Hub 33 Assign a local nam...

Page 4: ...us license information 44 Restore AnywhereUSB Manager default configuration 45 Keep the current client ID 45 Change the client ID 45 Access the online help from the AnywhereUSB Manager 46 AnywhereUSB Manager window 46 AnywhereUSB Manager icons and toolbar 46 AnywhereUSB Manager menu options 47 AnywhereUSB Manager Hub menu options 47 AnywhereUSB Manager group menu options 48 AnywhereUSB Manager USB...

Page 5: ... the Hub 70 View system logs 70 View system statistics 70 Configure the time on the Hub 71 Configure time server synchronization 71 Set the server time manually 71 Restore factory default settings from the web UI 72 Reboot the Hub 73 Uninstall the AnywhereUSB Manager 73 View Hub information in Remote Manager Get started with Remote Manager 77 Update the firmware on the Hub from Remote Manager 77 V...

Page 6: ...4 Abbreviating Commands 114 Syntax Conventions 115 116 backup 117 display cloud 118 display device 119 display route 120 display tcp 121 display udp 122 display versions 123 exit 124 factory default 125 findme 126 fwupdate 127 help 128 info ethernet 129 info icmp 130 info ip 131 info tcp 132 info udp 133 newpass 134 quit 135 reboot 136 revert 137 set cloud 139 set ethernet 140 set host 141 set net...

Page 7: ... No remote Hubs found 158 Hide a group in the AnywhereUSB Manager 158 Invalid Hub certificate 159 Services turned off and locked out of the Hub 159 Microsoft Windows restrictions 160 Hubs and virtual machines 160 Hardware Use the Reset button to restore factory defaults 161 Regulatory and safety information Safety warnings 162 ...

Page 8: ...nywhereUSB Plus Hub are described in the table below Role Description Windows Administrator The Windows administrators have the Windows permissions to install the AnyhwhereUSB Manager software on the computer The Administrator can start stop and configure the AnywhereUSB Manager if it is run as a service Hub administrator The Hub administrators have access to the Hub password This enables the admi...

Page 9: ...e client ID This certificate is used to validate your user account with the Hub For more information see Client ID Group A group is a set of USB ports on an AnywhereUSB Plus Hub with exclusive access to a single user account Each USB port can be assigned to only one group by the Hub administrator When you log into the computer and connect to a Hub you are allowed to connect to any groups assigned ...

Page 10: ...you can create groups and assign ports to each group Once this step is complete you can specify the groups that a client ID is allowed to access See Create groups and assign to client IDs 8 Connect to groups Any user Administrator or non Administrator can open the AnywhereUSB Manager and connect to the Hubs and groups to which access is allowed Note If you installed the AnywhereUSB Manager as a se...

Page 11: ...Get started Verify product components AnywhereUSB Plus User Guide 11 n AnywhereUSB 2 Plus components n AnywhereUSB 8 Plus components n AnywhereUSB 24 Plus components ...

Page 12: ...ply kit recommended 1 8 amps per port Digi PN 76000965 n Alternate power supply kits may be used if USB port charging is not required o AC Power Supply US plug to 5 VDC 2 5 mm locking barrel plug 3 A max Digi PN 76000934 o AC Power Supply EU plug to 5 VDC 2 5mm locking barrel plug 3 A max Digi PN 76000935 o AC Power Supply Standard Temperature Universal plugs US EU UK AU to 5 VDC 2 5mm locking bar...

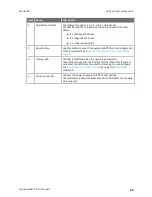
Page 13: ...on to reset the AnywhereUSB Plus Hub configuration to factory defaults See Use the Reset button to restore factory defaults 4 Power LED The LED is solid blue when the device is powered on This LED is also used for the Find Me feature When this feature is activated the LED blinks blue and then orange You can configure the Find Me feature in the web UI or by using the findme CLI command 5 Power conn...

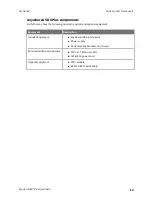
Page 14: ...have the following included required and optional equipment Equipment Description Included equipment n AnywhereUSB 8 port device n Power supply n Rack mounting brackets and screws Required additional equipment n STP Cat 7 Ethernet cable n IEC 60320 power cord Optional equipment n SFP module n RS232 DB9 Console cable ...

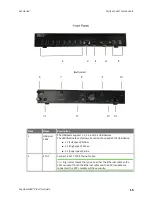
Page 15: ...ces The LED illuminates as follows based on the speed of the USB device n 1 1 Full speed Yellow n 2 0 High speed Green n 3 1 Super speed Blue 2 ETH1 Connect a Cat 7 STP Ethernet cable Note Digi recommends that you use either the Ethernet cable or the SFP module If both the Ethernet cable and the SFP module are connected the SFP module will have priority ...

Page 16: ...When this feature is activated the LED blinks orange and then green You can configure the Find Me feature in the web UI or by using the findme CLI command 5 Power The LED is solid blue when the Hub is powered 5 WWAN1 Signal Reserved for future use 5 WWAN1 Service Reserved for future use 6 BT Reserved for future use 7 Wi Fi1 Reserved for future use 8 Wi Fi2 Reserved for future use 9 Wi Fi3 Reserved...

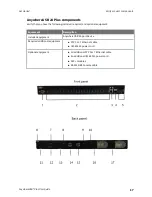
Page 17: ...owing included required and optional equipment Equipment Description Included equipment AnywhereUSB 24 port device Required additional equipment n STP Cat 7 Ethernet cable n IEC 60320 power cord Optional equipment n An additional STP Cat 7 Ethernet cable n An additional IEC 60320 power cord n SFP modules n RS232 DB9 Console cable ...

Page 18: ...e second SFP module is optional and used for redundancy 5 Fan1 The LED shows the status of Fan 1 n Solid green when the fan is running within normal range of use n Solid red if the fan slows down or the Hub is overheating 5 Fan2 The LED shows the status of Fan 2 n Solid green when the fan is running within normal range of use n Solid red if the fan slows down or the Hub is overheating 5 User LED u...

Page 19: ...nstalled on your computer After the manager software installs the AnywhereUSB Manager launches The AnywhereUSB Manager automatically discovers AnywhereUSB Plus Hubs on the local subnet The Windows administrator must perform the software install Prerequisites Before you begin you should decide whether you want to run the AnywhereUSB Manager as a stand alone or as a service For detailed information ...

Page 20: ...n Run AnywhereUSB Plus as a Windows Service Only a Windows administrator is able to open and use the AnywhereUSB Manager If you are not the Windows administrator you are cannot open the AnywhereUSB Manager but you have access to the devices connected to the Hub that are in the groups to which your client ID is assigned See Install AnywhereUSB Manager as a service or stand alone Note If you select ...

Page 21: ... Click OK The AnywhereUSB Manager launches Install AnywhereUSB Manager as a service or stand alone You can choose to install the AnywhereUSB Manager as a stand alone application or as a service Review the sections below for more detailed information Note A Windows Administrator must perform the AnywhereUSB Manager software install Stand alone Install the AnywhereUSB Manager as a stand alone if you...

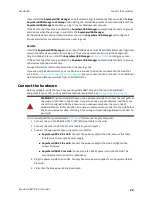
Page 22: ...d but you cannot choose to connect to an additional Hub or device without assistance from an Administrator Connect the hardware Before you begin verify that you have your AnywhereUSB Plus Hub the required additional equipment for your Hub and any additional optional equipment See Verify product components WARNING Digi recommends that you use a private network to connect the computer to the Hub as ...

Page 23: ...solid yellow green or blue depending on whether the USB flash drive is 1 1 2 0 or 3 1 4 If not already open launch the AnywhereUSB Manager 5 Expand AnywhereUSB Plus Hubs to display a list of AnywhereUSB Plus Hubs 6 Verify that the serial number of the Hub is in the list You can find the serial number on the Hub s label 7 You will notice that the Manager is showing the Hub in an error state with a ...

Page 24: ...e device The log in dialog appears c Click Login The web UI appears d Click AnywhereUSB from the Configuration section The AnywhereUSB Configuration page appears e In the Client Settings section click Add Client A new row labeled New Client is added to the client list and the Settings for Client section is populated for the new client f In the Client ID field enter the client ID you assigned to yo...

Page 25: ...Get started Verify initial connection AnywhereUSB Plus User Guide 25 12 Right click on Group 1 and select Connect to Group The USB flash drive is available in Windows ...

Page 26: ...can only be assigned to one group Any unassigned ports are included in the Unassigned row that displays beneath the list of groups If a group has ports assigned to it the group will display in the AnywhereUSB Manager even if a USB device is not connected to a port You can reassign the unused ports in a group so the group does not appear in the AnywhereUSB Manager See Hide a group in the AnywhereUS...

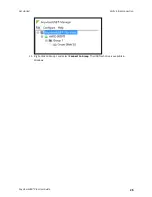
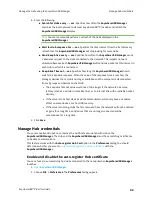
Page 27: ...ection The AnywhereUSB Configuration page appears 3 In the client list in the Client Settings section select the client ID to which you want to assign groups Information about the selected client ID displays in the Settings for Client section 4 Click the check box next to a group to which the computer is allowed access As you select groups the selected group numbers appear in the Group Access fiel...

Page 28: ...Create groups and assign to client IDs Assign a group to a client ID AnywhereUSB Plus User Guide 28 ...

Page 29: ...roup n Connect to a group To connect to a group right click on the group name and click Connect to Group n Connect to a USB ports in a group You can connect to the USB ports in a group depending on whether you are allowed access to the port and if you are connected to the group l If you are connected to the group right click on a USB device name and click Connect to Device You are connected to tha...

Page 30: ...ppears next to the device name and in the Device Status pane to show that the device is being used by you 1 Open the Anywhere USB Manager 2 Expand AnywhereUSB Plus Hubs to display the Hubs 3 Expand a Hub to display the groups in the Hub 4 Expand a group to display the USB devices in the group 5 Right click on the device to which you want to connect 6 The connect menu option available depends on wh...

Page 31: ...Connect to a group or USB device in the AnywhereUSB Manager Connect to a USB device AnywhereUSB Plus User Guide 31 ...

Page 32: ... Manager 33 Rename AnywhereUSB Plus Hubs groups and USB devices 33 Disconnect from a group or USB device 34 Configure auto connect 35 Manage the list of known Hubs 36 Hide an individual Hub 38 Hide all unauthorized Hubs 39 Minimize the AnywhereUSB Manager when launched 40 Autofind Hubs when the AnywhereUSB Manager launches 40 Specify search response and keepalive intervals for a Hub 41 Manage Hub ...

Page 33: ...ur desktop Rename AnywhereUSB Plus Hubs groups and USB devices Each AnywhereUSB Plus Hub and group has a default name that displays in the AnywhereUSB Manager You can also assign a local name to each Hub group or USB device that displays in the AnywhereUSB Manager which can help you to uniquely identify your local Hubs groups and USB devices The local name is local to the computer on which the Any...

Page 34: ...me 4 Right click on the group that you want to rename 5 Select the Assign Local Name menu option A dialog appears 6 Enter a local name for the group 7 Click OK Assign a local name to a USB device You can assign a local name to a USB device that displays in the in the Device Status pane and also in the tree view The local name is local to the computer on which the AnywhereUSB Manager is running 1 O...

Page 35: ...ill own the group that the USB device is in Note If you have auto connect enabled for the group you can disconnect from a USB device in the group but note that the device will be connected again the next time you log in to your account 1 Open AnywhereUSB Manager 2 Expand AnywhereUSB Plus Hubs to display the Hubs 3 Expand a Hub to display the groups in the Hub 4 Expand a group to display the USB de...

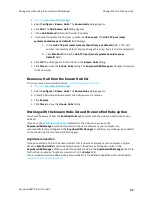
Page 36: ...p name and in the Group Status pane to show that you are connected to the group Disable auto connect for a group After you have enabled auto connect for a group you can disable this option You will no longer automatically connect to this group when you open the AnywhereUSB Manager 1 Open the AnywhereUSB Manager 2 Expand AnywhereUSB Plus Hubs to display the Hubs 3 Expand a Hub to display the groups...

Page 37: ...hereUSB Manager 2 Select Configure Known Hubs The Known Hubs dialog appears 3 From the list of known Hubs select the Hub you want to remove 4 Click Remove 5 Click Close to close the Known Hubs dialog Working with the known Hubs list and the Autofind Hubs option You should be aware of how the Autofind Hubs option works with the Hubs you add to the known Hubs list If you have the Autofind Hubs optio...

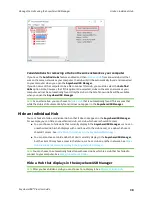
Page 38: ...ll automatically found it does not appear in the AnywhereUSB Manager Hide an individual Hub You can choose to hide an individual Hub so that it does not appear in the AnywhereUSB Manager For example you can hide an unauthorized Hub or a Hub which users shouldn t access n You can choose to hide Hubs that currently display in the AnywhereUSB Manager such as an unauthorized Hub which displays with a ...

Page 39: ...fault field a TCP port number is entered by default You can change this entry but it is not recommended b Click Standard to hide the Hub TCP port most systems should leave at default field 6 Click OK The Hub appears in the Hub list in the Hidden Hubs dialog 7 Click Close to close the Hidden Hubs dialog Display a hidden Hub You can display any Hub that was hidden using the Hide Hub menu option 1 Op...

Page 40: ... Hubs that were hidden using the Hide unauthorized Hubs option 1 Open AnywhereUSB Manager 2 Choose File Preferences The Preferences dialog appears 3 De select the Hide unauthorized Hubs option 4 Click Save Hubs that have failed to connect now display in the AnywhereUSB Manager Minimize the AnywhereUSB Manager when launched You can choose to automatically minimize the AnywhereUSB Manager when it la...

Page 41: ...ind Hubs to automatically find Hubs on the network This is the default n De select Autofind Hubs to ensure that the Hubs are not automatically found In this case you must manually add the Hubs to which you want to connect 5 Click Save Specify search response and keepalive intervals for a Hub You can specify the search and response time for Hubs on the network and the keepalive intervals for the co...

Page 42: ... and the computer is disconnected from all groups and devices on that Hub l The keepalive timeout value would need to be longer if the network has more latency such as a cellular or satellite link or an internet link with unreliable packet delivery l If the value is too short devices will be disconnected which may have an adverse affect on some devices such as USB memory l If the value is too long...

Page 43: ...or the new certificate file and click Open The file should have a pem extension 6 An update message displays in the Manage Hub Credentials dialog 7 Click Close Remove a Hub certificate You can choose to remove a Hub to which you no longer want the AnyhwereUSB Manager to connect After you have removed a Hub certificate if you have the Auto register Hub Cert option selected in the Preferences dialog...

Page 44: ...ages You can view the system message log of the AnywhereUSB Manager events The date and time at which an event occurred is listed as well as the event type and additional information A new log is created each time you start the AnywhereUSB Manager The system message log is used for troubleshooting 1 Open the AnywhereUSB Manager 2 Select Help System Messages The System Messages dialog appears n Cli...

Page 45: ...ttings and keep your currently configured client ID and identity certificate 1 Open the AnywhereUSB Manager 2 Select File Preferences The Preferences dialog appears 3 Click the Setup tab 4 Click Restore default settings A dialog appears 5 Select the Keep Client ID option This is selected by default 6 Click OK The AnywhereUSB Manager closes automatically The next time you launch the AnywhereUSB Man...

Page 46: ...hereUSB Manager menu options You can use the menus associated with the Hubs groups and USB devices to configure local names preferences and connections Right click on a Hub group or device name to display the menus n AnywhereUSB Manager Hub menu options n AnywhereUSB Manager group menu options n AnywhereUSB Manager USB device menu options Click on a Hub group or device name to display information ...

Page 47: ...nto the task bar and the notification area of the task bar Maximizes the AnywhereUSB Manager Minimizes the AnywhereUSB Manager into the notification area of the task bar AnywhereUSB Manager menu options You can use the menu options to view AnywhereUSB Plus Hub information n File Preferences n File Exit n Configure Known Hubs n Configure Hidden Hubs n Configure Manage Hub Credentials n Help System ...

Page 48: ...from Group n Enable Auto Connect n Disable Auto Connect n Assign Local Name AnywhereUSB Manager USB device menu options Right click on a USB device name in the AnywhereUSB Manager to configure and connect to the USB device n Connect to Device n Connect to Group n Disconnect from Device n Assign Local Name AnywhereUSB Manager Hub Status pane When you select an AnywhereUSB Plus Hub in the AnywhereUS...

Page 49: ...in the client list for the Hub The Hub administrator needs to allow each new client ID by adding the client ID to the client list See AnywhereUSB Manager icons and toolbar for more information about the Hub icons Name The name of the Hub supplied by the Hub The default value for the Hub name is the serial number assigned to the Hub You can change the Hub name in the Ethernet Network section of the...

Page 50: ...ou select a group in the AnywhereUSB Manager information about the group displays in the Group Status pane Label Description Group No The group number from the Hub Group Name The name of the group supplied by the Hub By default a group is named Group appended by a consecutive number such as Group 1 Group 2 and so on You can change the group name in the AnywhereUSB screen in the web UI See Create g...

Page 51: ...D at machine name AnywhereUSB Manager Device Status pane When you select a USB device in a group in the AnywhereUSB Manager information about the device displays in the Device Status pane Label Description Vendor Name of the USB device vendor if supplied by the device Product Name of the USB product if supplied by the device Local Name A descriptive local name for the USB device The local name als...

Page 52: ...You are using this device n No one is using this device n In use by client ID at machine name Set Hub preferences In the AnywhereUSB Manager you can set preferences for keepalive time messages and responses and how often the AnywhereUSB Manager searches for a Hub and the Hub response time Click File Preferences to display the Preferences dialog Setup tab n Client ID n Start Manager minimized n Aut...

Page 53: ...a Hub Exit the AnywhereUSB Manager You can log out of the AnywhereUSB Manager close the dialog 1 Open the AnywhereUSB Manager 2 Click File Exit to disconnect all USB devices connected to your computer close all connections and close the AnywhereUSB Manager 3 If you are connected to any USB devices a confirmation dialog appears 4 Click Yes to exit the AnywhereUSB Manager ...

Page 54: ...ent IDs 56 Automatically register or reject unknown clients 60 Rename a Hub and the groups in a Hub 61 View Hub system information 62 Configure the IP address on the Hub 63 Ethernet network bonding 64 Change the Hub password 64 View current connections to the Hub 65 Configure network services 65 Configure the findme feature 66 Configure device identity settings 67 Allow the Hub to connect to Remot...

Page 55: ... situation continue to access the device and a log in dialog appears If your internet connection is private only the log in dialog appears The user name is admin and the default password is located on the label on the bottom of the Hub Note that the password is case sensitive and must be typed in exactly as it appears on the label 5 Configure or maintain the Hub as needed See Administrators Config...

Page 56: ... the client IDs for the computers that are allowed to connect to the Hub You can manually add client IDs or choose to automatically add client IDs to the list Note You can have up to 24 client IDs in the client list The client IDs are assigned to groups of USB ports on the Hub When a computer connects to a group in the AnywhereUSB Manager the computer has access to all of the ports in the group an...

Page 57: ...access The computer can access all of the ports in the specified groups as defined in the Group Settings section Note If needed you can also add additional client IDs to the list 1 Open the web UI 2 Click AnywhereUSB from the Configuration section The AnywhereUSB Configuration page appears 3 In the client list in the Client Settings section select the client ID that you want to configure Informati...

Page 58: ...certificates are exchanged between the computer and the Hub After the initial connection only that computer with the client ID and unique identity certificate is able to connect to the Hub Any other computer with the same client ID will be rejected For information about computers with the same client ID see AnywhereUSB Manager client ID is not unique WARNING After you have manually added a client ...

Page 59: ...for the computer b In the Description field enter a descriptive name for the client ID c Click the check box next to a group to which the computer is allowed access As you select groups the selected group numbers appear in the Group Access field in the Settings for Unknown Clients section Note The Certificate value is Unavailable until certificates have been exchanged between the computer and the ...

Page 60: ...n dialog appears 5 Click OK Automatically register or reject unknown clients In the AnywhereUSB Configuration page you have the choice to automatically register or reject computers that have not previously connected to the Hub The Automatically Register Unknown Clients option is disabled by default meaning that computers that have not previously connected to the Hub are rejected Note Digi recommen...

Page 61: ...n the Group Settings section You can change the groups to which a computer has access in the Client Settings section A user will be able to connect to the Hub in the AnywhereUSB Manager 1 Open the web UI 2 Click AnywhereUSB from the Configuration section The AnywhereUSB Configuration page appears 3 Select the option to automatically add the client ID for an unknown computer to the client list for ...

Page 62: ... have spaces or underscores 4 Click Apply Rename a group You can rename the AnywhereUSB Plus Hub in the AnywhereUSB page in the web UI By default a group is named Group appended by a consecutive number such as Group 1 Group 2 and so on The group name displays in the Group Name field in the Group Status pane in the AnywhereUSB Manager 1 Open the web UI from your selected Hub 2 Click AnywhereUSB fro...

Page 63: ...to IP Auto Private IP Addressing APIPA is a standard protocol that automatically assigns an IP address from a reserved pool of standard Auto IP addresses to the computer on which it is installed If DHCP is enabled or responds later the IP address assigned by DHCP overrides the Auto IP address that was previously assigned Note If the Obtain an IP address automatically using DHCP option is disabled ...

Page 64: ...e Ethernet network connection fails all data is sent from the second Ethernet network connection n Fault Tolerance Active Backup The Hub uses only one of the Ethernet network connections at a time If one Ethernet network connection fails all data is sent from the second Ethernet network connection This is the default 4 Click Apply Change the Hub password You can change the administrator password f...

Page 65: ...e TCP Port information is available on the Network Service Configuration page n Remote Address The IP address of the computer connected to the Hub n Service A description of the service connected to the Hub 3 Click Refresh to update the information in the screen Configure network services You can configure network services options in the Network Service Configuration page All network services opti...

Page 66: ...the security of web data transfers The default TCP Port value is 443 4 Enter the port number in the TCP Port field If you change the port number on this screen you must also change the corresponding port number on your computer 5 Click Apply to apply and save the changes Configure the findme feature You can use the findme feature to cause an LED on the Hub to blink which can help you to identify a...

Page 67: ... The System Configuration page appears 3 Enter the following information n Description An identifying description of the Hub n Contact Any contact information for a person that can manage the Hub such as the administrator name and contact information n Location The physical location of the Hub 4 Click Apply to apply and save the changes Allow the Hub to connect to Remote Manager You can use Digi R...

Page 68: ...red in seconds The default is 60 seconds n Server keepalive interval The interval at which Remote Manager sends a keep alive packet to the Hub if the Remote Manager connection is idle The Hub expects to receive either Remote Manager protocol messages or keep alive packets at the specified frequency The time is measured in seconds The default is 60 seconds n Maximum missed keepalives The number of ...

Page 69: ...anges are applied on top of the current settings for the Hub 1 Open the web UI 2 Click Backup Restore from the Administration section The Backup Restore page appears 3 Click Choose File to select a backup file that you previously saved 4 Click Restore to apply the selected backup file to the Hub Update the firmware You can update the firmware on a Hub from the Update Firmware page Information abou...

Page 70: ...ion The System Message Log File Browser page appears 3 From the Select Log File list box select the log file that you want to view The eventlog txt file is selected by default 4 Click Get File The messages in the log file display in the Messages in Log File section 5 The filters that relate to the log file option you selected appear in the Messages in Log File section All filters are selected by d...

Page 71: ...for the NTP servers is configured by default Note Digi recommends using NTP 1 Open the web UI 2 Click Time in the Configuration section The Time Configuration page appears 3 Select Enable Time Server Synchronization This option is selected by default 4 From the Timezone drop down select the time zone the server is in 5 Click Apply to apply and save the change Set the server time manually You can u...

Page 72: ...tes deletes all Hub and AnywhereUSB Manager keys resets the password for the administrative user and restores the settings to the factory defaults When restoring the Hub to the factory defaults from the web UI you can choose to retain the stored IP configuration which is configured on the Ethernet Network Configuration page Note You can also use the factory default CLI command for all Hub models a...

Page 73: ... 6 You must re deploy the Hub Reboot the Hub You can reboot the Hub if needed For example changes to some Hub settings require saving the changes and rebooting the Hub for the changes to take effect on the Hub Note If the Set Time option is selected in the Time Configuration page and the Hub is rebooted the Set Time option is de selected and the time reverts to the last time stamp that was written...

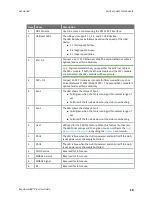
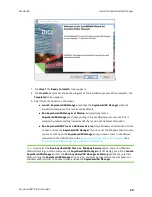
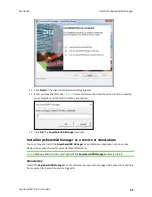
Page 74: ...ort tools b From the Support Downloads section click Drivers c Find and select AnywhereUSB Plus from the product list d Select your AnywhereUSB Plus model e Select and download the appropriate software for your operating system 2 Click on the downloaded software to launch the AnywhereUSB Manager installation wizard The Welcome screen appears 3 Click Next The Program Maintenance screen appears 4 Se...

Page 75: ...uration The configuration settings you have made are retained and re applied the next time you install the AnywhereUSB Manger n Select Remove User Configuration The configuration settings you have made are not retained and removed with the program 7 Click Remove If the AnywhereUSB Manager is open the following dialog displays Do not change the default settings 8 Click OK A progress bar appears 9 W...

Page 76: ...Administrators Configure the AnywhereUSB Plus in the web user interface Uninstall the AnywhereUSB Manager AnywhereUSB Plus User Guide 76 10 Click Finish to complete the uninstall and close the dialog ...

Page 77: ... creating a Remote Manager account and logging in see the Get Started section in the Digi Remote Manager User Guide 2 Add the Hub to the list of devices monitored by Remote Manager For more detailed information about using Remote Manager see the Digi Remote Manager User Guide Update the firmware on the Hub from Remote Manager You can update the firmware on an AnywhereUSB Plus Hub from Remote Manag...

Page 78: ...e toolbar The Home page for the Hub appears View Hub summary dashboard Remote Manager tracks connection history between an AnywhereUSB Plus Hub and Remote Manager You can a graph of the connection information See View Hub connection history for detailed information 1 Log into your Remote Manager account For information about creating a Remote Manager account and logging in see the Get Started sect...

Page 79: ...mote Manager View Hub connection history AnywhereUSB Plus User Guide 79 4 Click Properties in the toolbar The Home page for the Hub appears 5 Click Connection History in the left pane The connection history for the Hub displays ...

Page 80: ...ice you need to be an Administrator n Stand alone If you run the AnywhereUSB Manager as a stand alone you need to be the same user that was logged in during the installation process or an Administrator If you are not an Administrator and you try to configure the AnywhereUSB Manager from a command line with the Run as Administrator option selected the commands will fail AnywhereUSB Plus User Guide ...

Page 81: ...able devices AW02 000001 AW02 000001 local 18574 Group 2 AW02 000001 2 Group 1 AW02 000001 1 In use by you U3 Cruzer Micro AW02 000001 1101 means Autoconnect enabled means Autoconnect inherited Auto Find enabled Autoconnect All disabled AnywhereUSB Manager not running as a service Run the autoconnect clear all command awusbmanager autoconnect clear all Run the list command again to verify that the...

Page 82: ...r a group is the name of the Hub appended by the number of the group In this example the auto connect feature will be disabled for Group 1 so the group name is highlighted below AnywhereUSB Manager below are the available devices AW02 000001 AW02 000001 local 18574 Group 2 AW02 000001 2 Group 1 AW02 000001 1 In use by you U3 Cruzer Micro AW02 000001 1101 In use by you means Autoconnect enabled mea...

Page 83: ... User Guide 83 AW02 000001 AW02 000001 local 18574 Group 2 AW02 000001 2 Group 1 AW02 000001 1 In use by you U3 Cruzer Micro AW02 000001 1101 In use by you means Autoconnect enabled means Autoconnect inherited Auto Find enabled Autoconnect All disabled AnywhereUSB Manager not running as a service ...

Page 84: ...e Examples Run the list command to verify the current state of the auto connect feature for a group and to determine the address for a group In this example Group 2 has the auto connect feature enabled so an asterisk displays next to the group name The auto connect feature is not enabled for Group 1 so an asterisk does not display The address for a group is the name of the Hub appended by the numb...

Page 85: ...elow are the available devices AW02 000001 AW02 000001 local 18574 Group 2 AW02 000001 2 In use by you Group 1 AW02 000001 1 In use by you U3 Cruzer Micro AW02 000001 1101 In use by you means Autoconnect enabled means Autoconnect inherited Auto Find enabled Autoconnect All disabled AnywhereUSB Manager not running as a service ...

Page 86: ... found This option is not required n off Disables the autofind feature When disabled Hubs are not automatically found when AnywhereUSB Manager launches In this case you must manually add the Hubs to which you want to connect to the known Hubs list This option is not required Examples Run the list command to verify the status of the autofind feature In this example the autofind feature is enabled A...

Page 87: ...nning as a service You can run the autofind command again to enable the feature You can specify the on option but it is not required awusbmanager autofind Run the list command again to verify AnywhereUSB Manager below are the available devices AW02 000001 AW02 000001 local 18574 Group 2 AW02 000001 2 In use by you Group 1 AW02 000001 1 In use by you U3 Cruzer Micro AW02 000001 1101 means Autoconne...

Page 88: ... connected to the group that the device you want to connect to is in In this example the device is in Group 1 so you should be connected to Group 1 You will need the address for device to which you want to connect AnywhereUSB Manager below are the available devices AW02 000001 AW02 000001 local 18574 Group 2 AW02 000001 2 In use by you Group 1 AW02 000001 1 In use by you U3 Cruzer Micro AW02 00000...

Page 89: ...Configure the AnywhereUSB Manager from the command line connect device AnywhereUSB Plus User Guide 89 Autoconnect All disabled AnywhereUSB Manager not running as a service ...

Page 90: ... to Group 1 AnywhereUSB Manager below are the available devices AW02 000001 AW02 000001 local 18574 Group 2 AW02 000001 2 In use by you Group 1 AW02 000001 1 U3 Cruzer Micro AW02 000001 1101 means Autoconnect enabled means Autoconnect inherited Auto Find enabled Autoconnect All disabled AnywhereUSB Manager not running as a service Run the connect group command awusbmanager connect group AW02 00000...

Page 91: ...SB Manager below are the available devices AW02 000001 AW02 000001 local 18574 Group 2 AW02 000001 2 In use by you Group 1 AW02 000001 1 In use by you U3 Cruzer Micro USB stick 1 AW02 000001 1101 In use by you means Autoconnect enabled means Autoconnect inherited Auto Find enabled Autoconnect All disabled AnywhereUSB Manager not running as a service Run the device info command awusbmanager device ...

Page 92: ...u Group 1 AW02 000001 1 In use by you U3 Cruzer Micro AW02 000001 1101 means Autoconnect enabled means Autoconnect inherited Auto Find enabled Autoconnect All disabled AnywhereUSB Manager not running as a service Run the device name command awusbmanager device name AW02 000001 1101 USB Stick Run the list command again to verify the name change AnywhereUSB Manager below are the available devices AW...

Page 93: ...ddress of the device from which you want to disconnect Examples Run the list command to view the address for device from which you want to disconnect AnywhereUSB Manager below are the available devices AW02 000001 AW02 000001 local 18574 Group 2 AW02 000001 2 In use by you Group 1 AW02 000001 1 In use by you U3 Cruzer Micro AW02 000001 1101 In use by you means Autoconnect enabled means Autoconnect...

Page 94: ...want to connect Make sure that auto connect is disabled for the group When it is disabled an asterisk does not display next to the group name If you need to disable auto connect for the group see autoconnect clear group AnywhereUSB Manager below are the available devices AW02 000001 AW02 000001 local 18574 Group 2 AW02 000001 2 In use by you Group 1 AW02 000001 1 In use by you U3 Cruzer Micro AW02...

Page 95: ...Configure the AnywhereUSB Manager from the command line disconnect group AnywhereUSB Plus User Guide 95 Autoconnect All disabled AnywhereUSB Manager not running as a service ...

Page 96: ...igure the AnywhereUSB Manager from the command line exit AnywhereUSB Plus User Guide 96 exit Purpose Shuts down the service If the AnywhereUS Manager is open it is shut down as well Syntax awusbmanager exit ...

Page 97: ...etermine the group s address AnywhereUSB Manager below are the available devices AW02 000001 HUB 000001 AW02 000001 local 18574 Group 2 Admin group AW02 000001 2 In use by you Group 1 AW02 000001 1 In use by you U3 Cruzer Micro AW02 000001 1101 means Autoconnect enabled means Autoconnect inherited Auto Find enabled Autoconnect All disabled AnywhereUSB Manager not running as a service Run the group...

Page 98: ... Group 1 AW02 000001 1 In use by you U3 Cruzer Micro AW02 000001 1101 means Autoconnect enabled means Autoconnect inherited Auto Find enabled Autoconnect All disabled AnywhereUSB Manager not running as a service Run the group name command awusbmanager group name AW02 000001 2 New Group Run the list command again to verify the name change AnywhereUSB Manager below are the available devices AW02 000...

Page 99: ... address is the address of the Hub that you want to hide The port is the TCP port number for the Hub you want to hide This is required if the TCP port number is not the default 18574 Examples Run the hidden hub add command to add a Hub to the hidden Hub list n Use the default port of 18574 awusbmanager hidden hub add 10 10 10 34 n Change the TCP port number awusbmanager hidden hub add 10 10 10 56 ...

Page 100: ...d X next to the Hub name or a Hub which users shouldn t access n You can also choose to hide Hubs that don t currently display in the AnywhereUSB Manager but the client ID may have access in the future such as a Hub on another network Note For information on hiding Hubs in the AnywhereUSB Manager see Hide an individual Hub and Hide all unauthorized Hubs Syntax awusbmanager hidden hub list Examples...

Page 101: ...t number is not the default 18574 Examples Run the hidden hub list command to verify the address and port number of the Hub that you want to remove 10 10 10 21 18574 10 10 10 34 18574 10 10 10 56 5600 Run the hidden hub remove command n If the TCP port number is the default entering the port number in the command is optional awusbmanager hidden hub remove 10 10 10 34 n If the TCP port number is no...

Page 102: ...the Hubs in the hidden Hubs list Syntax awusbmanager hidden hub remove all Examples Run the hidden hub list command to view the list of hidden Hubs 10 10 10 12 18574 10 10 10 14 18574 10 10 10 15 5600 Run the hidden hub remove all command awusbmanager hidden hub remove all Run the hidden hub list command again to verify that the Hubs have been removed ...

Page 103: ...Configure the AnywhereUSB Manager from the command line help AnywhereUSB Plus User Guide 103 help Purpose Displays a list of the CLI commands for the AnywhereUSB Manager Syntax awusbmanager help ...

Page 104: ...ou Group 1 AW02 000001 1 In use by you U3 Cruzer Micro AW02 000001 1101 means Autoconnect enabled means Autoconnect inherited Auto Find enabled Autoconnect All disabled AnywhereUSB Manager not running as a service Run the hub info command awusbmanager hub info AW02 000001 Information about the Hub displays NAME AW02 000001 LOCALNAME HUB 000001 MODEL AnywhereUSB 2 Plus VERSION 3 0 0 54 awusb dby 3 ...

Page 105: ...000001 AW02 000001 local 18574 Group 2 AW02 000001 2 In use by you Group 1 AW02 000001 1 In use by you U3 Cruzer Micro AW02 000001 1101 means Autoconnect enabled means Autoconnect inherited Auto Find enabled Autoconnect All disabled AnywhereUSB Manager not running as a service Run the hub name command awusbmanager hub name AW02 000001 Hub 1 Run the list command again to verify the local name Anywh...

Page 106: ...nown hub add address port The address is the address of the Hub or a Hub hostname that can be resolved by your network nameservers This is required The port is the TCP port number which is 18574 by default You can change the TCP port number if needed Examples Add a known Hub Run the known hub add command to add a Hub to the known Hub list n Use and address and the default port of 18574 awusbmanage...

Page 107: ...rpose Displays a list of Hubs that have been added to the known Hubs list Note For more information about known Hubs see Manage the list of known Hubs Syntax awusbmanager known hub list Examples Run the known hub list command awusbmanager known hub list A list of known Hubs is returned 10 10 10 50 18574 10 10 10 12 18574 ...

Page 108: ... the Hub you want to remove This is required if the TCP port number is not the default 18574 Examples Run the known hub list command to verify the address and port number of the Hub that you want to remove 10 10 01 12 18574 10 10 01 14 18574 10 10 01 15 5600 Run the known hub remove command n If the TCP port number is the default entering the port number in the command is optional awusbmanager kno...

Page 109: ...l the Hubs in the known Hubs list Syntax awusbmanager known hub remove all Examples Run the known hub list command to view the list of known Hubs 10 10 01 12 18574 10 10 01 14 18574 10 10 01 15 5600 Run the known hub remove all command awusbmanager known hub remove all Run the known hub list command again to verify that the Hubs have been removed ...

Page 110: ... the auto find feature enabled or disabled n Status of the auto connect all feature enabled or disabled n Specifies whether the AnywhereUSB Manager is running as a service Syntax awusbmanager list Examples This example shows one Hub AW02 000001 On the Hub Group 1 has the auto connect feature enabled as specified by the asterisk next to the group name AnywhereUSB Manager below are the available dev...

Page 111: ...all feature enabled or disabled n Specifies whether the AnywhereUSB Manager is running as a service Syntax awusbmanager list full Examples Run the list full command awusbmanager list full The example below shows the Hub on the network and the groups and devices on that Hub Information about the Hub group and device is also returned AnywhereUSB Manager below are the available devices AW08 D00001 10...

Page 112: ...00001 1 In use by you ADDRESS AW08 D00001 1 GROUP 1 NAME Group 1 PORTS 1 2 3 4 AUTOCONNECT enabled IN USE BY YOU USB DISK 3 0 AW08 D00001 1803 In use by you ADDRESS AW08 D00010 1803 VENDOR VENDOR ID 0x13fe PRODUCT USB DISK 3 0 PRODUCT ID 0x6300 SERIAL 070A00376967E000 AUTOCONNECT inherited IN USE BY YOU means Autoconnect enabled means Autoconnect inherited Autofind disabled Autoconnect All disable...

Page 113: ... 117 display cloud 118 display device 119 display route 120 display tcp 121 display udp 122 display versions 123 exit 124 factory default 125 findme 126 fwupdate 127 help 128 info ethernet 129 info icmp 130 info ip 131 info tcp 132 info udp 133 newpass 134 quit 135 reboot 136 revert 137 set cloud 139 set ethernet 140 set host 141 set network 142 set service 144 set system 146 set time 147 set usbc...

Page 114: ...ord n user ID admin n password The default password is found on the label of your Hub Note If you are unable to log in to your Hub see Use the Reset button to restore factory defaults for instructions on restoring the default password 3 After you have successfully accessed the command line the prompt is displayed Abbreviating Commands You can abbreviate all commands by typing enough letters to uni...

Page 115: ...erial n Braces surround entries that require you to chose one of several options which are separated by the vertical bar n Non italicized text indicates literal values that is options or values that must be typed exactly as they appear Yes and no options are examples of literals n Italicized text indicates that a type of information is required in that option For example filename means that the na...

Page 116: ...ault findme fwupdate exit help info newpass quit reboot revert set show who Display options for the set command set syntax set options cloud host network service system time usbclient usbgroup Display options for the net command set net syntax set network options options globalsettings ip ipaddr submask subnet mask gateway gateway ipaddr dhcp on off dns1 primary dns server ipaddr dns2 secondary dn...

Page 117: ...pecified TFTP server and filename A local file for filename may be selected by specifying local as the serveripaddress value If a filename is not specified the command uses the default filename of backup cfg from serveripaddress filename Restores the configuration file from the specified TFTP server and filename A local file for filename may be selected by specifying local as the serveripaddress v...

Page 118: ...ays the status of the connection to Remote Manager Syntax display cloud Examples display cloud Device Type AnywhereUSB 2 Plus Device ID 00000000 00000000 00409DFF FF3C5C05 Status Connected to 52 73 177 207 3199 from 10 10 12 14 48288 Server remotemanager digi com Connection Type Device initiated Connection Method TCP SSL ...

Page 119: ...splay device AnywhereUSB Plus User Guide 119 display device Purpose Displays general product information This information can also be displayed in the web UI For more information see Configuration and Management web user interface Syntax display device ...

Page 120: ...s User Guide 120 display route Purpose Displays Route Table entries Syntax display route Examples display route Kernel IP routing table Destination Gateway Genmask Flags Metric Ref Use Iface 0 0 0 0 10 10 12 1 0 0 0 0 UG 10 0 0 eth0 10 10 12 0 0 0 0 0 255 255 255 0 U 0 0 0 eth0 ...

Page 121: ... Internet connections only servers Proto Recv Q Send Q Local Address Foreign Address State tcp 0 0 0 0 0 0 18574 0 0 0 0 LISTEN tcp 0 0 0 0 0 0 80 0 0 0 0 LISTEN tcp 0 0 0 0 0 0 22 0 0 0 0 LISTEN tcp 0 0 0 0 0 0 443 0 0 0 0 LISTEN tcp6 0 0 22 LISTEN Active Internet connections w o servers Proto Recv Q Send Q Local Address Foreign Address State tcp 0 0 10 10 12 14 48288 52 73 177 207 3199 ESTABLISH...

Page 122: ...des current UDP information Syntax display udp Examples disp udp Active Internet connections only servers Proto Recv Q Send Q Local Address Foreign Address State udp 0 0 0 0 0 0 5353 0 0 0 0 udp 0 0 127 0 0 1 323 0 0 0 0 udp 0 0 0 0 0 0 43850 0 0 0 0 udp6 0 0 1 323 Active Internet connections w o servers Proto Recv Q Send Q Local Address Foreign Address State ...

Page 123: ...Configure the AnywhereUSB Plus Hub from the CLI display versions AnywhereUSB Plus User Guide 123 display versions Purpose Displays EOS firmware version information Syntax display versions ...

Page 124: ...Configure the AnywhereUSB Plus Hub from the CLI exit AnywhereUSB Plus User Guide 124 exit Purpose Logs you out of the Hub Syntax exit ...

Page 125: ...nd AnywhereUSB Manager keys resets the password for the administrative user and restores the settings to the factory defaults After the Hub reboots you must re deploy the Hub Note You can also restore the Hub to the factory default settings from the web UI and the Reset button on the Hub The Reset button has the same action as the factory default command However if you restore the Hub to the facto...

Page 126: ... n AnywereUSB 8 Plus and AnywhereUSB 24 Plus When enabled the user LED blinks green then orange Note You can also configure this feature on the Find Me page in the web UI Syntax findme option Options enable on off Causes the Locator LED to blink or stop blinking on Causes the Locator LED to blink off Causes the Locator LED to stop blinking Examples Display the current state of the Locator LED find...

Page 127: ...plete Syntax fwupdate host filename A local file for filename may be selected by specifying local as the host value The host is the literal local or a hostname or IP Address of the TFTP host that can serve this file Example Load new firmware from local file update bin fwupdate local update bin Load new firmware from locale file AW08_firmware_A bin fwupdate 1 2 3 4 AW08_firmware_A bin ...

Page 128: ...lp command Example help backup display factory default findme fwupdate exit help info newpass quit reboot revert set show who help set syntax set options cloud host network service system time usbclient usbgroup help set net syntax set network options options globalsettings ip ipaddr submask subnet mask gateway gateway ipaddr dhcp on off dns1 primary dns server ipaddr dns2 secondary dns server ipa...

Page 129: ...e statistics are useful in understanding how the Hub is operating and can be helpful in finding problems In particular if an error counter is found to be increasing there may be a problem with the Hub To reset the statistics reboot the device Syntax info ethernet Examples info eth Ethernet Statistics Bytes Received 49094876 Bytes Sent 177210984 Unicast Packets Received 325217 Unicast Packets Sent ...

Page 130: ... by rebooting the Hub and include data event and error counts These statistics are useful in understanding how the Hub is operating and can be helpful in finding problems In particular if an error counter is found to be increasing there may be a problem with the Hub To reset the statistics reboot the device Syntax info icmp Example info icmp ICMP Statistics Datagrams Received 0 Datagrams Sent 0 Re...

Page 131: ...Internet Protocol IP activity To reset the statistics reboot the device Syntax info ip Example info ip IP Statistics Datagrams Received 201797 Datagrams Sent 54487 Header Errors Received 0 Datagrams Forwarded 0 Address Errors Received 10 Send No Route 0 Unknown Protos Received 0 Send Discarded 0 Received Discarded 0 Fragments Created 0 ...

Page 132: ... event and error counts These statistics are useful in understanding how the Hub is operating and can be helpful in finding problems In particular if an error counter is increasing there may be a problem with the Hub To reset the statistics reboot the device Syntax info tcp Example info tcp TCP Statistics Segments Received 94106 Segments Sent 147569 Currently Established 2 Segments Retransmitted 2...

Page 133: ...us User Guide 133 info udp Purpose Displays statistics for User Datagram Protocol UDP communications activity To reset the statistics reboot the device Syntax info udp Example info udp UDP Statistics Datagrams Received 13877 Datagrams Sent 2665 Receive Errors 0 No Ports 0 ...

Page 134: ...anges administrator password for the Hub You can also change the password in the web UI See Change the Hub password Syntax newpass You are asked for the current password the new password and then to repeat new password Examples newpass changing password for user admin current password new password repeat new password ...

Page 135: ...Configure the AnywhereUSB Plus Hub from the CLI quit AnywhereUSB Plus User Guide 135 quit Purpose Logs you out of the Hub Syntax quit Example quit ...

Page 136: ...he Hub Note You can also reboot the Hub from the web UI See Reboot the Hub Syntax reboot Wait approximately 15 seconds for the reboot to complete When the reboot is complete all the LEDs turn on and then turn off leaving the power LEDs on For the AnywhereUSB 24 Plus model one or both of the power LEDs will be on ...

Page 137: ... names Reverts these network settings see set network n Ethernet settings configured by the set ethernet command n Network settings configured by the set network command revert network all Reverts settings for all interfaces to default settings revert network globalsettings Reverts the global network settings See set network for details on these options revert network interface comma separated lis...

Page 138: ...Configure the AnywhereUSB Plus Hub from the CLI revert AnywhereUSB Plus User Guide 138 usbgroup Reverts to the groups to the default group list ...

Page 139: ...d in seconds rxkeepalive 5 7200 seconds Specify the interval at which the Hub sends a keep alive packet to Remote Manager if the Remote Manager connection is idle Remote Manager expects to receive either Remote Manager protocol messages or keep alive packets at the specified interval The time is measured in seconds txkeepalive 5 7200 seconds Specify the interval at which the Remote Manager registe...

Page 140: ...eb UI See Ethernet network bonding Syntax set ethernet option Option bonding active backup balance rr active backup The Hub uses only one of the Ethernet network connections at a time If one Ethernet network connection fails all data is sent from the second Ethernet network connection balance rr The Ethernet network connection alternates between the two ports as the Hub sends data If one Ethernet ...

Page 141: ...r the device set host name name Display the current host name set host Options name name The name for the Hub If provided this host name is placed in the DHCP Option 12 field when the device is configured as a DHCP client by set network and requests IP configuration from a DHCP server This is an optional setting that is only used when DHCP is enabled The name can be up to 32 characters long and ca...

Page 142: ...o an outside network unless controlled by another route and the device s use of Domain Name Server DNS ip ipaddr Sets the device IP address when DHCP is off submask subnet mask Sets the device subnet mask address when DHCP is off gateway gateway ip address Sets the network gateway IP address The following three IP address options have a precedence That is if all three options are turned on the ord...

Page 143: ...eUSB Plus Hub from the CLI set network AnywhereUSB Plus User Guide 143 Examples Manually set the device IP address set network ip 10 0 0 1 gateway 255 255 255 0 submask 255 255 255 0 dhcp off Enable DHCP set network dhcp on ...

Page 144: ...ce to which the rest of the command s options apply This range varies among Digi devices Enter set service to display the index numbers for the network services on your Digi device state on off Used to enable or disable a given network service ipport network port Used to change the network port on which a given network service listens Supported network services The following table shows the networ...

Page 145: ...Shell service Allows users secure access to log in to the Digi device and access the command line interface AnywhereUSB MDNS The MDNS port is not configurable Examples Disable HTTP set service range 4 state off Change the network port ipport of a service set service range 4 ipport 500 Displaying the service table In this example the set service command displays the entire service table set service...

Page 146: ...isplay system identifying information set system Options description string A description of this device The maximum length is 64 characters The default is blank description field location string The location of this device The maximum length is 64 characters The default is blank location field contact string The contact for this device The maximum length is 64 characters The default is blank cont...

Page 147: ...rce time and date are also local to the device but they are meaningful because they are persistent On a device with a configured clock source time and date received from a clock source are expected to be UTC Syntax set time options Options time hh mm ss hh mm The time Hours can range from 00 to 23 minutes can range from 00 to 59 and seconds can range from 00 to 59 If omitted all default to 00 date...

Page 148: ...Configure the AnywhereUSB Plus Hub from the CLI set time AnywhereUSB Plus User Guide 148 Set the date and time to 2 15 PM April 3 2008 set time time 14 15 date 04 03 08 ...

Page 149: ...Options Use these options to add a client ID to the client list index 1 24 Specify the client index id string Specify the client ID for the computer description string Specify a descriptive name for the computer groups list Specify the groups this client ID can access Use these options to register or reject unknown clients autoreg on off Determine whether unknown clients should be registered autor...

Page 150: ...Configure the AnywhereUSB Plus Hub from the CLI set usbclient AnywhereUSB Plus User Guide 150 Automatically register unknown clients set usbclient index 3 autoreg on ...

Page 151: ...ports are selected in the Unassigned row that displays beneath the list of groups You can also do this in the web UI See Create groups and assign ports to the group Syntax set usbgroup option Options group 1 24 ports list Specify group number to change and a single port or a range of ports to assign to this group Note Ports can only be assigned to one group at a time If a port is assigned to a new...

Page 152: ...tings in the device to show for example show time The following table shows the options can be specified options Lists any additional options which depend on the settings group Throughout these descriptions the following descriptions apply to the port and range options port range Identifies a particular serial port Optional on a single port device range range A configuration table entry or range o...

Page 153: ...tions who ID Local address Remote address Service 1 10 10 12 14 18574 10 10 12 19 57536 AnywhereUSB 2 10 10 12 14 18574 10 10 12 16 37298 AnywhereUSB 3 10 10 12 14 18574 10 10 12 11 50217 AnywhereUSB 4 10 10 12 14 18574 10 10 12 12 34844 AnywhereUSB 5 10 10 12 14 22 10 10 12 16 37301 Command line 6 10 10 12 14 60348 52 73 177 207 3199 Remote manager 7 10 10 12 14 18574 10 10 12 28 37324 AnywhereUS...

Page 154: ...deploy a new Hub see Get started 1 If you are re deploying a Hub remove the Hub from the network 2 Make a connection between the Hub and each computer that should be allowed to connect to the Hub a Connect the hardware b Verify initial connection AnywhereUSB Plus User Guide 154 ...

Page 155: ...their user account the computer is able to connect to the Hubs that recognize that client ID Create a client ID during initial launch of the AnywhereUSB Manager The AnywhereUSB Manager can be initially opened by a user in one of the following ways n Installation When the AnywhereUSB Plus Hub software is installed the Launch AnywhereUSB Manager option is selected by default When the installation co...

Page 156: ...n some cases multiple computers may inadvertently use the same client ID When this occurs and computers with the same client ID attempt to connect with the same Hub the first computer to associate itself with the Hub will be able to connect to the Hub Subsequent computers will not be able to connect that Hub If you discover that multiple computers are assigned the same client ID see AnywhereUSB Ma...

Page 157: ...visit our Knowledge Base at knowledge digi com AnywhereUSB Manager client ID is not unique 158 No remote Hubs found 158 Hide a group in the AnywhereUSB Manager 158 Invalid Hub certificate 159 Services turned off and locked out of the Hub 159 Microsoft Windows restrictions 160 Hubs and virtual machines 160 AnywhereUSB Plus User Guide 157 ...

Page 158: ...DP port 5353 n Check for a link light on the Ethernet port If the link light is not lit connect all of the Hubs to switches using network cables n Verify that the Autofind Hubs option is selected in the Preferences dialog in the AnywhereUSB Manager Start the Manager and choose File Preferences to open the dialog n Connect the Hub directly to the host computer n Some anti virus software might block...

Page 159: ...uto register Hub Cert option in the Preferences dialog is not selected you can manually add the Hub to the Manage Hub Credentials list After it is added the AnywhereUSB Manager gets a new certificate for the Hub on the next connection attempt Note The Hub must be on a secure network before you manually add the Hub to the Manage Hub Credentials list or if you remove the certificate and a new one is...

Page 160: ...ereUSB Plus Hub on the network and a web camera is connected to a port on the Hub Laptop A is able to see the video feed from the camera A user on laptop B can use Microsoft Remote Desktop to gain access to laptop A In this situation the video feed for both laptop A and laptop B is restricted by Windows and neither user can view the video feed from the web camera Hubs and virtual machines Hubs may...

Page 161: ...e the Hub to the factory default settings from the web UI and the factory default CLI command The Reset button has the same action as the factory default command However if you restore the Hub to the factory defaults from the web UI you have the option to retain the IP address configuration option After you restore the factory defaults on a Hub none of the existing AnywhereUSB Managers will be abl...

Page 162: ...children are likely to be present n This is equipment is suitable for installation in Information Technology Rooms in accordance with Article 645 of the National Electrical Code and NFPA 75 n Use certified and rated Laser Class I Optical Transceiver product n Ensure that the power cord is connected to a socket outlet with earthing connection n Never open the equipment For safety reasons the equipm...

Page 163: ...bles d être présents n Convient pour l installation dans les salles informatiques conformément à l article 645 du code national de l électricité et à la norme NFPA 75 n Utilisez un produit émetteur récepteur optique laser de classe I certifié et évalué n Veillez à connecter le cordon d alimentation à une prise de courant avec mise à la terre n Ne jamais ouvrir l équipement Pour des raisons de sécu...

Reviews: