background image

Pro Tools AVoption|V10 and Media Station|V10 Guide

56

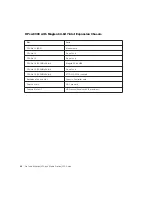
HP xw8000 with Magma 64-bit 7-Slot Expansion Chassis

Slot

Card

CPU Slot 1 (AGP)

Monitor card

CPU Slot 2

Do not use

CPU Slot 3

Do not use

CPU Slot 4 (133MHz 64-bit)

Magma 64-bit HBA

CPU Slot 5 (100MHz 64-bit)

Do not use

CPU Slot 6 (100MHz 64-bit)

ATTO 3300FC or unused 

Backplane Chassis Slot

Chassis Controller card

Chassis Slot 1 

HD Core card

Chassis Slots 2–7

HD Process/Accel cards (6 maximum)

Summary of Contents for AVoption V10

Page 1: ...echnical Support USA tel 650 731 6100 fax 650 731 6384 Product Information USA tel 650 731 6102 tel 800 333 2137 International Offices Visit the Digidesign Web site for contact information Web Site www digidesign com Pro Tools AVoption V10 and Media Station V10 Guide Version 6 3 for HD Systems on Windows ...

Page 2: ...uplicated in whole or in part without the written consent of Digidesign DIGIDESIGN AVID and PRO TOOLS are trademarks or registered trademarks of Digidesign and or Avid Technology Inc All other trademarks are the property of their respective owners Product features specifications system requirements and availability are subject to change without notice PN 910612411 00 REV A 03 04 ...

Page 3: ...igned to provide reasonable protection against harmful interference when the equipment is operated in a commercial environment This equipment generates uses and can radiate radio frequency energy and if not installed in accordance with the instruction manual may cause harmful interference to radio communications Operation of this equipment in a residential area is likely to cause harmful interfere...

Page 4: ...A Avid Equinox Break Out Box Avid DS Avid Xpress Avid Xpress DV Film Composer Media Composer MediaDock 2 MediaDock LVD MediaDrive MediaRAID MEDIArray MEDIArray Drive MEDIArray II MEDIArray II Drive Meridien I O box NewsCutter NewsCutter DV NewsCutter XP Pro Tools AVoption V10 Symphony Products for the Mac OS X Operating System Avid Adrenaline DNA Avid Xpress Avid Xpress DV Film Composer Media Comp...

Page 5: ...press DV Film Composer Media Composer MediaDock 2 MediaDock LVD MediaDrive MediaRAID MEDIArray MEDIArray Drive MEDIArray II MEDIArray II Drive Meridien I O box Pro Tools AVoption V10 or Symphony configuration 3 Products for the UNIX Operating System products were tested in an AirPlay or VideoSPACE configuration 4 Products for MediaNetwork and Workgroups products were tested in a typical Avid ProEn...

Page 6: ......

Page 7: ...e Capabilities 5 AVoption V10 Interface 6 Synchronization Hardware 9 Chapter 3 Installing AVoption V10 11 Uninstalling Pro Tools Software 11 Installing Pro Tools Hardware 12 Installing AVoption V10 Hardware 12 Installing Media Station V10 Software 15 Installing Pro Tools Software 16 Installing AVoptionDNA Software Components 17 Starting Up Your System 17 Authorizing Media Station V10 17 Authorizin...

Page 8: ...lips Sequences and Media 44 Chapter 5 Pro Tools Movie Track 45 Avid Movie Track in Pro Tools 45 Movie Track Options 45 Exporting Files from Avid Programs 46 Adding Video Clips 47 Undo Redo for Video Editing Commands 47 Movie Online 48 Movie Offline 48 Viewing Video Playback 48 Moving the Movie Track or Video Clips 48 Copying Video Clips 49 Clearing Selected Video Clips 50 Locking the Movie Track 5...

Page 9: ...les AC Power cable Pro Tools Installer CD ROM including Pro Tools TDM software AVoption V10 software components Avid Media Station V10 Installer CD ROM Avid Media Station V10 application key DigiTranslator 2 0 iLok License Card Pro Tools AVoption V10 Capabilities Pro Tools with AVoption V10 lets you Import and play back Avid video on the Pro Tools Movie track with near sample accu rate precision a...

Page 10: ...k Avid Unity MediaNet work provides integrated high speed network storage systems for Avid and Pro Tools worksta tions For detailed information on configuring your Pro Tools system with AVoption V10 as an Avid Unity MediaNetwork client see the Pro Tools Client Avid Unity MediaNetwork Guide Also re fer to the Avid Unity compatibility pages of the Digidesign Web site www digidesign com com pato as w...

Page 11: ...ified by Digidesign such as the HP xw8000 a SCSI HBA is not required The audio drives and the video drives should each be connected to separate SCSI channels For more information see Set ting Up Local Storage on page 19 Fibre Channel Host Bus Adapter HBA for Avid Unity MediaNetwork On Windows systems AVoption V10 is only qualified with the Nvidia Quadro 4 980 XGL AGP monitor card which re quires N...

Page 12: ...Acrobat Reader included on the Pro Tools In staller CD ROM Conventions Used in This Guide Digidesign guides use the following conven tions to indicate menu choices and key com mands The following symbols are used to highlight im portant information Convention Action File Save Session Choose Save Session from the File menu Control N Hold down the Control key and press the N key Control click Hold d...

Page 13: ...g for NTSC 23 976p and NTSC 24p projects DV25p 420 DV25 progressive scan at 4 2 0 sampling for PAL 25p and PAL 24p projects The oldest class of ABVB files ABVB MSM files are not supported in Pro Tools or Media Station V10 These files were cre ated with versions of Media Composer ear lier than 7 0 and do not have the omf ex tension At the time of this writing IMX video files are supported in Media ...

Page 14: ...goes through a power on self test POST The front panel of the AVoption V10 breakout box provides the following LED indicators HD Yellow Is currently non functional SD Green Lights when Standard Definition SD codec selected DV Yellow Lights when DV input is selected in Media Station V10 software NTSC Yellow Lights when an NTSC project is selected PAL Green Lights when a PAL project is se lected Ref...

Page 15: ... Y component input BNC connector Connects to ana log video output of decks 3 COMPONENT R Y IN Video R Y component input BNC connector Connects to analog video output of decks 4 COMPONENT B Y IN Video B Y component input BNC connector Connects to analog video output of decks 5 COMPOSITE IN Composite video input BNC connector Connects to analog video output of decks 6 S VIDEO IN Super video input 4 ...

Page 16: ... digital video source 14 SDI OUT 1 Serial digital output number 1 BNC connector Connects to VTR input a video monitor or other serial digital device 15 SDI OUT 2 Serial digital output number 2 BNC connector Connects to VTR input a video monitor or other serial digital device 16 SDTI IN Not currently used 17 SDTI OUT Not currently used 18 1394 Host Connects to any available 1394 FireWire port on th...

Page 17: ...on V10 Component Composite SDI S Video DV Synchronization Hardware Synchronization Peripheral AVoption V10 requires the Digidesign SYNC I O for use with Pro Tools HD systems Synchronization Source For accurate synchronization during capture and playback a common video reference is re quired Black burst House Reference Synchronization source Local video source such as the TBC video output of the ma...

Page 18: ...Pro Tools AVoption V10 and Media Station V10 Guide 10 ...

Page 19: ...ation V10 Software on page 15 5 Install Pro Tools software See Installing Pro Tools Software on page 16 6 Install AVoptionDNA software components See Installing AVoptionDNA Software Compo nents on page 17 7 Setup local storage if necessary See Setting Up Local Storage on page 19 Uninstalling Pro Tools Software If you are upgrading your Pro Tools system with AVoption V10 you must first uninstall Pr...

Page 20: ...ost port on the AVoption V10 breakout box and connect the other end to any an internal 1394 FireWire port on your computer For the latest information on supported computers and PCI slot configuration be sure to check the AVoption V10 compatibil ity pages on the Digidesign Web site www digidesign com compato The Pro Tools and AVoption V10 hard ware must be installed before installing Media Station ...

Page 21: ...osite in of the video deck or Using a 4 pin connector connect S VIDEO OUT on the AVoption V10 breakout box to S Video in of the video deck Connecting Digital Video Input and Output To connect the output of a serial digital video source to the AVoption V10 Using a BNC cable connect the serial digital output from a digital video source to SDI IN on the AVoption V10 breakout box To connect the serial...

Page 22: ...oop Sync In Out Loop Sync is the clock signal used to synchro nize Pro Tools HD series audio interfaces Con nect Loop Sync In on the SYNC I O to Loop Sync Out on the primary Pro Tools HD audio in terface Connect Loop Sync Out on the SYNC I O to Loop Sync In on the primary Pro Tools HD audio interface If you have multi ple Pro Tools audio interfaces connect Loop In on the SYNC I O to Loop Out on th...

Page 23: ... can be used to route AVoption V10 inputs and outputs to flexible input sources and output destinations Installing Media Station V10 Software You must install Media Station V10 software be fore installing Pro Tools software If a current in stallation of Pro Tools software is present you must uninstall it before installing Media Station V10 software To install Media Station V10 software 1 Be sure t...

Page 24: ...xt 8 Select your work environment This loads an initial set of Pro Tools Preferences that include some of the more popular settings for post pro duction audio or audio with MIDI 9 Click Next 10 Select whether to install the Surround Mixer plug in This plug in is required for mixing mastering and monitoring in surround Select Yes Monitor in Pro Tools Film For mat if your monitoring is configured fo...

Page 25: ...10 Use the included Avid Application key USB dongle to authorize Avid Media Station V10 To authorize Media Station V10 software Insert the Avid Application Key USB dongle into an available USB port on your computer Authorizing DigiTranslator 2 0 DigiTranslator 2 0 is authorized using the iLok USB Smart Key iLok and License Card from PACE Anti Piracy The iLok is similar to a dongle but unlike a don...

Page 26: ...h On launch Pro Tools checks that appropriate version of the firmware is installed on the AVop tion V10 breakout box If the correct version of the firmware is not installed Pro Tools automat ically installs the correct version of the firm ware Once the update is complete you will be prompted to quit Pro Tools and power cycle the AVoption V10 breakout box before the upgrade will take effect Media S...

Page 27: ...Network rather than local storage local storage is not re quired Installing the SCSI Host Bus Adapter HBA To install a SCSI HBA 1 Unplug and open your computer according to the manufacturer s instructions 2 Release any static electricity by touching the power supply or another grounded item 3 Remove the SCSI accelerator card from the anti static bag being careful to handle it only by the edges 4 L...

Page 28: ...ave Parameters and Exit and press Enter Installing the Windows Device Driver If you are using an ATTO SCSI HBA card you will need to install its Windows device driver To install the ATTO Windows device driver 1 Disconnect all hard drives from the SCSI HBA card 2 Start your computer Note the version of the ATTO SCSI BIOS when booting If it is version 1 68 proceed to the next step If it is not versi...

Page 29: ...rives For more information see the Pro Tools Reference Guide Video Media Station V10 software can capture contiguous video to multiple hard disks This is useful if the length of your video session exceeds the storage space available on a single drive For example 26 minutes of video material using 3 1 compression requires approximately 11 1 GB of storage space Striped Drive Requirements Video Stora...

Page 30: ...d and playback make the first drive a Dynamic drive by right clicking the disk ID section of the disk in the Computer Management window and selecting Upgrade to or Create Dynamic disk depending upon the status of your disk When you select a disk in the Computer Man agement window the white section of the disk changes to stripes showing that the section has been selected 6 Repeat the preceding step...

Page 31: ...igned es pecially for Pro Tools post production work flows with AVoption V10 Record audio and video directly from tape Import an EDL and batch digitize from tape Open and re digitize an existing sequence from an Avid editing system such as Media Composer Adrenaline Render all effects Export an AAF sequence for import to Pro Tools Import an AAF exported from Pro Tools Lay back audio and video to ta...

Page 32: ...s Bins are like folders where you organize clips and sequences Bins are stored in the indi vidual project folders Projects Projects are where you organize a num ber of Bins Bins can also be shared between projects In one project you could create a new Bin to hold all of your video clips and a Bin to hold your sound effects and a Bin for sequences You could close that project open a new project and...

Page 33: ...Chapter 4 Media Station V10 Software 25 Figure 3 Media Station V10 Timeline bottom Source Monitor top left and Record Monitor top right ...

Page 34: ...ect will open with the Project window The name of the project appears in the upper left hand corner of the Project window To the right of the Project window is the first Bin for the Project To view the Bins in a Project Click the Bins tab in the Project window Dou ble click any listed Bin to view its contents To view and edit Project Settings Click the Settings tab to view the Project set tings in...

Page 35: ... and Video To capture audio and video from tape verify that the following connections are made Connect your video source to the appropriate inputs of your AVoption V10 For more infor mation about the video connections on the AVoption V10 breakout box see Connecting Analog Video Input and Output on page 13 Connect the audio source to the first eight an alog or any digital inputs of your primary Pro...

Page 36: ... your project DV25 offers a good quality picture with a moderate level of compression 10 1m and 4 1m are multi cam resolutions and should not be used for Pro Tools 9 Select the drives where you would like the au dio and video to be stored The button on the left toggles between 1 and 2 drives Since Pro Tools requires audio and video to be on sep arate drives toggle this button so that 2 drives are ...

Page 37: ...ield in the Bin after recording has completed 16 To view the captured clip double click it in the Bin and it will open in a pop up window Click in the pop up window so that it appears in the Client monitor then press the Space bar to play or pause press the Home key to return to the start or click above the pop up window s navigation controls to skip to a particular loca tion Re digitizing an Exis...

Page 38: ... will be created in the Bin even if using the same reso lution as the original clips being re digitized 7 Click OK Media Station V10 will prompt you to insert the required tapes as needed and notify you when the capture is complete Digitizing from an EDL Media Station V10 includes Avid EDL Manager software which lets you open and create an EDL create a sequence from an EDL and digi tize the sequen...

Page 39: ...g opens Locate and select the files to im port one or more files can be selected for im port 3 Select the desired video resolution for selected video files 4 Select the desired Audio Import Options Media Station V10 supports audio files with mixed bit depth and sample rates in the Time line but Pro Tools does not If you are importing audio files which do not match the sample rate and bit depth of ...

Page 40: ...the new media files Audio and video media must be stored on sepa rate drives Click the button to the left of the drive selector until there are separate selectors for audio and video 6 Click Open The selected files are imported into the selected Bin Preparing a Sequence for Export Adding Captured Media Files to a Sequence Before exporting captured audio and video from Media Station V10 for import ...

Page 41: ...ce will include everything after the cursor To include the whole clip in the sequence press the Home key which will place the cursor at the start of the clip 4 Verify that the Source Track Enable buttons are properly aligned with the Timeline Track En able buttons To align the Source and Timeline tracks click on Source track button and drag to the Timeline track button 5 Click the Overwrite button...

Page 42: ...nks 1 Select the sequence to be exported in the Bin it will highlight and make the Bin the active window 2 Select File Avid Links Digidesign Pro Tools 3 Select the folder where you would like the ex ported sequence to be stored 4 Enter a name for the sequence 5 Click Save Media Station V10 automatically exports the complete sequence as an AAF file which can be imported into Pro Tools All video eff...

Page 43: ... the Timeline 5 Click the Mark In button to mark an in point at the beginning of the sequence 6 Press the End key to move the cursor to the end of the sequence 7 Click Mark Out button to set an out point at the end of the sequence The entire sequence should now be selected 8 Select Clip Render In Out if the command appears grayed out click in the Timeline again 9 In the Render Effects dialog selec...

Page 44: ...ks in Se quence option if you do not want to export any audio 6 Under the Video Details tab select one of the following from the Export Method pop up menu Link to Current Media The Pro Tools session will link to the same video files as the current Media Station V10 sequence Use this setting if the video files are currently stored on a drive which is suitable for Pro Tools video playback Copy Media...

Page 45: ...ence see Render All Effects on page 35 Transcode Video To Use this only if you need to change the video resolution Pro Tools supports most resolutions supported by Media Station V10 and even supports mixed resolutions in the Pro Tools Timeline so in most cases there is no need to spend extra time transcoding the video However if you have video of a resolution which is not currently sup ported by P...

Page 46: ...oSuite effects from the original sequence even if those effects were previously rendered Convert Audio Sample Rate Bit Depth File For mat Select Project for any of these and the cur rent Audio Project Setting will be used see Configuring Audio Settings on page 27 8 Click Save or Save As in the Export Settings di alog Click Save to use the specified settings whenever Export to Pro Tools is selected...

Page 47: ...to be sure that what you get in Media Station V10 is what you heard in Pro Tools you should either route and record your mix to new tracks in Pro Tools for export or use Bounce to Disk Media Station V10 only recognizes OMFI media files which are stored in the OMFI MediaFiles folder Once you have mixed audio in Pro Tools either save or copy the files to the OMFI Media Files folder being used for Me...

Page 48: ...ing Op tions window In the Publishing Options dialog enter the Pro Tools Comment and Clip Name or Click OK to complete the export Be sure to save the bounce in the OMFI MediaFiles folder that you are using for Media Station V10 audio All audible audio in the selection will be ex ported to multi mono OMF files 3 Quit Pro Tools 4 Launch Media Station V10 5 Select the Bin to import the files from Pro...

Page 49: ...to start Enable Caps Lock to hear audio as you scrub or nudge 20 Click in the Timeline to place the cursor where you would like the clip to start in the se quence or press the Home key to move the cur sor to the beginning of the sequence 21 Click the Clear Both Marks button to remove in and out points if present 22 Click the Overwrite button to lay the audio into the Timeline 23 Select the Fast Me...

Page 50: ...to the Source Monitor Track buttons will ap pear for each audio track 9 Click and drag each source track button to the Timeline track button where you want that track routed 10 Click in the Source Monitor and type Home so that the cursor is at the top of the sequence 11 Click in the Timeline to place the cursor where you want the imported sequence to start or press the Home key to place the cursor...

Page 51: ... starts at 1 00 00 in the Timeline Media Station V10 will start recording when the tape reaches 1 00 00 Specify the Record Deck Time to start re cording wherever the deck is currently parked Specify the Mark In Time to start recording at the address entered in the top window to the right of the transport controls 14 Click the yellow Preview button to check that all of the desired tracks are playin...

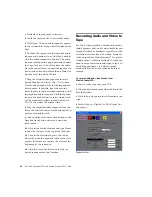
Page 52: ...log click Save Deleting Clips Sequences and Media To delete a clip sequence or media file from Media Station V10 1 Selecting the item to delete in the Bin 2 Press the Delete key Use the Select Unreferenced Clips command in the menu at the bottom of the Bin to se lect all unreferenced clips in the Bin ...

Page 53: ...k OK To delete the Movie track 1 Select the track by clicking the Track Name button in the Edit window 2 Choose File Delete Selected Tracks To clear all video from the Movie track Choose Movie Clear Movie Track You cannot change names of clips after they have been added to the Movie track When added clips retain the name they were given by the original Avid application Movie Track Options The Movi...

Page 54: ...her methods such as laying off to tape and re digitizing When an AAF or OMF sequence exported from an Avid workstation is imported into Pro Tools the video track displays each of the video files as regions in the Edit window Generally these re gions reflect the regions on the Avid timeline unless you have an effect which spans more than one video clip All video effects including fades titles and m...

Page 55: ...s included with AVoption V10 To add OMFI video to the Avid Movie track 1 If the Pro Tools session does not already have an Avid Movie Track add one by choosing Movie New Avid Movie Track 2 Choose Movie Add Movie select the desired Avid video file and click OK 3 In the Spot dialog that appears specify the SMPTE frame number for the start of the video clip 4 Click OK when you are done Undo Redo for ...

Page 56: ...ie Movie Online To put the movie back online Select Movie Movie Online Viewing Video Playback AVoption V10 includes video outputs to con nect an NTSC or PAL video reference monitor You can connect a client monitor that has Com ponent Composite S Video SDI or DV video inputs Full screen video is displayed on the video reference monitor For more information on connecting a video reference monitor se...

Page 57: ...Select the clip you want to move on the Movie track with the Grabber tool 4 In the Spot dialog specify a new SMPTE frame number for the start of the clip In this dialog you can press Plus or Minus on the nu meric keypad enter a number and press the En ter key to add or subtract that number of frames from the currently selected time field 5 Click OK when you are done Copying Video Clips You can cop...

Page 58: ...anscoder time to decompress each frame be fore it needs to be displayed This offset is deter mined in the QuickTime Movie Sync Offset dia log This only affects QuickTime Movie tracks How much offset is required appears to depend on the decompression hardware not the CPU session load or source material Pro Tools with AVoption V10 automatically compensates for the latency in playing back Avid video ...

Page 59: ...rub window To place and resize the Scrub window 1 Stop playback 2 Choose Movie Set Scrub Window Size Loca tion The Scrub Movie window opens 3 Place and resize the Scrub Movie window as desired 4 Close the Scrub Movie window Window placement and size are saved for the next time the window is opened The window closes automatically if you start playback The Scrub window is only available in Pro Tools...

Page 60: ...Pro Tools AVoption V10 and Media Station V10 Guide 52 ...

Page 61: ...he Frame Rate pop up menu select 29 97 FPS 4 In Pro Tools from the Audio Rate Pull Up Down pop up menu select 0 1 Down Pro Tools with AVoption V10 does not sup port 24 or 23 976 fps video output Though 24 and 23 976 fps video clips are sup ported the actual output of Pro Tools is limited to NTSC 29 97 fps and PAL 25 fps standards On playback the 24 fps clips are converted in software to these stan...

Page 62: ...eo tape running at 29 97 fps the Pro Tools video display and the output of the video deck will remain in sync Playing in Sync with 25 fps PAL Video Tapes To lay back a 24P session directly to a 25 fps PAL tape 1 Select the Video Output from the Movie track s Track Options pop up menu 2 Choose Windows Show Session Setup 3 From the Frame Rate pop up menu select 25 FPS 4 From the Audio Rate Pull Up D...

Page 63: ... tion V10 with and without an expansion chassis HP xw8000 Slot orders are labeled from top starting with the monitor card to bottom Slot Card CPU Slot 1 AGP Monitor card CPU Slot 2 Do not use CPU Slot 3 Do not use CPU Slot 4 133MHz 64 bit HD Core card CPU Slot 5 100MHz 64 bit HD Process Accel card if any CPU Slot 6 100MHz 64 bit HD Process Accel card if any or ATTO 3300 FibreChannel HBA card if an...

Page 64: ...U Slot 1 AGP Monitor card CPU Slot 2 Do not use CPU Slot 3 Do not use CPU Slot 4 133MHz 64 bit Magma 64 bit HBA CPU Slot 5 100MHz 64 bit Do not use CPU Slot 6 100MHz 64 bit ATTO 3300FC or unused Backplane Chassis Slot Chassis Controller card Chassis Slot 1 HD Core card Chassis Slots 2 7 HD Process Accel cards 6 maximum ...

Page 65: ...se CPU Slot 4 64 bit HD Process Accel card if any CPU Slot 5 64 bit HD Core card CPU Slot 6 64 bit UL3D SCSI HBA Slot Card CPU Slot 1 AGP Monitor card CPU Slot 2 32 bit Do not use CPU Slot 3 32 bit Do not use CPU Slot 4 64 bit Do not use CPU Slot 5 64 bit Magma 64 bit HBA CPU Slot 6 64 bit UL3D SCSI HBA Backplane Chassis Slot Chassis Controller card Chassis Slot 1 HD Core card Chassis Slots 2 7 HD...

Page 66: ...Pro Tools AVoption V10 and Media Station V10 Guide 58 ...

Page 67: ... buffer underrun in which data could not be read from the hard drive fast enough to play video Video playback stopped due to a software decompression buffer underrun Indicates a software decompression buffer un derrun in which there weren t enough CPU cy cles to decompress video fast enough to main tain play back Video playback stopped due to a hardware or driver buffer underrun Indicates a DIO bu...

Page 68: ...Pro Tools AVoption V10 and Media Station V10 Guide 60 ...

Page 69: ... 1 components 1 connecting a DV device 13 connecting a SYNC I O 14 connecting a VTR 15 connecting analog video 13 connecting audio optical 14 connecting black burst 14 connecting digital video 13 connecting house video reference 14 Declaration of Conformity iv front panel 6 hardware capabilities 5 installing a new system 12 PAL monitor 15 PCI slot configurations 55 post production workflows 23 rea...

Page 70: ...justing to 48 Frames View 46 Frames view for Movie track 46 H hard drives formatting audio drives 21 formatting NTFS 21 formatting video drives 21 striped drives 21 using more than two 21 using two 21 house reference synchronization 9 house sync connecting to AVoption V10 14 house video reference 14 I illegal frame boundaries 48 iLok 18 iLok USB Smart Key 17 Importing files preparing 46 installati...

Page 71: ...ideo Details tab 36 exporting a sequence 34 Avid Links 34 manual 34 exporting a sequence as a digital movie 43 exporting part of a sequence 39 importing an AAF sequence from Pro Tools 41 importing from Pro Tools 39 importing non OMFI media files 31 installing software 15 opening a sequence 33 Projects 24 Record Monitor 24 recording audio and video to tape 42 re digitizing a sequence 29 render effe...

Page 72: ...potting to a new frame location 49 spotting video to a new frame location 49 moving the Movie track 48 naming the Movie track 45 QuickTime Movie Sync Offset 50 Scrub window 50 spotting the entire Movie track to a new frame location 49 spotting video to a new frame location 49 video editing undo or redo 47 video playback 48 video scrubbing 50 Q QuickTime exporting from Media Station V10 43 QuickTim...

Page 73: ...d PAL 18 video clips clearing selection 50 copying 49 video connections 13 video playback from Pro Tools with AVoption V10 48 Video Reference In 14 video resolutions mixed resolutions 6 supported with Pro Tools 5 viewing blocks in the Movie track 46 VTR 15 connecting to AVoption V10 15 ...

Reviews: