background image

Chapter 4: Synchronic Parameters

33

BEG and END Range (0–100%) 

The Offset Range 

references a “Start” and “End” offset value that 
is set using the Range controls.

Standard, Spin, and Stab Playback Offset

If Playback mode is set to Standard, Spin, or 
Stab, Playback Offset determines where within a 
slice playback should start. A slice normally 
starts playback at the very first sample of the 
slice. However, Synchronic lets you start play-
back of the slice at a point that is offset by some 
percentage into a slice, thus creating some very 
interesting effects. The Playback Offset can 
range from 0% (the start of the slice) to 100% 
(the end of the slice).

Stretch Playback Offset

If Playback Mode is set to Stretch, Playback Off-
set determines that amount of granular recy-
cling that occurs. Higher Offset percentages re-
sult in increased resonance as the beginning of 
the slice is recycled more and more to fill the du-
ration of the slice.

Smear Playback Offset

If Playback Mode is set to Smear, Playback Offset 
determines the amount of smearing that occurs 
between adjacent slices.

Low Frequency Oscillator (LFO)

LFO Waveshape 

Selects the modulation wave-

shape for Playback Offset.

LFO2 Duration (8 Bars, 4 Bars, 2 Bars, 1 Bar, Half 
Note, Quarter Note) 

Applies the LFO according 

to the selected duration.

Assigning the Playback User Knobs 
(PB1 and PB2)

(RTAS Only)

In Edit mode, you can assign the Playback User 
Knobs to control any Playback Edit parameter. 
User Knob assignments are made on a per preset 
basis. This gives you a great deal of flexibility on 
how you can control the Synchronic Playback 
module in Performance mode. 

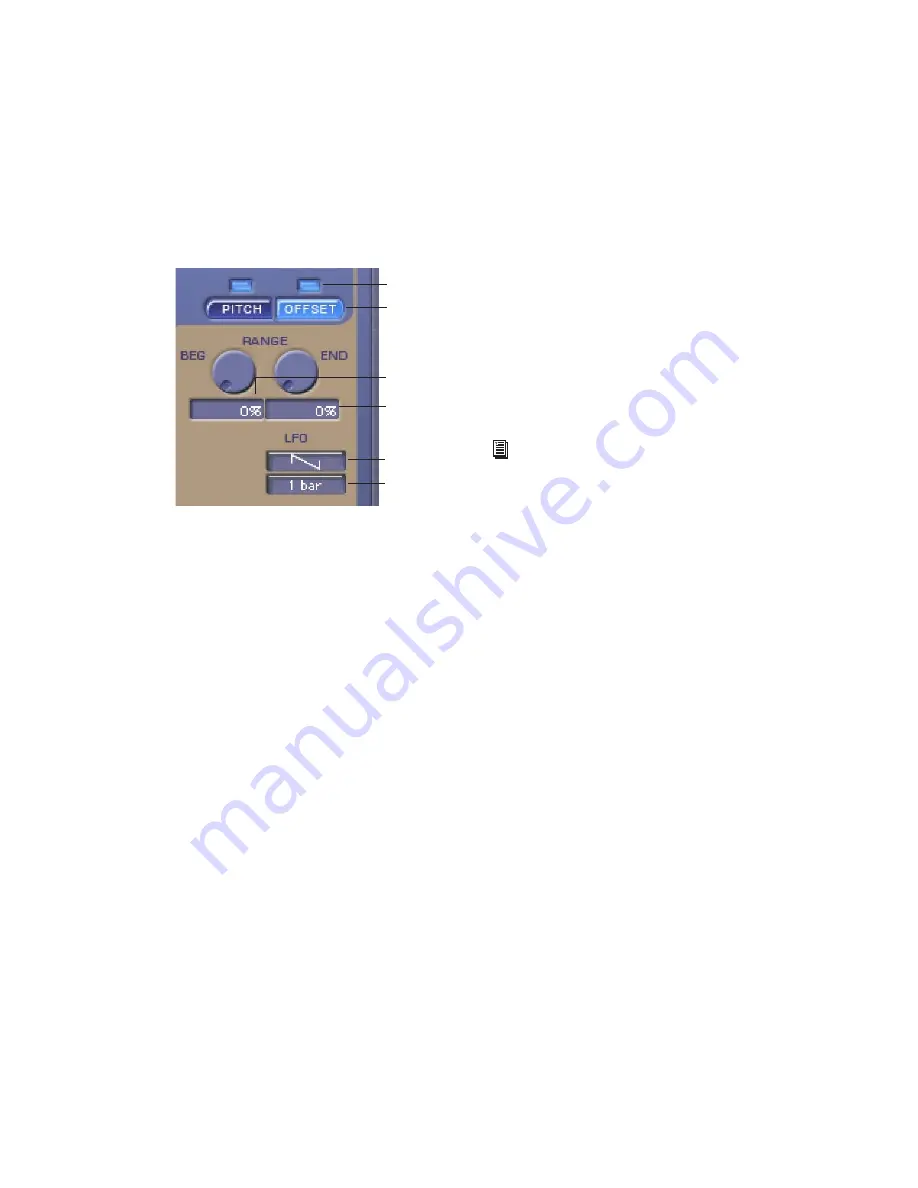
Playback Offset settings

Offset Enable 

Offset Select
button

LFO Waveshape
selector

Beginning Offset
(0–100%)

End Offset
(0–100%)

LFO Duration
selector

button

For more information on LFO Waveshape 
and Duration, see “Low Frequency Oscilla-
tor (LFO)” on page 33.

Summary of Contents for Synchronic

Page 1: ...Synchronic Version 7 3 ...

Page 2: ...esign Pro Tools Pro Tools Academic Pro Tools HD Pro Tools LE Pro Tools M Powered and RTAS are either trademarks or registered trademarks of Avid Technology Inc in the US and other countries All other trademarks contained herein are the property of their respective owners Product features specifications system requirements and availability are subject to change without notice PN 9329 55998 00 REV A...

Page 3: ...is Guide 3 About www digidesign com 4 Chapter 2 Installation and Configuration 5 Installing Synchronic 5 Authorizing Synchronic 5 Removing Plug ins 7 Configuring MIDI 8 Using Instrument Tracks 8 Using MIDI and Auxiliary Input Tracks 8 Chapter 3 Synchronic Overview 9 Synchronic Modules 9 Playing Synchronic RTAS 10 Performance and Edit Modes 13 Performance Controls 13 Synchronic Presets 14 ...

Page 4: ...le 34 XFade Module 40 MIDI Module 42 Keyboard Focus Mode 45 Chapter 5 Using the Synchronic AudioSuite Plug in 47 Using Synchronic AudioSuite 47 Synchronic AudioSuite Modules 47 Previewing Synchronic AudioSuite 49 Chapter 6 Automating Synchronic RTAS 53 Using Automation Playlists 53 Using MIDI 54 Chapter 7 Synchronic Plug in Settings 57 Index 59 ...

Page 5: ...ack order speed and volume of individual beats and sub divisions of the beat or slices within a loop Synchronic also includes a multi effects proces sor that synchronizes to the session tempo to create in tempo effects such as filter sweeps and delays Synchronic Features A DJ rig inspired user interface for live per formance including Sound Playback Ef fect and XFade presets and performance parame...

Page 6: ...ode or License Card System Requirements To use Synchronic you need An iLok USB Smart Key An iLok com account for managing iLok li censes A Digidesign qualified Pro Tools system For complete system requirements visit the Digidesign website www digidesign com Compatibility Information Digidesign can only assure compatibility and provide support for hardware and software it has tested and approved Fo...

Page 7: ...s on Tracks Clip Indicators The Plug in Window Adjusting Parameters Automating Plug ins Using the Plug in Settings Librarian Conventions Used in This Guide All Digidesign guides use the following conven tions to indicate menu choices and key com mands The following symbols are used to highlight im portant information Convention Action File Save Choose Save from the File menu Control N Hold down th...

Page 8: ...mpatibility documents for system require ments search the online Answerbase or join the worldwide Pro Tools community on the Digide sign User Conference Training and Education Study on your own using courses available online or find out how you can learn in a classroom setting at a certified Pro Tools training center Products and Developers Learn about Digidesign products download demo software or...

Page 9: ...to your computer 2 Double click the plug in installer application 3 Follow the on screen instructions to complete the installation 4 When installation is complete click Finish Windows or Quit Mac When you open Pro Tools you are prompted to authorize your new plug in Authorizing Synchronic The Synchronic plug in is authorized using the iLok USB Smart Key iLok manufactured by PACE Anti Piracy Inc Th...

Page 10: ...m User ID is the name you create for your iLok com account 3 Transfer the licenses from your iLok com ac count to your iLok USB Smart Key by doing the following Insert the iLok into an available USB port on your computer Go to www iLok com and log in Follow the on screen instructions for trans ferring your licences to your iLok 4 Launch Pro Tools 5 If you have any installed unauthorized plug ins o...

Page 11: ...ok from the computer to remove the cutout be sure to re insert the iLok in any available USB port on your computer when you are finished Removing Plug ins If you need to remove a plug in from your sys tem follow the instructions below for your computer platform Windows To remove a plug in 1 Click Start 2 Click Control Panel 3 Double click Add or Remove Programs 4 Select the plug in from the list o...

Page 12: ...m the track to the plug in Using MIDI and Auxiliary Input Tracks With Pro Tools 7 x you can use a MIDI track and an Auxiliary Input instead of or in conjunc tion with an Instrument track With Pro Tools 6 9 x and lower you must insert Virus Indigo on an Auxiliary Input and route MIDI data from the MIDI track to the Auxiliary Input in order to play it See your Pro Tools Getting Started Guide for ins...

Page 13: ...nipulates the output of the Sound module Various aspects of sound play back such as speed order and direction are controlled by the Playback module Effect Module Processes the output of the Play back module Four concurrent effects are avail able Gain Noise Filter and Delay XFade Module RTAS Only Mixes the A and B sounds after they have been processed by the Sound Playback and Effect modules The cr...

Page 14: ... version of Synchronic also lets you add in tempo effects and mix between two different sounds Sounds A and B Synchronic starts and stops playback with the Pro Tools Transport Loading a Loop To load a loop in Synchronic 1 Insert Synchronic on an Instrument track See Previewing Synchronic AudioSuite on page 49 for detailed information on playing the AudioSuite version of Synchronic For detailed inf...

Page 15: ...t one or more audio files loops for import Mono files are im ported as mono presets and dual mono L and R files and interleaved stereo files are imported as stereo presets 4 Click Open The selected file is loaded into Synchronic and is immediately stored with the current preset The waveform for the loaded file appears in the Waveform display When selecting more than one loop they are loaded into c...

Page 16: ...ing them up you can perform those loops using the Playback Effects and XFade modules Slices can be played back in different orders in tempo effects can be added such as Filter and Delay and different combinations of sounds and effects can be crossfaded The flexibility of Synchronic s playback and ef fects possibilities along with its DJ rig inspired interface invite real time performance You can p...

Page 17: ...ccess to the mod ule s controls Changing parameters in Edit mode immediately alters the currently selected preset Edit mode lets you load audio files edit presets and make MIDI assignments that can be instantly recalled in Performance mode Performance Controls RTAS Only Synchronic provide several types of controls for real time performance including presets user assignable performance controls Use...

Page 18: ...ule presets are used to load and store audio files loops Playback Effects and XFade module pre sets are used to store and recall various Edit mode settings MIDI module presets store MIDI control as signments which can include combina tions of presets from each of the other modules Synchronic presets are unique to each instance each insert of Synchronic in a session To save the global state of Sync...

Page 19: ...dit For the Sound module you must be in Edit mode to se lect the preset you want to edit see Sound Module on page 18 2 If the module is in Performance mode toggle to Edit mode and edit as desired for detailed in formation on the Edit mode parameters of each module see Chapter 4 Synchronic Parame ters Any edits to any module s parameters are imme diately applied and stored in the selected preset To...

Page 20: ...Synchronic Plug in Guide 16 ...

Page 21: ...rrent value of the parameter You can edit the numeric value of a parameter with your com puter keyboard To type a parameter value 1 Click on the parameter text that you want to edit 2 Change the value Type the desired value or To increase a value press the Up Arrow on your keyboard To decrease a value press the Down Arrow on your keyboard 3 Do one of the following Press Enter on the numeric keyboa...

Page 22: ...und Performance Mode RTAS Only Performance mode lets you recall and interact with different audio files and loops loaded into Synchronic Sound Presets Sound presets recall audio files loaded in Syn chronic In Performance mode Sound presets are numbered from 1 12 and are arranged in two banks located above and below the Wave form display Each Sound preset may contain an individual mono or stereo au...

Page 23: ...eposition playback to that location in the waveform You can create syncopated rhythms by repeatedly clicking the waveform in either the A Sound or the B Sound during playback Alt clicking Win dows or Control clicking Mac the Waveform display re synchronizes playback with the cur rent Pro Tools MIDI Beat Clock location ac cording to bars and beats Starting and Stopping Playback You can only start o...

Page 24: ...Workspace Supported Audio Formats Synchronic supports AIFF BWF WAV and SD II Mac only audio file formats and 8 16 and 24 bit mono or stereo audio files Any com bination of supported bit rates and audio file formats can be imported and played back at the same time All audio files are converted to 32 bit floating point RTAS native format on import However Synchronic does not convert the sam ple rate...

Page 25: ...iles and interleaved ste reo files are imported as stereo presets 4 Drag the selected audio to the Waveform dis play in Synchronic Selecting Multiple Files for Import When multiple files are selected they are load ing into the next available unoccupied presets For example if preset 2 is the selected preset and preset 3 and 4 already have sounds loaded importing three sound files will load them int...

Page 26: ...eat When accurately de fined these attributes help Synchronic properly play back the loop in synchronization with the Pro Tools MIDI Beat Clock assuming you have not applied too many of Synchronic s beat scrambling processing capabilities This way you can play back a loop at nearly any tempo with reasonable accuracy Name Displays the name of the audio file for the currently loaded audio loop The n...

Page 27: ...a sound file by adjusting the Detection slider Once a loop is sliced up Synchronic can replay the loop at any tempo with any number of mod ifications Furthermore each slice of the loop starts playback according to the Pro Tools MIDI Beat Clock so it maintains its original rhythmic pattern at any tempo To add a missing slice Control click Windows or Command click Mac the Waveform display at the cor...

Page 28: ... lected Slice s end point Slices generated during detection or by Command clicking may need to be adjusted slightly For example if you audi tion a slice by clicking on it and you hear a click at the end of the slice you will need to trim the end of the slice The Trim slider can adjust the end of any slice except the last one by 30 milliseconds When in Single Slice Audi tion mode the Waveform Displ...

Page 29: ...ple of a slice Type 1 Sounds best on loops that predom inantly contain high frequencies such as a tambourine or a hi hat loop Type 2 Sounds most natural for most loops and is the default setting Playback Module The Playback module determines how the sounds loaded into the Sound module presets are played back Each sound slice in the selected Sound module preset is played back synchro nized to the P...

Page 30: ...ayback modes Standard Stretch Stab Spin and Smear These modes determine the character of each slice as it is played how each slice is played back Standard Plays each slice without any additional manipulation and plays each slice from start to end Stretch Uses a granular time compression ex pansion technique to make a slice fit the amount of time the slice has to play The Play back Offset settings ...

Page 31: ...ing see Playback Offset on page 32 Playback Start Start determines where to start playback within a sound either Clocked to the MIDI Beat Clock or from a specific slice Clocked Sets the start position relative to the current position of the MIDI Beat Clock For ex ample if Pro Tools starts playing back at beat 2 of bar 13 and Synchronic is playing back a two bar drum loop then Synchronic will start...

Page 32: ...at Span Span 2 5 Plays slices by stepping forward some number of slices 2 5 then skipping back to play the stepped over slices in order For ex ample selecting Span 3 with a loop containing eight slices would play slices 1 4 3 2 5 4 3 6 5 4 7 6 5 8 7 6 and so on Straddle Straddle 2 5 Plays slices by stepping forward then making a small step backward For example selecting Straddle 4 with a loop con ...

Page 33: ...ns are included Off Beats Syncopate Clave Pick Up and Swing Off Beats Off Beats 1 5 Five variations that generally emphasize the and of the beat Syncopate Syncopate 1 5 Five variations fea turing dotted rhythms Latin Latin 1 5 Five variations based on Afro Caribbean Cuban and Brazilian rhythms Selecting Playback Duration ...

Page 34: ...on of the playback of slices Forward Backward For Back Back For F B Did dle F B Beats and Random Forward Plays all slices forward from beginning to end Backward Plays all slices backward from end to beginning For Back Plays alternating slices forward then backward Back For Plays alternating slices backward then forward F B Diddle Plays consecutive slices forward backward forward forward backward f...

Page 35: ...Frequency Oscillators LFO1 and LFO2 Each LFO has a se lectable Waveshape and Duration The LFO will sweep through the selected waveshape accord ing to the selected duration If an LFO Waveshape is set to Off that LFO does not modulate the associated parameter If both LFO waveshapes are set to Off then only the BEG parameter will affect the playback pitch The END parameter will have no affect on play...

Page 36: ...duration The LFO will sweep through the selected waveshape ac cording to the selected rhythm For more infor mation on the rhythmic patterns see Playback Duration on page 28 LFO2 Duration 8 Bars 4 Bars 2 Bars 1 Bar Half Note Quarter Note Applies the LFO according to the selected duration Playback Offset Playback Offset lets you define where in the slice playback starts Playback Offset can be contin...

Page 37: ...onance as the beginning of the slice is recycled more and more to fill the du ration of the slice Smear Playback Offset If Playback Mode is set to Smear Playback Offset determines the amount of smearing that occurs between adjacent slices Low Frequency Oscillator LFO LFO Waveshape Selects the modulation wave shape for Playback Offset LFO2 Duration 8 Bars 4 Bars 2 Bars 1 Bar Half Note Quarter Note ...

Page 38: ...ectors The Sound A and B Sound selectors determine whether or not the A and B sounds are patched into the Effect module Click the Sound A or B selectors to toggle the A or B sound on or off Selecting a User Knob assignment PB2 assigned to Offset Beginning To select the same User Knob assignment for all presets press and hold Alt Win dows or Option Mac while selecting the User Knob assignment Perfo...

Page 39: ...e the Ef fect Select button The button is illuminated when the effect is enabled Selecting an Effect for Editing To view the Gain Noise Filter or Delay effect parameters Click the Effect Select button Gain Noise Fil ter or Delay The selected effect s button will il luminate and the effect s parameters will be available for editing Gain Effect Gain is used to add Volume Distortion or Satu ration to...

Page 40: ...ere are three different Noise modes Dark White and Brite each with two variations Osc or AM BEG and END Range 0 100 Use the BEG and END parameters to control the amount of mod ulation by noise At 0 there is no modulation At 100 the input signal is 100 modulated by the selected noise mode such that only the amplitude envelope of the input signal remains Use the Range controls to set the amount of N...

Page 41: ...fect processes the post Noise signal using a lowpass filter a highpass filter or ring modulation BEG and END Range 0 100 Use the BEG and END parameters to determine the range of a fil ter frequency sweep when modulated by the LFO Waveshapes The actual cutoff frequency in Hertz varies from between filter types LFO1 and LFO2 Set the Waveshape and Duration for dynamic sweeping filter effects For stat...

Page 42: ...modulating signal Delay Effect The Delay effect processes the post Filter signal with modulating delay that synchronizes to the Pro Tools MIDI Beat Clock BEG and END Range 0 100 Use the BEG and END parameters to control the amount of delay which is a combination of delay level and feed back level At 0 there is no delay At 100 the delay forms and infinite feedback loop Use the Range controls to set...

Page 43: ...fect User Knobs to control any Effect Edit parameter User Knob assignments are made on a per preset ba sis This gives you a great deal of flexibility on how you can control the Synchronic Effect module in Performance mode To assign a User Knob to control Edit parameters Select the desired Edit parameter assignment from the User Knob Assignment pop up menu Selecting Delay Mode Selecting a User Knob...

Page 44: ...ovides a single assignable User Knob control XF that provides direct con trol over any of the XFade module s Edit mode settings The current control assignment is dis played below the User Knob XFade Preset Mode The XFade module provides twelve presets to store and recall crossfade settings Edit Mode In Edit mode the XFade module lets you edit crossfade modulation effects and the XFade User Knob as...

Page 45: ...c crossfade set tings set both LFO1 and LFO2 to Off Assigning the XFade User Knob XF In Edit mode you can assign the XFade User Knob to control any XFade Edit parameter User Knob assignments are made on a per preset ba sis This gives you a great deal of flexibility on how you can control the Synchronic XFade module in Performance mode To assign a User Knob to control Edit parameters Select the des...

Page 46: ... octave This lets you readily assign Synchronic preset snapshots to any and all octaves of your MIDI keyboard Octave Display Displays the current octave transposition of the on screen MIDI keyboard C3 is middle C Pre Mapped MIDI Keys Synchronic provides a default MIDI keyboard mapping for triggering Sound Playback Effect and Crossfade presets Synchronic s default MIDI key mappings are MIDI note nu...

Page 47: ...I key on the on screen keyboard or press the corresponding key on your MIDI keyboard The current state of the assign enabled modules will be stored and assigned to the selected key and corresponding MIDI note number If a MIDI key is used to recall a combination that does not include all modules the modules that are not included in the combination will remain as they were For example a combination ...

Page 48: ...ber in the MIDI Control Number field either by selecting the field and typing the number or by jiggling the MIDI controller Pitch Wheel Assigns MIDI pitch bend the pitch wheel to control the corresponding User Knob or the XFade crossfade fader Controller Assigns a continuous MIDI control ler to control the corresponding User Knob or the XFade crossfade fader MIDI module Edit mode To save a templat...

Page 49: ...To enable or disable Keyboard Focus mode for Synchronic Click the a z Keyboard Focus Enable but ton in the upper right corner of the Synchronic plug in window If Synchronic Keyboard Focus is enabled desig nated characters listed above in QWERT Key board Mapping will control Synchronic and will not be used otherwise by Pro Tools a z Keyboard Focus Enable button enabled Keyboard Focus has no effect ...

Page 50: ...Synchronic Plug in Guide 46 ...

Page 51: ...h of these modules has been modified slightly for the AudioSuite version Edit Mode Only in AudioSuite Modules In the RTAS version of Synchronic each module can be independently switched between Edit and Performance modes with the Mode toggle In the AudioSuite version of Synchronic the modules function only in Edit mode Perfor mance mode is not available since its features are not relevant to non r...

Page 52: ...lets you edit the Playback parameters The AudioSuite version of this module replicates the Edit mode functionality of its real time counterpart with the following differences Playback user knobs unavailable The Playback user knobs are only necessary and available in the RTAS version of Synchronic Synchronic AudioSuite Sound module The Load Selection button is available only in the AudioSuite versi...

Page 53: ... sampler 2 Use the Detection Slider to slice up the loops into rhythmically logical units beats and subdi visions of the beat 3 Preview the sliced up loop 4 When you are finished with a loop you pro cess it to a track Loading Audio into the Waveform Display In the AudioSuite version of Synchronic you can load audio into the Waveform display using any of the following methods Load Selection button ...

Page 54: ...can preview it in the Audio Suite window To preview a loop in Synchronic AudioSuite Click Preview in the Plug in window Synchronic plays back the loaded loop accord ing to the session tempo Processing a Loop to a Pro Tools Track Once you have finished editing your loop in Synchronic AudioSuite you can process it to a selection in Pro Tools Making a selection in Pro Tools Making a selection in Pro ...

Page 55: ... Pro Tools Timeline using the Load Selection button you can improve any timing prob lems that may exist by modifying the Time line selection before processing the loop from Synchronic For example if a percus sive audio event were late at the beginning of a bar you might load the bar into Syn chronic with the selection exactly at the on set of the event Then you can modify the Timeline selection to...

Page 56: ...Synchronic Plug in Guide 52 ...

Page 57: ...indow for the plug in you want to automate 2 Do one of the following Click the Automation Enable button in the Plug in window or Control Start Alt click Windows or Com mand Option Control click Mac the Track View Selector in the Edit window 3 Choose the parameters to automate and click Add If there are multiple plug ins on the same track you can select from among these by click ing their buttons i...

Page 58: ...recording them to a MIDI track You can also edit and manually enter the MIDI data on the track as desired and use it to control Syn chronic during playback As an alternative to using the Plug in Auto mation window you can enable individual plug in parameters directly from the Plug in window by Control Alt Start clicking Win dows or Command Control Option click ing Mac the parameter s text field or...

Page 59: ...r numbers to the Playback Effects and XFade User Knobs 1 If necessary switch the MIDI module to Edit mode see Performance and Edit Modes on page 13 2 Select Pitch Wheel or Controller from the Source pop up menu for the desired User Knob assignment 3 If you select Controller you will also need to enter the MIDI controller number in the MIDI Control Number field either by selecting the field and typ...

Page 60: ...troller that you want to view 2 If the desired controller doesn t appear in the Track Display Format pop up menu select Add Remove Controller 3 In the Automated MIDI Controllers dialog lo cate the parameter by its MIDI Controller num ber and click Add then OK 4 Select the new automation type from the Track Display Format selector of the MIDI track MIDI Pitch Bend automation controlling Synchronic ...

Page 61: ...settings file will increase corresponding to the number and size of audio files loaded into Synchronic For more information Plug in Settings files and using the Librarian see the DigiRack Plug ins guide Librarian menu Pro Tools always saves the current session s plug in settings with the session itself The Librarian allows you to access settings saved during other sessions Plug in settings and pre...

Page 62: ...Synchronic Plug in Guide 58 ...

Page 63: ...odules 47 Playback module 48 previewing a loop 50 processing a loop 50 Sound module 48 authorizing plug ins 6 automating Synchronic using MIDI 55 automation Auto Latch mode 54 Auto Touch mode 54 creating 54 enabling plug in parameters 53 plug in automation automating Synchronic 53 recording 54 B Back For 30 Backward 30 boxed version 2 C Clocked 27 Controller 44 crossfade fader 40 D Delay effect 38...

Page 64: ...ser Knobs 39 enabling an effect 35 enabling Keyboard Focus mode 45 enabling plug in automation 53 F F B Beats 30 F B Diddle 30 Filter effect 37 For Back 30 Forward 30 G Gain effect 35 Generate Missing 24 guide conventions 3 I importing a sound 21 importing multiple audio files 21 installing Synchronic 5 Instrument tracks 8 K Keyboard Focus mode 45 L Latin Latin 1 5 29 LFO 31 Delay effect 38 Filter...

Page 65: ...of Synchronic 47 switching to 13 performing Synchronic 12 Pick Up Pick Up 1 5 30 Pitch 31 Pitch enable button 31 Pitch Wheel 44 playback 19 Playback Duration 28 Playback module 9 25 Direction 30 Back For 30 Backward 30 F B Beats 30 F B Diddle 30 For Back 30 Forward 30 Random 30 Duration 28 Latin Latin 1 5 29 Off Beats Off Beats 1 5 29 Pick Up Pick Up 1 5 30 Swing Swing 1 5 30 Syncopate Syncopate 1...

Page 66: ...ct 35 Settings Librarian using 57 slice 23 adding 23 Audition Modes 24 Current 24 Delete 24 deleting 23 detection 23 generating missing 24 playback mode 26 playback order 27 playback start 27 settings 23 Trim 24 Slice 27 Slice Extension 25 slices playback direction 30 slicing a loop 12 slicing up a sound 23 Smear playback 27 Sound A 19 Sound A and B selectors 14 Sound B 19 Sound module 9 18 attrib...

Page 67: ...es 1 Synchronic modules 9 Synchronic playback starting and stopping 19 Synchronic presets 14 Syncopate Syncopate 1 5 29 system requirements 2 U User Knobs 14 assigning 34 39 41 Effect module FX1 and FX2 35 39 Playback PB1 and PB2 26 XFade module XF 41 user assignable controls 14 W Wait Bar 44 waveform display 19 website www digidesign com 4 X XFade module 9 40 crossfade fader 40 Edit mode 40 LFO 4...

Page 68: ...City CA 94014 3886 USA Tel 650 731 6300 Fax 650 731 6399 TECHNICAL SUPPORT USA Tel 650 731 6100 Fax 650 731 6384 PRODUCT INFORMATION USA Tel 800 333 2137 INTERNATIONAL OFFICES Visit the Digidesign website for contact information www digidesign com ...

Reviews: