Motion Trigger Record
1. Press
ENTER
to confirm MOTION TRIGGER RECORD setup.
2. Press
▲
/
▼
to toggle the option between ON and OFF.
1. Select “
ON
” to set up the motion trigger recording: It can automatically switch from stand-by mode to Recording Mode.
The motion detection will change the scanning sequence and show “D” on the monitor.
NOTE:
The trigger recording time will depend on the ALARM DURATION mode setting. It will record from the last trigger
time. For example, when the alarm duration setting is 1 min, the time recording time is from 9:00:00 to 9:01:00.
If the motion detection trigged again at 9:00:40, the triggered recording time will from 9:00:00 to 9:00:40 and
9:00:40 to 9:01:40. The total recording time is 00:01:40.
2. Select ”
OFF
”: The screen shows the motion detection and will change the scanning sequence while in the recording
mode and show “M” on the monitor.
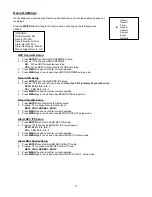
Camera Channel Setup
To access the Camera option, press
MENU
followed by the 4-digit password. Use the
▲
/
▼
to scroll to the Camera
option
and press
ENTER.
TITLE
DWELL
ALARM
RECORD
---01 ON 5
5
5 LOW
EVENT
---02 ON 5
5
5 LOW
EVENT
---03 ON 5
5
5 LOW
EVENT
---04 ON 5
5
5 LOW
EVENT
The options available in this section are as follows:
Title
This feature is used to assign a 6-character title to each camera input.
1. Press
▲
/
▼
to select the desired time camera channel (1-9), and then press
ENTER
.
2. Press
▲
/
▼
to select the desired character and
◄
/
►
to move to the next character
3. Press
MENU
to confirm and exit the
Title
setting.
4. Press
MENU
again to exit the Camera Setup Option.
Dwell
This feature is used to enable or disable the dwell feature for each camera when viewing using the call monitor output.
1. Press
▲
/
▼
to select the desired time camera channel (1-9), then press
ENTER
.
2. Press
◄
/
►
to select the
Dwell
feature on the screen.
3. Press
MENU
to confirm and exit the dwell setting.
4. Press
MENU
again to exit the Camera Setup Option.
Brightness / Contrast / Color
This feature is used to adjust the video settings on each channel.
1. Press
▲
/
▼
to select the desired time camera channel (1-9), then press
ENTER
.
2. Press
◄
/
►
to select the
Brightness, Contrast, or Color
feature on the screen.
3. Press
▲
/
▼
to select
0~9
on the screen.
4. Press
MENU
to confirm and exit the
Brightness, Contrast, or Color
control feature
5. Press
MENU
again to exit the Camera Setup Option.
Alarm Polarity
This feature is used to select the alarm polarity as LOW / OFF / HIGH.
1. Press
▲
/
▼
to select the desired time camera channel (1-9), then press
ENTER
.
2. Press
◄
/
►
to select the
Alarm Polarity
feature on the screen.
3. Press
▲
/
▼
to select
LOW / OFF / HIGH
on the screen.
4. Press
MENU
to confirm and exit the
Alarm Polarity
feature
5. Press
MENU
again to exit the Camera Setup Option.
13


