background image

43 

Troubleshooting 


Check that the HDD has been installed correctly. 

No recorded video 

Check camera’s video cables and connections. 
Check monitor’s video cables and connections. 
Make sure that the camera is receiving power. 

No video 

Check that Timer / Alarm Enable is set to YES. 

Timer / Alarm recording isn’t working 

Check if the system is in Key Lock mode. 
Press 

MENU

 and 

ENTER

 at the same time and 

enter password to escape the Key Lock mode. 

Buttons aren’t working when pressed 

Check the power source cord connections. 
Check that there is power at the outlet. 

No Power 

Need to insert HDD. 
Make sure that the HDD Cartridge is locked, then 
press any key to continue. 

HDD not found 

SOLUTION 

PROBLEM 

Summary of Contents for DGN216

Page 1: ...16 Channel Multiplex Digital Video Recorder Models DGN216 Installation User Manual Digimerge Technologies Inc...

Page 2: ...ronment This equipment generates uses and can radiate radio frequency energy and if not installed and used in accordance with the instruction manual may cause harmful interference to radio communicati...

Page 3: ...9 Setting the Message Latch Feature 19 System Time Date Set up 19 Selecting the Date Display Format 19 Setting System Time Date 20 Changing the System Password 20 Clearing the Hard Drive Data 20 Reset...

Page 4: ...3 Appendix 4 Rack Mount Installation 49 Appendix 5 Recording Times in Hours 50 Appendix 6 Compatible HDD Brands 51 Limited Warranty 52...

Page 5: ...urning the power off correctly This equipment should be operated using only the power source from standard package Unauthorized repair or parts substitutions may result in fire electric shock or other...

Page 6: ...io inputs and 2 outputs Resolution 704X564 full screen 352X282 4 channels 224X188 9 channels and 176X141 16 channels Independent main and call monitor outputs allow for sequencing of camera views or f...

Page 7: ...rical outlet A Red LED indicator light will be ON to indicate that the DVR is in Standby mode 3 Press the Power button The POWER LED will turn from red to orange and other red LED indicators will turn...

Page 8: ...Press SLOW to slow down the speed during Play mode It can also be used to slow down the speed of FAST Forward and Rewind 7 SELECT When in a multi camera viewing mode this feature is used to select the...

Page 9: ...ton has two functions i Pressing STOP terminates recording or playing The DGN216 returns to live monitoring mode and stops all other actions ii In Menu mode the STOP button is used to scroll down thro...

Page 10: ...or 75ohms 4 LAN Connect DVR by LAN cable 5 CALL Connects to the CALL monitor for real time sequencing 6 AUDIO OUTPUTS R L Connects to a speaker or a monitor with audio speaker 7 AUDIO INPUTS 1 4 Conn...

Page 11: ...ecord mode set up Camera Camera channel set up System System setup Sets the date chooses an HDD overwrite setting changes password resets system settings or clears the HDD Event Event List Allows you...

Page 12: ...rder until it hits the End of the list Playback can be stopped at any time by pressing the STOP button D Motion Recording M Manual Record Time A Alarm Record Time T Timer Recording M HDD Storage in Ma...

Page 13: ...tions NTSC 25A 15 8 4 2 1 PAL 18A 12 6 3 2 1 NOTE A means record with Audio 6 Press MENU to confirm current operation and enter to next Timer Record setup 7 Press move location to Timer Enable Yes or...

Page 14: ...close RECORD IPS setup mode Record Quality Setup 1 Press ENTER to confirm Record Quality setup 2 Press to choose Record Quality level BEST HIGH NORMAL BASIC 3 Press MENU to exit and confirm current op...

Page 15: ...character title to each camera input 1 Press to select the desired time camera channel 1 16 and then press ENTER 2 Press to select the desired character and to move to the next character 3 Press MENU...

Page 16: ...the recording time to that channel i e the normal record sequence for cameras is Camera 1 Camera 2 Camera 3 etc In Event mode when an alarm in triggered from channel 1 the DVR will record using the fo...

Page 17: ...7 Press ENTER to turn the target cursor ON Press ENTER again to turn the target cursor OFF 8 Camera Select 1 15 toggles the corresponding target on the cursor line ON or OFF see Figure 1 1 There are o...

Page 18: ...N DETECTION SETUP 1 16 1 2 3 4 5 6 7 8 9 10 11 12 13 14 15 032 Figure 1 2 MOTION DETECTION SETUP LINE 1 2 3 4 5 6 7 8 9 10 11 12 13 14 15 032 Figure 1 3 MOTION DETECTION SETUP ALL 1 2 3 4 5 6 7 8 9 10...

Page 19: ...nal Audible Alarm Buzzer then press ENTER 2 Press to enable or disable the Internal Audible Alarm Buzzer Options are ON Buzzer is on When the DVR detects an alarm the system sounds the internal buzzer...

Page 20: ...NU to exit Setting the Dwell Time This timer is used to select the amount of time between 1 10s a channel appears on the call monitor before sequencing to the next channel To Set the Dwell Time 1 On t...

Page 21: ...If you have completed all your system configuration changes press MENU again to exit and close menu setup Clearing the Hard Drive Data This option will erase all data from the hard drive Ensure that t...

Page 22: ...is time 3 Press MENU to exit this screen and confirm the current operation 4 If you have completed all your system configuration changes press MENU again to exit and close menu setup NOTE This will no...

Page 23: ...iled S HDD LOSS Slave HDD does not exist User can use other HDD S HDD ERROR Slave HDD may contain error HDD FULL HDD is full SYSTEM ERROR System may have failed 02 VLOSS Channel 2 Video Loss 03 ALARM...

Page 24: ...letter A 2 Timer Record The display will indicate a scheduled recording using the letter T 3 Manual Record The display will indicate a manual recording by pressing the REC button using the letter M 4...

Page 25: ...to 1 4X Continue to press FF to slow down the speed The minimum slow speed is 1 32X Slow Reverse Press PLAY on the front panel then press SLOW for slow forward Press REW to play images slowly forward...

Page 26: ...OM The application program will install on your PC Note The CD contains a self running installation that automatically starts when the CD is inserted Follow the instructions for installation as indica...

Page 27: ...26 3 Choose the destination location and press Next 4 Set the program shortcut setting and press Next 5 Press Next to begin copying the files...

Page 28: ...e internet computer STEP 3 Connecting the PC and DVR via the Internet 1 To configure the Server IP please click twice to enter the setup 2 Key in the User Name Password and Server IP The default setti...

Page 29: ...g DNS for dynamically connected clients STEP 1 SOFTWARE INSTALLATION DYNAMIC IP SETTING Follow the same procedure as outlined on Page 19 for the Static IP Setting STEP 2 DDNS REGISTRATION FOR A DYNAMI...

Page 30: ...t and Add Host 7 Users can set up their own DDNS HOST For example the user s Host name is digimerge dyndns org Click on Add Host to finish the setting NOTE Some routers don t support some DDNS HOSTs S...

Page 31: ...2003 the setup procedure is similar to that of Win XP O S 3 Click on Properties for TCP IP setup 4 Click on INTERNET PROTOCOL TCP IP and then select Properties to setup Click twice Local Area Connecti...

Page 32: ...e setting window enter ipconfig and write down the router s gateway e g 192 168 1 1 8 Close the window above Enter the IP address router s gateway 192 168 1 1 to log in to the router from the Internet...

Page 33: ...DDNS setting 1 Click on INTERNET PORT and choose your WAN type e g PPPoE Enter your User Name and Password to dial up the dynamic IP address Press save after you set up 2 Press LOCAL PORT and set Sta...

Page 34: ...Dynamic DNS key in the DNS Account User Name and Password that you applied in step 3 Press save after you setup STEP 5 IP SETTING In the DVR MENU NETWORK set the IP ADDRESS GATEWAY NET MASK DNS and WE...

Page 35: ...ny login IP address to access the Video Server This function is designed to store a list of IP addresses which you can control and manage Backup Program You can press button and you can backup all rel...

Page 36: ...th one static ADSL you can remotely watch the video anywhere with a networkable computer Step 1 Click twice to enter the Login setup please refer to software installation Step 2 Key in User Name and P...

Page 37: ...Disconnection 4 Resolution D1 CIF 5 Image quality High Middle Low 6 Image adjusting Brightness Contrast Saturation 7 Snapshot press this button to automatically save the image on your PC 8 Record pre...

Page 38: ...ill be a recorded file on your PC Each recording file can save up to 6000 frames The recording file will be assigned to the second file if it is more than 6000 frames If the HDD space is less than 200...

Page 39: ...MAL controls basic functions only GUEST LEVEL watch the image only 2 Life time During this period of time users are allowed to control the Video Web Server Set up the ALARM function You can use it to...

Page 40: ...st which you want to send to when the alarm is triggered 3 If it is not necessary for you to verify the password and user s name please choose Verify as No When the alarm is triggered the video server...

Page 41: ...grade the firmware and get the online users information NOTE Do not reboot the DVR while it is upgrading the firmware 1 Firmware Version For the current firmware version you can click on the Find butt...

Page 42: ...rver Step 3 Click on YES to confirm that the Download Application is authentic and has been verified Note If you would like to download the Video Web Server Application you can do this by clicking thi...

Page 43: ...eature when it is locked press the ENTER and MENU keys at the same time key in the password Default 0000 and press the ENTER key again 1 2 3 4 5 6 7 8 9 1 0 1 1 1 2 1 3 14 15 1 Image transmission rate...

Page 44: ...mer Alarm Enable is set to YES Timer Alarm recording isn t working Check if the system is in Key Lock mode Press MENU and ENTER at the same time and enter password to escape the Key Lock mode Buttons...

Page 45: ...75 BNC Audio input output 4 audio inputs RCA and 2 audio outputs RCA Motion detect area 15 X 12 Targets per camera NTSC 15 14 targets per camera PAL Motion detect sensitivity 256 Levels Video loss de...

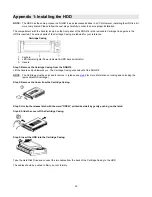
Page 46: ...cator 3 Handle Step 1 Remove the Cartridge Casing from the DGN216 Lift the handle and pull towards you The Cartridge Casing will slide out of the DGN216 NOTE The Cartridge must be unlocked to remove i...

Page 47: ...cabinet turn the key counter clockwise to Position B NOTE The DGR216 will not function if the key is not in the locked position 1 If two HDD s are installed the bottom one should be set to Master and...

Page 48: ...47 Appendix 2 Connection Diagram to Cameras and Monitor...

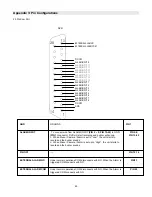
Page 49: ...M disconnects with NO When the Alarm is triggered COM connects with NO EXTERNAL ALARM NO PIN 25 Under normal operations COM disconnects with NO When the Alarm is triggered COM connects with NO EXTERNA...

Page 50: ...s for rack mounting applications can be purchased as an optional accessory Front Angle with Rack Mount Optional Side View with Rack Mount Optional For more information about the rack mount other acces...

Page 51: ...gh 60hr 120hr 226hr 450hr 900hr 1800hr Normal 96hr 192hr 360hr 720hr 1440hr 2880hr Record Quality Basic 160hr 320hr 600hr 1200hr 2400hr 4800hr HDD Type 250GB NOTE The above data has been taken from ac...

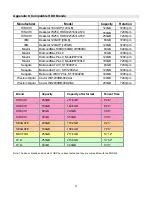
Page 52: ...us 9 Model 6Y160L0 160GB 7200rpm Seagate Barracuda ATA IV ST380021A 80GB 7200rpm Seagate Barracuda ATA V ST3120023A 120GB 7200 rpm Seagate Barracuda 7200 7 Plus ST3160023A 160GB 7200 rpm Western Digit...

Page 53: ...OVIDED UNDER THIS LIMITED WARRANTY IS THE EXCLUSIVE REMEDY OF THE PURCHASER DIGIMERGE SHALL IN NO EVENT BE LIABLE FOR ANY SPECIAL INDIRECT INCIDENTAL PUNITIVE OR CONSEQUENTIAL DAMAGES OF ANY KIND OR C...

Page 54: ...53 Digimerge Technologies Inc 300 Alden Road Markham Ontario L3R 4C1 www digimerge com...

Reviews: