170
Appendix J: Replacing the Hard Drive
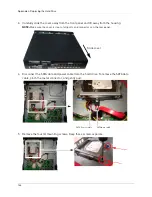
4. Slide the DVD/CD-RW drive out the slot.
5. Align the screw holes on the hard drive to the 4 blue rubber grommets. Ensure the SATA
power and data connectors on the hard drive faces away from the front panel.
6. From the bottom, screw the hard drive in place.
7. Connect the SATA data and power cable to the hard drive.
Final Result
Align the hard drive screw hole with
the blue rubber grommet.
Hard drive 2 & 3
Hard drive 1
Summary of Contents for DH230 Series
Page 1: ......
Page 8: ...viii...
Page 76: ...62 Backup...
Page 127: ...113 Using the iSMS Client PTZ Controls cont d...
Page 173: ...159 Appendix F Connecting PTZ Cameras PTZ Compatibility List...
Page 202: ......
Page 203: ......


