34
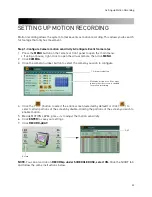
8. Under EVENT, enter the number of frames you want the camera to record in if it detects
motion, under
F/S
. Repeat for any other cameras that you wish to enable motion recording.
NOTE:
If you want to disable continuous recording, under CONTINUOUS, under F/S, select
OFF
.
This causes the system to record only when the cameras detect motion.
9. Under QUALITY, enter the desired video quality when the camera detects motion.
10. Click
ENTER
to save your settings.
Step 2: Configure Cameras that have motion Enabled
1. Click the
DAY EVENT
tab.
2. Ensure that under MOTION, the camera number matches the number in CH.
Step 3: Configure Schedule settings
1. Click
SCHEDULE
.
IMPORTANT
It is critical that the
camera number under
MOTION is the same as the
channel number you are
configuring.
This ensures that when
there is motion to that
particular camera, that it
will trigger motion
recording.
SCHEDULE
Summary of Contents for DH230 Series
Page 1: ......
Page 8: ...viii...
Page 76: ...62 Backup...
Page 127: ...113 Using the iSMS Client PTZ Controls cont d...
Page 173: ...159 Appendix F Connecting PTZ Cameras PTZ Compatibility List...
Page 202: ......
Page 203: ......

