background image

48 


If the setup is properly done, the cameras will appear on the screen (see Figure 6,page 
48). 


Figure 6: Remote Camera Views 


Note: 

If you are behind a router you need to open 4 ports related to the main port.  For 

example: If you set up port 5000 you need to open ports 5000, 5001, 5002 and 5003 in 
order to get connected remotely. 


Enter the user ID and password then press OK


Summary of Contents for DHT304

Page 1: ...DHT300 Series 4 9 16 Channel Network DVR Models DHT304 DHT309 DHT316 Installation User Manual Digimerge Technologies Inc...

Page 2: ...VE COVER OR BACK NO USER SERVICEABLE PARTS INSIDE REFER SERVICING TO QUALIFIED SERVICE PERSONNEL Explanation of two Symbols The lightning flash with arrowhead symbol within an equilateral triangle is...

Page 3: ...he FCC Rules These limits are designed to provide reasonable protection against harmful interference in a residential installation This equipment generates uses and can radiate radio frequency energy...

Page 4: ...YBACK 30 THE MASTER SLAVE HDD 30 PAN TILT ZOOM 31 REMOTE CONTROL 32 CAMERA INSTALLATION 33 PAN TILT CAMERA INSTALLATION 33 MONITOR STANDARD VCR INSTALLATION 34 NETWORK ALARM COMPUTER INSTALLATION 35 N...

Page 5: ...ANNEL SETTING 53 ADMIN USER ID PASSWORD OR GUEST PASSWORD CHANGE 54 Remote Capture Video Settings 55 Remote DVR Settings 55 TECHNICAL SPECIFICATIONS 57 TROUBLE SHOOTING 58 CARE AND MAINTENANCE 59 Limi...

Page 6: ...ming pool 8 Accessories Use this product only with a stand tripod bracket or table recommended by the manufacturer or sold with the product Any mounting of the product should follow the manufacturer s...

Page 7: ...r the cabinet has been damaged f When the product displays a distinct change in performance this indicates a need for service 17 Replacement Parts When replacement parts are required be sure the techn...

Page 8: ...EATURES 4 Video inputs 4 BNC inputs looping operation Video outputs 2 Composite outputs 1 Super VHS output VGA option available PC monitor 9 16 Channel only USB Port for USB Memory Key Interface USB p...

Page 9: ...via USB connection Note MINIMUM SYSTEM REQUIREMENTS FOR NETWORK USE 1 CPU SPEED SHOULD BE 1 0GHZ or more 2 RAM 256 MB RAM or more 3 Operating System Windows 98 2000 XP 4 Videocard stand alone 32 MB 5...

Page 10: ...YSTEM INCLUDING THE COMPONENTS SHOWN ABOVE FULL FF REW COPY STOP FF PLAY REW PAUSE REC STOP REC REC PLAY TIMER ALARM HDD EVENT SEARCH POP SEQ SETUP PIP QUAD ENTER PTZ ALRS CH1 CH2 CH3 CH4 SETTING SETU...

Page 11: ...ssfully Note The system is only checking for a MASTER HDD Install the Slave HDD onto the DVR if using a Slave HDD and setup the HDD Slave in the SETUP MENU and restart the DVR Note If the HDD is not p...

Page 12: ...etwork values set in the DVR Note The settings for the network values can be changed in the SETUP MENU NETWORK INFOMATION MAC ADDRESS XX XX XX XX XX XX IP ADDRESS 192 168 001 150 SUBNET MASK 255 255 2...

Page 13: ...R ALARM HDD EVENT SEARCH POP SEQ SETUP PIP QUAD ENTER PTZ ALRS CH1 CH2 CH3 CH4 SETTING SETUP DISPLAY SETTING SETUP DISPLAY EVENT SEARCH POP SEQ SETUP PIP QUAD ENTER PTZ ALRS CH1 CH2 CH3 CH4 TFT LCD DI...

Page 14: ...ntly being shown FRONT PANEL FUNCTION BUTTONS 1 CHANNEL ARROW BUTTONS These buttons perform the following functions a Displays a picture in Full Screen In Quad 1 mode Select the Channel 1 button and h...

Page 15: ...ft up down or right ZOOM Press arrow button to zoom in or out 2 QUAD ENTER BUTTON a QUAD Pressing this button goes to Quad viewing mode b ENTER This button serves as the ENTER key in Menu mode SINGLE...

Page 16: ...arms You can scroll through Events using the and keys and navigate between Pages of Events using the and keys Press the QUAD ENTER Button to exit the Event list The following letters represent the dif...

Page 17: ...is ON the LED will blink as an Alarm is being triggered e HDD FULL If the OVERWRITE menu is set up the LED will not blink in any case The LED blinks if the HDD has less than 1GB of storage space and...

Page 18: ...grated into the multimedia data to aid copyright owners to identify illegally distributed video or image data The Watermark proves preservation of integrity as well as the chance of being manipulated...

Page 19: ...HARD DRIVE AND USB CONNECTIONS FULL FF REW COPY STOP FF PLAY REW PAUSE REC STOP REC REC PLAY TIMER ALARM HDD EVENT SEARCH POP SEQ SETUP PIP QUAD ENTER PTZ ALRS CH1 CH2 CH3 CH4 SETTING SETUP DISPLAY US...

Page 20: ...VGA OUT IN OUT VIDEO IN OUT RS 232 VGA OUT ETHERNET AUDIO IN OUT S VHS OUT VIDEO OUT SLAVE OUT 1CH 2CH 3CH 4CH SL AVE OUT VIDEO O UT AUDIO O UT A UD IO IN S VIDEO OUT ETH ERNET USB2 0 RS 232 4 3 2 1...

Page 21: ...rnal motion sensors door window contacts etc 2 WARNING OUT 3 ALARM OUT Send signal to VCR or other devices in Alarm or motion situation 4 COM 5 RS 485 Connect the PTZ control wires to these terminals...

Page 22: ...perties MAIN KEY BUZZER LOSS BUZZER TIME DATE SET SEQUENCE SET TITLE SET ALARM SET MOTION SET DISPLAY TIME DATE DATE FORMAT CH1 CH2 CH3 CH4 QUAD DISPLAY CH1 CH2 CH3 CH4 ALARM CH1 CH2 CH3 CH4 MOTION CH...

Page 23: ...M REC SCHEDULE REC REC SETTTING SCHEDULE REC HDD REC SET REC QUALITY REC REC SPEED REC SELECT HDD CLEAR ALL HDD OVERWRITE HDD SLAVE GATEWAY SYSTEM HDD INFO DISP RS232 BAUD PASSWORD SET NETWORK TCP IP...

Page 24: ...e the date v DATE FORMAT There are three formats to display the date MM DD YYYY for U S A YYYY MM DD for Asian countries DD MM YYYY for European countries 2 SEQUENCE SET This sub menu allows you to se...

Page 25: ...n where the motion is taking place A third option OSD BUZZER will display MD and emit a buzzer sound in the event that motion is detected ii CHANNEL Select which channels will have the Pixel Motion Se...

Page 26: ...settings i HDD INFO DISP Sets the display settings for information on the HDD status This can be displayed as a percentage of HDD space used or amount of Bytes available or the HDD information display...

Page 27: ...s also known as Real Time The slowest Time Lapse speed is 1 IPS it will allow for the longest recording durations but it records less information iv REC SELECT Selects which channels will be recorded...

Page 28: ...r MOTION goes off under alarm or motion situation When ALARM REC mode is on images are being stored in HDD iii REC QUALITY Selects the Recording Quality level for Alarm Recording from Low Basic Normal...

Page 29: ...e again whether you will be proceeding with the Upgrade process Connect the USB Memory with the FIRMWARE to be upgraded and click YES Note The name of the Firmware Upgrade File is dht_dvr4 bin NEVER P...

Page 30: ...press the QUAD ENTER button on the highlighted recording The DVR will play that video You can stop the video at any time by pressing the STOP button Note If the HDD SLAVE is set as Y you could set th...

Page 31: ...e PLAY BUTTON to return to the normal play mode Shuttle You can select the playback speed for both forward and reverse by turning the shuttle to the left or right Shuttle movement changes the playback...

Page 32: ...LT key on the DVR for 3 seconds or press the Pan Tilt button on the remote control 4 You will see a contracted screen with a blue border 5 Use the Arrow keys to move sideways and the QUAD ENTER Button...

Page 33: ...EFT RIGHT arrow keys used in Menu mode ENTER Confirms selections in Menu mode WTMK Select the Enable or Disable of WTMK while display COPY Back up stored data in HDD to USB memory key Rewinds video in...

Page 34: ...ATION 1CH 2CH 3CH 4CH SLAVE OUT VIDEO OUT AUDIO OUT AUDIO IN S VIDEO OUT ETHERNET USB2 0 RS 232 VGA OUT IN OUT BNC CAMERA DC VIDEO AUDI REAR 4 3 2 1 485 485 GND COM WARNING OUT ALARM OUT 1CH 2CH 3CH 4...

Page 35: ...cassette in order to back up video and make it viewable for other parties To record the video signals from your DVR connect a BNC video cable RCA audio cable from the SLAVE OUT S OUT AUDIO OUT to the...

Page 36: ...4 3 2 1 485 485 GND COM WARNING OUT ALARM OUT RISQUE DE ELECTROIQUE NE PAS ENLEVER RICK OF ELECTRONIC SHOCK DO NOT OPEN ATTENTION CAUTION TO REDUCE THE RISK OF ELECTRIC SHOCK DO NOT REMOVE COVER OR B...

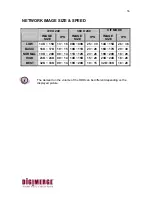
Page 37: ...13 18 08K 09K 25 30 14K 15K 26 36 BASIC 16K 17K 10 15 10K 11K 23 28 16K 17K 20 30 NORMAL 19K 20K 09 14 11K 12K 23 28 19K 20K 18 28 HIGH 23K 24K 09 14 14K 15K 15 20 23K 24K 18 28 BEST 32K 33K 09 14 19...

Page 38: ...4Hours 25Hours 60 IPS 26Hours 24Hours 21Hours 17Hours 13Hours 360 X 240 LOW BASIC NORMAL HIGH BEST 01 IPS 2581Hours 2222Hours 1951Hours 1600Hours 1194Hours 02 IPS 1290Hours 1127Hours 976Hours 808Hours...

Page 39: ...OW BASIC NORMAL HIGH BEST 01 IPS 0 031GB H 0 036GB H 0 041GB H 0 05GB H 0 067GB H 02 IPS 0 062GB H 0 071GB H 0 082GB H 0 0999GB H 0 134GB H 03 IPS 0 093GB H 0 107GB H 0 123GB H 0 149GB H 0 2GB H 05 IP...

Page 40: ...tor lights Power indicator HDD Access indicator 3 Handle YOU MAY FIND THAT THE CARTRIDGE CASING IS LOCKED IN THIS CASE SKIP AHEAD TO STEP 8 TO FIND INSTRUCTIONS ON UNLOCKING THE CABINET THEN RETURN TO...

Page 41: ...on is the DC Power cable and the wider cable is the standard Hard Drive IDE type connection 4 Secure the HDD in the Casing Use screws and tighten them positioning the HDD into place 5 Slide the top Co...

Page 42: ...he cabinet by turning the key clockwise If you need to unlock the cabinet turn the key counter clockwise from the position shown above IF YOU DO NOT LOCK THE CABINET THE DVR SYSTEM WILL NOT FUNCTION P...

Page 43: ...n the bottom of the DVR there is a place for the Slave HDD Remove the screws and install the Slave HDD Assemble with screws Note Make sure to set the HDD to slave mode then activate the slave mode in...

Page 44: ...wer allows you to access the DVR from a remote desktop or laptop in a TCP IP networking environment It can perform the following functions View live images from the 4CH 8CH and 16CH DVR Store search a...

Page 45: ...nstall the NetViewer from the supported CD R 1 Exit all applications currently running in the selected PC 2 Insert the supplied software CD in the CD ROM drive 3 Locate the Setup icon on your CD and d...

Page 46: ...Information 5 Enter your name and organization and press Next Figure 3 Destination Folder 6 Enter the desired folder for the installation or press Next Figure 4 Installation 7 Press Install to start i...

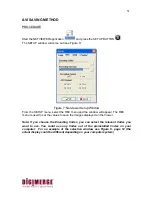
Page 47: ...e Finish button to end the installation process 9 Open the NetViewer icon located on your desktop and click on it 10 The Netviewer main window will appear on the screen as shown below NETVIEWER MAIN S...

Page 48: ...continue NOTE If you are using the Port Forwarding you should forward 4 serial ports from the set port number Example Set Port Number 5000 Ports to be Forwarded 5000 5001 5002 5003 VIEWING THE CAMERA...

Page 49: ...page 48 Figure 6 Remote Camera Views Note If you are behind a router you need to open 4 ports related to the main port For example If you set up port 5000 you need to open ports 5000 5001 5002 and 50...

Page 50: ...d the most recent recorded data will be played regardless of search data set on the DVR 2 Select the display mode Available modes are QUAD FULL PIP POP You could change the channel right button of the...

Page 51: ...11 Connect Disconnect button 12 Information Display Screen The status of NORMAL ALARM MOTION SCHEDULE REC is displayed Marking whether currently displaying image is LIVE or PLAYBACK 13 Video image is...

Page 52: ...nu and the window will appear The REC menu is used to set the values to save the images displayed on the Viewer Note If you choose the Encoding Codec you can select the relevant Codec you want to use...

Page 53: ...4 If 4 displays the IPS 16 you could set the new value at 3 IPS 4 i e x 16 IPS 4 IPS Note CodecS Microsoft Windows Media Series is recommended in situations where a Codec is not working properly or if...

Page 54: ...53 RECORDING CHANNEL SETTING 1 Select the Channels to be saved LOCAL REC BUTTON 2 Press the LOCAL REC BUTTON to start recording Press the LOCAL REC BUTTON again to stop recording Recording...

Page 55: ...o change the guest password repeat the procedure above by pressing the guest icon Click on the admin icon Enter the current password Enter the ID of the admin user Max 5digits Enter new the password f...

Page 56: ...n and select the DVR tab Press OK to finish Used to Change the DVR Setting over the Network Set the data and time Set the resolution for the Normal Rec and the Alarm Rec Set the IPS for the Normal Rec...

Page 57: ...available capacity for saving Select the HDD for Recording Select the HDD for Playback Press button to apply the changes 60 IPS is equal to 30 frames per second 1 IPS is equal to 0 5 frames per secon...

Page 58: ...BNC Input port That each of these inputs has a corresponding Video Out BNC connector is looping operation is desired 1 CH PORT PAN TILT video input available 1 RCA Input port 1 VGA Output port 9 16 on...

Page 59: ...ease check the following points The HDD is full and overwrite is not enabled Recording stopped SOLUTION PROBLEM Check the jumper PIN connection Activate the Slave HDD in the Menu option HDD SLAVE Slav...

Page 60: ...mal temperature environment Extreme temperatures can shorten the life of the electronic devices Handle the monitor carefully Dropping it can cause serious damage to the unit Occasionally clean the uni...

Page 61: ...t fire flood or Acts of God v adjustment maintenance or repair of the product other than in accordance with Digimerge approved procedures and vi use of replacement parts other than those specified by...

Page 62: ...and prices If the dealer fails to respond cannot be reached or fails to provide you with the required service you may obtain service directly from Digimerge by calling our service department at 866 34...

Reviews: