background image

GENERAL PRECAUTIONS:

1.

Read Instructions
All of the safety and operating instructions should
be read and understood before the product is used.

2.

Retain Instructions
The safety and operating instructions should be 
retained for future reference.

3.

Heed Warnings
All warnings on the product and the instruction 
manual should be followed.

4.

Follow Instructions
All operating and use instructions should be followed
for optimal performance

5.

Cleaning
Disconnect this video product from the power supply
before cleaning.  Do not use liquid cleaners or aerosol
cleaners.  Use a damp cloth for cleaning.  

6.

Attachments
Do not use attachments not recommended by the
video product manufacturer as they may cause
hazards.

7.

Water and Moisture
Do not use this product near water - for example,
near a bathtub, wash bowl, kitchen sink, wet 
basement, or near a swimming pool.

8.

Accessories
Use this product only with a stand, tripod, bracket or
table recommended by the manufacturer or sold
with the product. Any mounting of the product 
should follow the manufacturer’s instructions.

9.

Ventilation
This product should never be placed near or over a 
Radiator or heat register. This product should not be
placed in a built-in installation, such as a book case
or rack, unless proper ventilation is provided or the
Manufacturer’s instructions have been adhered to.

10.

Power Source
This product should be operated from the type of 
Power source indicated by the marking label. If you
are not sure of the type of power supply to your 
location, consult your product dealer or your local 
Power company

11.

Power Cord Protection
Power supply cords should not be routed so that 
They are likely to be walked on or pinched by items
placed on or near them

12.

Lightning
For added protection, unplug this product from its 
outlet during a lightning storm. This will prevent
damage to the video product due to lightning and
power surges

13.

Overloading
To avoid the risk of fire and electric shock, do not 
plug this product into an over-loaded power supply.

14.

Object and Liquid Entry
Never push objects into the openings of this product
as they may touch dangerous voltage points that
may result in fire or electric shock. Never spill a liquid
of any kind on this product.

15.

Servicing
Do not attempt to service this product yourself as 
opening or removing covers may expose you to
voltage or other hazards. Refer all servicing to
qualified service personnel

16.

Damage Requiring Service
Disconnect this product from the power supply
and refer servicing to qualified service
personnel under the following conditions:
a. When the power supply cord or plug is damaged
b. If objects have fallen into the product
c. If the product has been exposed to rain or liquids
d. If the product does not operate normally by

following the instruction manual. Adjust only
the controls that are covered in the instruction
manual as an improper adjustment may result 
in damage and will often require extensive work
by a qualified service technician to restore
the product to its normal operation

e. If the product has been dropped or the cabinet

has been damaged

f.  When the product displays a distinct change in

performance - this indicates a need for service

17.

Replacement Parts
When replacement parts are required, be sure the
technician uses replacement parts specified by
the manufacturer. Unauthorized substitutions may
result in fire, electric shock, or other hazards.

18.

Safety Check
Upon completion of any service to this product
ask the service technician to perform safety
checks to determine that the product is in
proper working condition.

19.

Grounding or Polarization
This product is equipped with a three-wire
grounding-type plug, a plug having a third
(grounding) pin and will only fit into a 
grounding-type power outlet.  This is a safety
feature.  If you are unable to insert the plug
into the outlet, contact your electrician to 
replace your obsolete outlet.  Do not defeat the
safety purpose of the grounding-type plug.

20.

Power Lines
An outside antenna system should not be 
located in the vicinity of overhead power lines
or other electric light or power circuits, or where
it can fall into such power lines or circuits. 
When installing an outside antenna system, 
extreme care should be taken to keep from
touching such power lines or circuits as contact
with them might be fatal.

21.

Wall or Ceiling Mounting
The product should be mounted to a wall or ceiling 
only as recommended by the manufacturer.

22.

Heat
The product should be situated away from heat 
such as radiators, hear registers, stoves, or other 
products (including amplifiers) that produce heat.

Summary of Contents for DM17TQ

Page 1: ...17 TFT LCD Monitor With Integrated Quad Processor Model DM17TQ Installation User Manual...

Page 2: ...und to comply with the limits For a Class B digital device pursuant to Part 15 of the FCC Rules These limits are designed to provide reasonable protection against harmful interference in a residential...

Page 3: ...limits are designed to provide reasonable protection against harmful interference in a residential installation This equipment generates Uses and can radiate radio frequency energy and if not install...

Page 4: ...MONITOR CONTROLS FRONT PANEL 5 6 MAIN MENU CONTROL 8 7 PAN TILT ZOOM 11 8 MONITOR CONNECTIONS BACK PANEL 12 9 SIDE PANEL 13 10 REMOTE CONTROL 14 11 TROUBLE SHOOTING 15 12 TECHNICAL SPECIFICATIONS 16 1...

Page 5: ...of any kind on this product 15 Servicing Do not attempt to service this product yourself as opening or removing covers may expose you to voltage or other hazards Refer all servicing to qualified serv...

Page 6: ...co D Protocol Metal cabinet with 4 camera inputs 4 BNC and 4 audio RCA 2 way audio Single or Dual PIP viewing options main and PIP channels Selectable POP viewing options Selectable still frame in qua...

Page 7: ...ount Ears USB Cable Owners Manual CONNECTING THE TFT STAND Use the supplied screws to connect the stand for the TFT monitor to the base Brackets and screws are also included for Rack Mounting applicat...

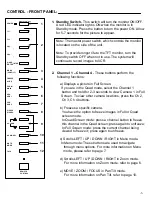
Page 8: ...images to VCR 2 Channel 1 Channel 4 These buttons perform the following functions a Displays a picture in Full Screen If you are in the Quad mode select the Channel 1 button and hold for 2 3 seconds...

Page 9: ...nnel 2 Press the Zoom button 3 Use the up down left right arrow keys to move the area which the monitor is zooming in on 4 Press Zoom again to escape Zoom mode b Main The second function of the Zoom M...

Page 10: ...ttons will also remove add a subpicture to create a Single PIP Dual PIP viewing mode PIP Sequence Holding this button for 3 seconds initiates Sequencing in Single or Dual PIP mode To exit PIP Sequenci...

Page 11: ...Change the time 24 hour clock iv DATE Change the date v DATE FORMAT There are three formats to display the date MM DD YYYY for U S A YYYY MM DD for Asian countries DD MM YYYY for European countries 2...

Page 12: ...ct the Alarm Input The default setting is OFF to activate the Alarm on a camera change the setting to N O Normally Open 6 Motion Set This sub menu allows you to enable disable the monitor s Pixel base...

Page 13: ...still functioning properly TITLE TIME Change the location of on screen display for Time Date and camera Titles T R B L represent Top Right Bottom Left respectively Therefore for example the setting TR...

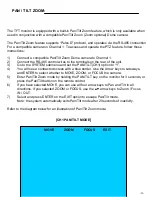
Page 14: ...and set the PAN TILT CH1 option to Y 4 You will see a contracted screen with a blue border Use the Arrow keys to sideways and ENTER to select whether to MOVE ZOOM or FOCUS the camera 5 Enter Pan Tilt...

Page 15: ...transmit audio and video from the monitor to a VCR or DVR 5 VCR Audio Video In Use with A V cables not supplied to receive audio and video from an external source VCR or DVR 6 Alarm Function Terminals...

Page 16: ...USB POWER CONTROLS SIDE PANEL 1 Power This switch controls power to the entire unit Depress the side with the I to turn the power ON Depress the O side to turn the unit OFF 1 13...

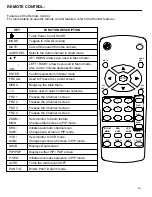
Page 17: ...row keys used in Menu mode Displays either PIP POP screen PIP POP Displays Quad screen QUAD Initiates automatic sequence in PIP mode P SEQ Sets monitor to VCR mode Changes second sub screen in PIP mod...

Page 18: ...ols NO POWER Check for AC connection NO POWER Poor picture quality Clean the camera lens Readjust the CONTRAST or BRIGHTNESS controls Picture but no sound Adjust the VOLUME Shrinking picture Check the...

Page 19: ...peed 30 fps Camera Input 4 BNC Alarm Inputs Outputs 4 2 Input signal Composite 1 V p p 75 ohm Contrast ratio 300 1 Brightness ratio 230 cd Power Source AC 100 240 V Power Consumption Normal 60W Max 70...

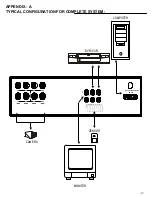
Page 20: ...ER DVR VCR MONITOR SENSOR CAMERA ALARM IN NC NO COM VCR IN RS 232 VGA IN AC100 240V 50 60Hz GND CH8 CH7 CH6 CH5 CH4 CH3 CH2 CH1 AUDIO VIDEO VCR OUT MONITOR OUT PAGE 2 PAGE 1 CH2 CH3 CH4 CH5 CH6 CH7 CH...

Page 21: ...rmal temperature environment Extreme temperatures can shorten the life of the electronic devices Handle the monitor carefully Dropping it can cause serious damage to the unit Occasionally clean the un...

Page 22: ...PROVIDED UNDER THIS LIMITED WARRANTY IS THE EXCLUSIVE REMEDY OF THE PURCHASER DIGIMERGE SHALL IN NO EVENT BE LIABLE FOR ANY SPECIAL INDIRECT INCIDENTAL PUNITIVE OR CONSEQUENTIAL DAMAGES OF ANY KIND OR...

Page 23: ...Digimerge Technologies Inc 300 Alden Road Markham Ontario L3R 4C1 www digimerge com...

Reviews: