background image

iv

1. Read these instructions.
2. Keep these instructions.
3. Heed all warnings.
4. Follow all instructions.
5. Do not use this apparatus near water.
6. Clean only with dry cloth.
7. Do not block any ventilation openings.  Install in accordance with the
    manufacturer's instructions.
8. Do not install near any heat sources such as radiators, heat
    registers, stoves, or other apparatus (including amplifiers) that 
    product heat..
9. Do not defeat the safety purpose of the polarized or grounding-type
    Plug. A polarized plug has two blades with one wider than the other. 
    A grounding type plug has two blades and a third grounding prong. 
    The wide blade or the third prong are provided for your safety. If the 
    provided plug does not fit into your outlet, consult an electrician for
    replacement of the obsolete outlet.
10. Protect the power cord from being walked on or pinched 
      particularly at plugs, convenience receptacles, and the point where
     

exit from the apparatus.

11. Only use attachments/accessories specified by the manufacturer.
12. Unplug this apparatus during lightning storms or when unused for
      long periods of time.
13. Refer all servicing to qualified service personnel.  Servicing is
      required when the apparatus has been damaged in any way, such
      as power-supply cord or plug is damaged, liquid has been spilled or
      objects have fallen into the apparatus, the apparatus has been
      exposed to rain or moisture, does not operate normally, or has been
      dropped.
14. CAUTION - THESE SERVICING INSTRUCTIONS ARE FOR USE
      BY QUALIFIED SERVICE   PERSONNEL ONLY.  TO REDUCE THE
      RISK OF ELECTRIC SHOCK DO NOT PERFORM ANY SERVICING
      OTHER THAN THAT CONTAINED IN THE OPERATING
      INSTRUCTIONS UNLESS YOU ARE QUALIFIED TO DO SO.
15. Use Certified/Listed Class 2 power source only.

 thy 

IMPORTANT SAFEGUARDS

All manuals and user guides at all-guides.com

Summary of Contents for DPV14D

Page 1: ...V I S I O N POLARIS 2 model DPV14D All manuals and user guides at all guides com a l l g u i d e s c o m...

Page 2: ...e To disconnect the cord pull it out by the plug Never pull the cord itself Allow adequate air circulation to prevent internal heat build up Do not place the unit on surfaces rugs blankets etc or near...

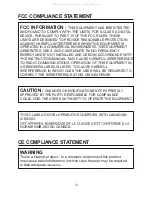
Page 3: ...ICATIONS OPERATION OF THIS EQUIPMENT IN A RESIDENTIAL AREA IS LIKELY TO CAUSE HARMFUL INTERFERENCE IN WHICH CASE THE USER WILL BE REQUIRED TO CORRECT THE INTERFERENCE AT HIS OWN EXPENSE CAUTION CHANGE...

Page 4: ...ct the power cord from being walked on or pinched particularly at plugs convenience receptacles and the point where exit from the apparatus 11 Only use attachments accessories specified by the manufac...

Page 5: ...of high sensitivity Digital Wide Dynamic Range Xtended Dynamic Range Excellent picture quality 560 lines of resolution 0 25 Lux Color 0 01 Lux B W F1 2 Sensitivity Auto electronic shutter 1 60 1 50 1...

Page 6: ...HT I O Terminals To select Day Night mode using external equipment connect control lines to the appropriate terminals DAY NIGHT OUTPUT It is the function that can turn on external IR LED Lamp by detec...

Page 7: ...ion using the bottom of the housing as a Drilling guide label Fig 2 3 Attach the housing to the ceiling using suitable fasteners M6x35 tapping screws are supplied only use if they are suitable Fig 2 4...

Page 8: ...ght Spot Video Out 1 2 3 4 5 6 1 2 3 4 5 6 The housing can also be mounted on a 4s electrical box MOUNTING HOUSING TO AN ELECTRICAL BACK BOX Electrical box Torx screws UNC 8 32 x 0 75 Rubber Washers 4...

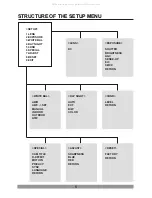
Page 9: ...NS DC EXPOSURE SHUTTER BRIGHTNESS AGC SENSE UP BLC D WDR RETURN WHITE BAL DAY NIGHT AUTO EXT B W COLOR 3DNR LEVEL RETURN SPECIAL CAM TITLE D EFFECT MOTION PRIVACY SYNC LANGUAGE RETURN ADJUST SHARPNESS...

Page 10: ...SPECIAL 7 ADJUST 8 RESET 9 EXIT EXPOSURE SHUTTER 1 60 BRIGHTNESS IIIIIIIIIIIIIIIIII 50 AGC HIGH SENSE UP AUTO BLC BLC D WDR OFF RETURN RET BLC GAIN MIDDLE DEFAULT LEFT RIGHT IIIIIIIIIIIIIIIIII 2 WIDTH...

Page 11: ...BAL MANUAL BLUE IIIIIIIIIIIIIIIIII 50 RED IIIIIIIIIIIIIIIIII 50 RETURN RET You can configure the DNR Digital Noise Reduction related settings if you press the Setup switch when ON is selected in 3DNR...

Page 12: ...ted area the green dots are displayed on the screen A CAM TITLE B Character Table C Command Line Move to left Move to right CLR Erase all characters POS Move the position of title END Save and End SPE...

Page 13: ...or Line Lock mode INT This mode is necessary for using the internal synchronization L L This mode is necessary for the operation of multi camera because it synchronizes the camera phase by using the...

Page 14: ...All manuals and user guides at all guides com...

Page 15: ...trol Setup Method OSD Language Power 15 625KHz H x 50Hz V Connector etc PAL Sharpness Video output Operating temperature Operating humidity 1 0 Vp p 75 ohm composite Auto Off Selectable limit 2X 256X...

Page 16: ...Window Size Cable Entry Weight Unit Shipping Unit mm 0 1 in 2 5mm thick impact resistant P C LEXAN 3 93 in 10cm diameter One 1 opening holes 1 68 lb 0 76kg 2 11 lb 0 96 kg 146 3 PF 3 4 TAP o 4 5o 4 5...

Reviews: