6
Setting Up The Expansion Bay
Select Recording Mode
1. Select
RECORD
from the main menu. Press
ENTER
on the remote. The Record menu
opens.
2. Select
BACK UP MODE
. Change the value to
OFF
. Press
f(-)
or
f(+)
on the remote to
change the values.
3. Press the
ESC
button on the remote until a
window prompts you to save. Select
SAVE
AND EXIT
. Press
ENTER
on the remote.
NOTE:
The overwrite option must be enabled
so that the system records on a continual loop.
Setting The Expansion Bay to Record Events
You can set the expansion bay to store events only. For example, you can set the expansion bay to
store all Motion events. This allows you to save hard drive space.
To configure your expansion bay to record events:
Configure the expansion hard drives
1. Press
(Menu) on the remote to open the
main menu.
2. Select
SYSTEM.
Press
ENTER
on the remote.
3. Select
HDD
. Press
ENTER
on the remote.
4. Select
HDD CONFIGURATION
. Press
ENTER
on the remote. A window opens with a list of
hard drives (Figure 2.1).
• Hard drives labeled
FIXED-00
and
FIXED-01
refer to the hard drives in the Blade.
• Hard drives labeled
FIXED-02
,
FIXED-03
and
FIXED-04
refer to the hard drives in the
expansion bay.
5. Select
FIXED-02
. Change the setting to
BACKUP
by pressing the
f(-)
or
f(+)
button on
the remote.
Repeat for
FIXED-03
and
FIXED-04
if desired.
6. Press the
ESC
button on the remote until you reach the main menu.
Select Recording Mode
1. Select
RECORD
from the main menu. Press
ENTER
on the remote. The Record menu opens.
2. Select
BACK UP MODE
. Change the value to
EVENT
. Press
f(-)
or
f(+)
on the remote to change
the values.
3. Press the
ESC
button on the remote until a window prompts you to save. Select
SAVE AND
EXIT
. Press
ENTER
on the remote.
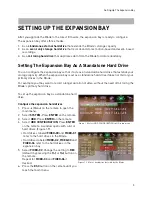
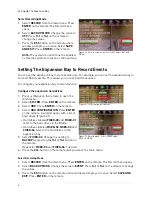
Figure 2.0 Record setup menu. Select OFF under BACKUP
MODE.
Figure 2.1 HDD Configuration menu.
Figure 2.2 Record menu. Select EVENT under
BACKUP MODE.
Summary of Contents for VBAY3HD
Page 8: ...viii...


