


2
www.digiop.com
© 2011 DIGIOP, Inc. All rights reserved.
Review the list of IP devices found by IPAdmin Tool. You can identify your camera by the MAC
address. If the camera was not found, click the
Refresh
button every minute until your camera
appears in the list.
3.
After finding your camera, right click the entry, then select
IP Address
from the drop-down list. An
IP Setup window will open.
Static Option
4.
In the IP Setup window, click the
Static
option bullet. If you have other compatible network
settings you want to apply to the device, enter them in the appropriate locations. Click
Setup
to
save settings.
5.
In the
Login
window, enter the ID and PW
(password) for your camera, then click
Login
. The
default administrator values for the ID and PW are
root
and
pass
.
6.
In the IPAdmin Tool window, click
Refresh
.
Verify that the entry representing the camera now
shows the (new) static IP address.
7.
Continue with procedure
Step 5. Setup camera Basic Configuration
.
Installing cameras on LANs without DHCP
In networks without a DHCP server, cameras must be powered on and reconfigured one at a time to avoid
addressing conflicts between other cameras, or possibly with another device on the network. Configuring
the network settings of your cameras includes these steps:
—
Determine the network settings of your computer.
—
Check the network for compatibility with the default static network settings of your camera.
—
Find an IP address that is not in use and can be assigned to your camera.
—
Attach your camera to the network, power it on, and configuring it with new network
settings.
Determine the network settings of your computer
1.
At a PC attached to the LAN where your camera will be connected, determine the IP address, subnet
mask, and default gateway of your PC. To find this information:
a.
Hold down the
Windows
key and press
r
to
open the Run dialog box.
b.
Type
cmd
in the entry field, then click
OK
to
open the Command Prompt window.
c.
At the command prompt, enter
ipconfig.
The response will show the your PC’s network
settings.
d.
Record the IP Address, Subnet Mask, and Default Gateway for your PC’s Ethernet adapter for
future reference.
NOTE
The Ethernet adapter data you see by using ipconfig will probably be different from that shown
in the example above. If you are using Windows Vista or Windows 7, the IP address is identified
as the “IPv4 Address.”
Check LAN for default IP address compatibility
Before connecting your camera to the LAN, check the network to see if IP address 192.168.0.100 is already
in use. At a Microsoft Windows computer attached to the LAN where the camera will be connected, open a
Command Prompt window and enter:
ping 192.168.0.100
The “
Request timed out
” response indicates that the IP address is not in use and the camera can be
connected without causing conflicts. If the response from the ping command received a “
Reply..
”, the IP
address is in use. Contact Technical Support for further assistance, if needed.
Find network settings (IP addresses) that are not in use
1.
At your PC, find an IP address on your network that is not in use:
a.
Write down the EXACT IP address of your PC up to the third/last period. Using the example
shown above, this expression is: 192.168.1. After the third period, include any number
between 1 and 254 that is different from the one in your PC’s IP address, 168. As a first try,
let’s choose 200, which will form the IP address 192.168.1.200.
b.
Next, use the
ping
command in the Command Prompt window to see if this IP address is in
use on your network. Enter:
ping 192.168.1.200
.
In the example shown above, the message “
Reply from 192.168.1.200: ..
” indicates that
your PC can reach a device with that IP address, and that address is in use (i.e., you cannot
use it for your camera).
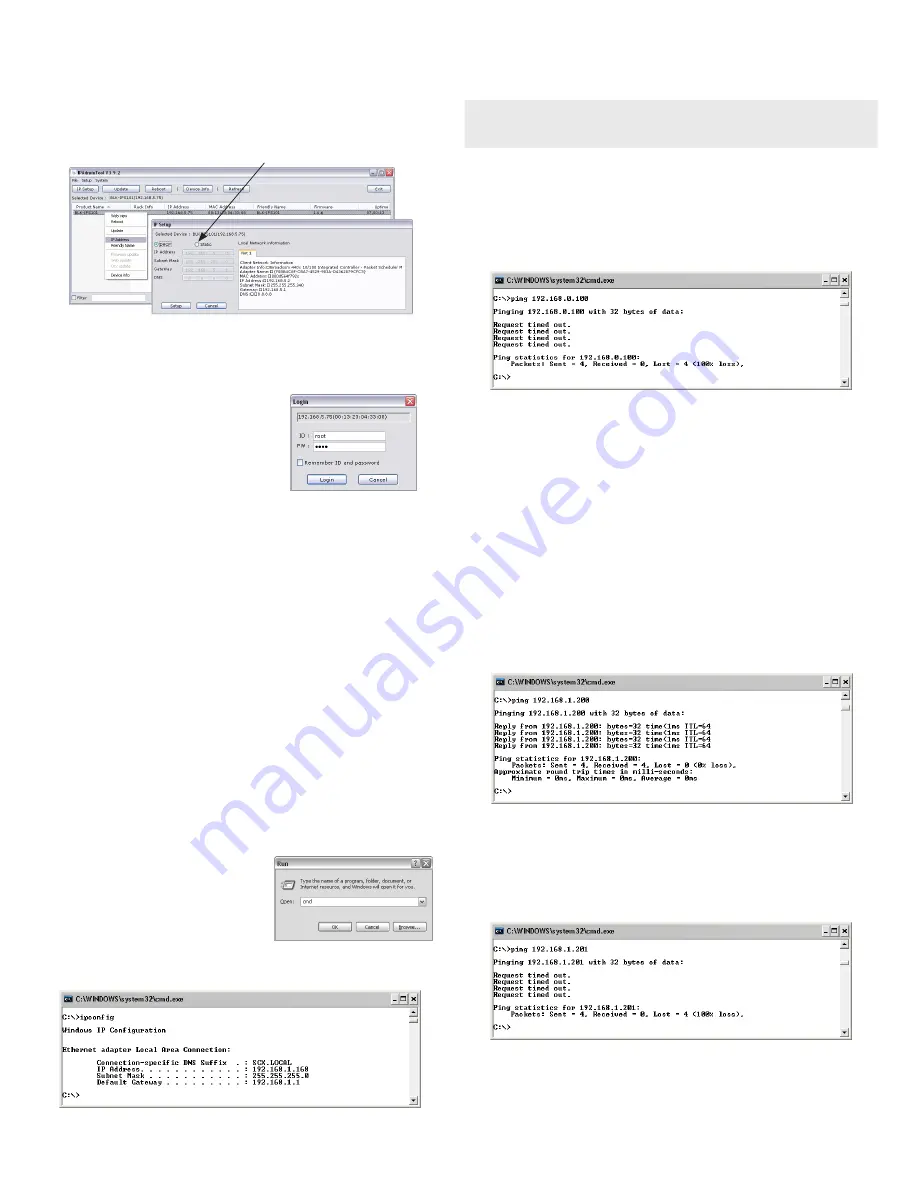
c.
Since the
ping
test showed that 192.168.1.200 is in use, try another number between 1 and
254. Let’s try to ping 192.168.1.201. At the command prompt, enter:
ping 192.168.1.201
d.
In this test, the message “
Request timed out
” indicates that your PC cannot reach the
device with that IP address, and that address is probably not in use. If this test showed that
this IP address is in use, try other IP addresses using the steps above until an unused address
is found.


