background image

LIVEMIX CS-DUO

 11

GETTING STARTED WITH THE CS-DUO

THE OVERVIEW SCREEN

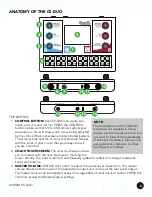
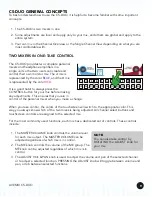
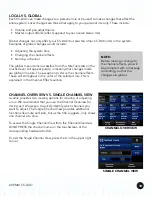
The default view when the CS-DUO is powered up is the Channel Overview. Each channel in the 

overview screen shows the following information:

1. 

CHANNEL NUMBER:

 This is the number of the audio channel on the network. The Livemix 

system allows up to 24 input channels.

2. 

CHANNEL NAME:

 This is the custom channel name. See Naming a Channel in the next section 

for details.

3. 

SIGNAL LEVEL INDICATOR:

 This small colored square serves as a signal level meter for the 

channel. It is colored gray if no signal is present, then illuminates in green, yellow, and finally red 

as the signal increases in level. Turn down your source volume if you see red.

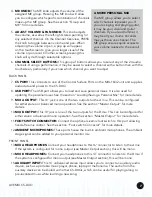
4. 

VOLUME LEVEL: 

This horizontal strip shows the current volume level of the channel

5. 

PAN LEVEL (NOT SHOWN): 

The volume strip switches to pan by pressing the ADJUST knob.

6. 

SHOW 13-24:

 PRESS this button to switch the Channel Overview display to channels 13-24. 

PRESS it again to switch back to channels 1-12.

7. 

ACCESSORY CHANNELS:

 PRESS this button to view the Accessory Channels screen, where 

you can adjust levels for other audio sources such as the built-in intercom, metronome, ambient 

microphones, and the auxiliary input. See the “Accessory Channels” section for more details. 

8. 

MIX TOOLS:

 PRESS this button to go to the Mix Tools page, where you can perform other 

advanced mixing functions. See the Mix Tools section for more details.

Summary of Contents for CS-DUO

Page 1: ...1266 Park Road Chanhassen MN 55317 952 401 7700 support digitalaudio com www digitalaudio com CS DUO USER GUIDE Version 1 1 May 2015...

Page 2: ...at the safety purpose of the polarized or grounding type plug A polarized plug has two blades with one wider than the other A grounding type plug has two blades and a third grounding prong 8 Protect t...

Page 3: ...uct to the place of purchase Please write the RMA number on the outside of the shipping carton Any product sent to us without a valid RMA number will be refused Include the following with the product...

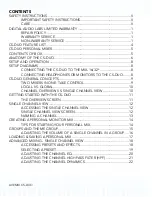
Page 4: ...ONE TAKE CONTROL 9 LOCAL VS GLOBAL 10 CHANNEL OVERVIEW VS SINGLE CHANNEL VIEW 10 GETTING STARTED WITH THE CS DUO 11 THE OVERVIEW SCREEN 11 SINGLE CHANNEL VIEW 12 ACCESSING THE SINGLE CHANNEL VIEW 12...

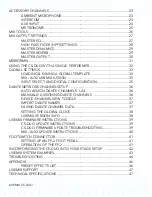
Page 5: ...ORK CHANNEL SETUP 36 AUTO ASSIGN DANTE CHANNELS 1 24 36 MANUALLY ASSIGNING DANTE CHANNELS 36 DEVICE CHANNEL VIEW TOGGLE 37 IMPORT DANTE NAMES 37 SAVING DANTE CHANNEL DATA 37 SETTING THE GLOBAL CLOCK 3...

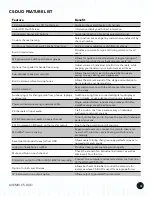
Page 6: ...dio from phones laptops metronomes Audition a song from a connected digital audio player play to tracks or use advanced metronome features Power and audio over single network cable Single cable interf...

Page 7: ...dio data from the MIX 16 32 Provides two separate mixes each with headphone outputs Provides an easy to use and powerful set of controls Provides stereo headphone amplification or mono output of perso...

Page 8: ...date to reflect the changes made with knobs and buttons 3 MASTER VOLUME ROTATE this control to adjust the overall level of each mix The master volume affects both the level of the headphone output and...

Page 9: ...ration See the section Master Output for more details 10 MIX B OUTPUT This jack is one of the two outputs for the B mix This can be configured for either stereo or balanced mono operation See the sect...

Page 10: ...SB CS PORT FOOTSWITCH MIX A OUT MIX B OUT LIVEMIX DATA IN 24VDC 3 75A LIVEMIX DATA OUT STEREO MIXES 1 16 LIVEMIX DATA OUT MIX 16 STEREO MIXES 17 32 MIX 32 ONLY PUSH TO SETUP MASTER OUT PUSH TO SETUP M...

Page 11: ...ou take control the colors of the touchscreen will switch to the appropriate color This way you always know which of the two mixes is being adjusted All channel select buttons and touchscreen controls...

Page 12: ...e Mix Tools tab on the touchscreen will appear purple indicating that changes made are global in nature The exception to this is the channel effects These will still appear in the color of the selecte...

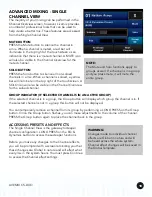
Page 13: ...finally red as the signal increases in level Turn down your source volume if you see red 4 VOLUME LEVEL This horizontal strip shows the current volume level of the channel 5 PAN LEVEL NOT SHOWN The vo...

Page 14: ...g the preset or other Channel Effect settings are Global Changes See the section Selecting an EQ Dynamics Preset for more details 3 MUTE BUTTON PRESS the Mute button to silence the channel in a mix Wh...

Page 15: ...n screen keyboard to enter the desired channel name Use the uppercase number and special character buttons and delete keys as needed When you have finished naming a channel use the Next Channel and Pr...

Page 16: ...all the drums start with these three ADD PITCH REFERENCE Mix the channels you need for pitch reference Limit this to 1 or 2 channels like a piano or acoustic guitar These will ensure your are singing...

Page 17: ...r press Show Next Group to setup additional groups and repeat step 2 ADJUSTING THE VOLUME OF A GROUP To adjust the volume of a group select any one of the channels in the group Multiple channel keys w...

Page 18: ...4 PRESS the ADJUST knob to return the channel to the group ADJUSTING THE VOLUME OF A SINGLE CHANNEL IN A GROUP FROM THE SINGLE CHANNEL VIEW When a channel is in a group the Single Channel View will in...

Page 19: ...PRESS X to Exit to the Channel Overview To save a mix to a USB device insert a USB flash drive into the slot on the back of the CS DUO When the device is recognized the USB Storage button will appear...

Page 20: ...Group button will display which group the channel is in If the selected channel is not in a group this button will not be displayed You can temporarily remove a channel from its group by performing a...

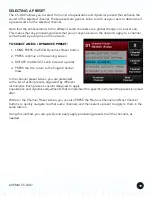
Page 21: ...1 LONG PRESS the EQ Dynamics Preset button 2 PRESS continue on the warning screen 3 ROTATE the ADJUST knob to select a preset 4 PRESS the X to return to the Single Channel View In the channel preset...

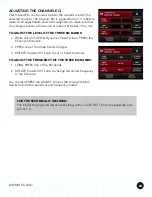
Page 22: ...ile still on the EQ Dynamics Preset screen PRESS the Channel EQ button 2 PRESS one of the three bands to adjust 3 ROTATE the ADJUST knob to cut or boost the band TO ADJUST THE FREQUENCY OF THE THREE E...

Page 23: ...assed 40Hz 40Hz or lower will be filtered out This setting is good for most instruments 80Hz 80Hz or lower will be filtered out This setting will cut out some 60Hz hum and noise good for male vocals 1...

Page 24: ...nel Dynamics button The compressor has two controls one is the amount of compression applied to the channel the second is the type ROTATE the ADJUST knob to adjust the amount of compression applied to...

Page 25: ...because you are hearing the sound of the audience and the reverberation of the hall you are performing in INTERCOM The Livemix system contains a built in intercom that allows performers to communicate...

Page 26: ...r Auxiliary Input This is useful for a local click track or guide track When Share Aux is selected you share the audio on your Auxiliary Input with anyone who has their Monitor All Aux button selected...

Page 27: ...sing the Met Setup button 1 BPM Press BPM to adjust the tempo of the metronome Use the ADJUST knob to change the tempo 2 BEATS PER MEASURE PRESS the Beats per Measure button to cycle through the optio...

Page 28: ...stereo or single channel mono mix that is output from the CS DUO Another way to access these options is to PRESS the Master Volume Knob GROUP ME SETUP This provides an alternate way to get to the Grou...

Page 29: ...is where you will assign the output options of the CS DUO and set some important system and ear protection settings MASTER EQ This 3 band EQ can be used to tailor the overall sound of the monitor mix...

Page 30: ...to play very low frequencies By only sending the stage monitor or headphones the frequencies they can handle well and filtering out the lower frequencies that are below their advertised frequency resp...

Page 31: ...applied to the mix MASTER REVERB When you hear instruments in an acoustic space such as a concert hall theater or stadium you are always hearing the natural reverberation of the environment The CS DUO...

Page 32: ...e Volume Limit you ensure that even at a maximum Master Volume you are listening at safe levels The Volume Limit will not affect the sound of your mix it is completely transparent PEAK LIMITER The Pea...

Page 33: ...s screen of the remote unit You may need the performer to let you know what port they are connected to with the intercom TO CONNECT TO ANOTHER CS DUO PRESS the MirrorMix button from the Mix Tools menu...

Page 34: ...of knobs control the A mix To link the A and B mixes 1 SELECT the A MIX 2 LONG PRESS both Master Volume knobs 3 Confirm that you want to group the contols To unlink the mixes LONG PRESS on both Maste...

Page 35: ...RT The MIX 16 32 has a USB port and will show up as a sound device when plugged into a computer You can record the output of any single CS DUO in the system INPUT SELECT AND DIGITAL CONFIGURATION IF L...

Page 36: ...Channel Overview To save a template to a USB device insert a USB flash drive into the USB slot on the back of the CS DUO When a USB device is recognized the USB Storage button will appear on the Load...

Page 37: ...rt of the MIX 16 32 You can then connect a Windows PC or Apple OS X computer and record the stereo signal into your audio recording software of choice INPUT SELECT AND DIGITAL CONFIGURATION If the LM...

Page 38: ...of the chosen Dante device MANUALLY ASSIGNING DANTE CHANNELS You may want to manually subscribe to channels on a Dante network Using the manual assign feature will allow you to connect to multiple de...

Page 39: ...ix channel names that appear in the Channel Overview and Single Channel View To import Channel Labels from the Dante network 1 PRESS the Global Setup button from the Mix Tools menu 2 PRESS the Input S...

Page 40: ...ton to bring up a page that displays the firmware versions for the CS DUO MIX 16 32 and Dante option card The firmware on the CS DUO MIX 16 32 and Dante option card are user updateable To find out if...

Page 41: ...SB flash drive into the USB port on the back of the CS DUO The CS DUO will automatically start the firmware update process and present you with a pop up display 4 Press YES to begin the update If you...

Page 42: ...show the progress Do not turn off the power until the update is complete or you may damage the unit 6 Press the Finish button 7 Disconnect the MIX 16 32 from the PC and verify that the update was suc...

Page 43: ...he buttons A TAP is a short press less than 1 sec in duration A HOLD is a long press lasting more than a second 1 TAP BUTTON 1 A short tap on button 1 will select the next channel on the CS DUO When y...

Page 44: ...e network cable Any CAT 5 CAT 5e or CAT 6 cable will work with the CS DUO Note that your CS DUO may be located a fair distance from the MIX 16 32 that it is connected to so you may need a network cabl...

Page 45: ...ds at least one connected personal mixer to make a mix Each Livemix CS DUO personal mixer connects via CAT5 CAT6 cable to one of the ports of the MIX 16 32 Using various controls on the unit two users...

Page 46: ...ee a red mute label next to the channel name on the overview screen Verify that the channel is connected properly to the AD 24 or configured properly if using the Dante Option Card I AM ADJUSTING THE...

Page 47: ...I DON T HEAR ANY CHANNELS Make sure you have the correct input device selected In the Global Setup menu select Input Select and Digital Configuration then Input Source Select and verify that the corr...

Page 48: ...ELECTRIC FINGER 12 BASS ELECTRIC PICK 13 BASS ELECTRIC SLAP 14 BASS UPRIGHT 15 GUITAR ELECTRIC LEAD 16 GUITAR ELECTRIC RHYTHM 17 GUITAR ACOUSTIC 18 KEYS ACOUSTIC PIANO 19 KEYS ELECTRIC PIANO 20 KEYS...

Page 49: ...L SPECIFICATIONS CS DUO Output Power THD N 22 200mW 1 THD N 100mW 03 THD N 32 250mW 1 THD N 100mW 014 THD N 64 250mW 1 THD N 100mW 005 THD N 300 130mW 1 THD N 100mW 003 THD N Frequency Response 20Hz 2...

Page 50: ...SYSTEM SPECIFICATIONS THD N 18 dBu 1KHz input 03 100mW 22 Load 014 100mW into 32 Load 005 100mW into 64 ohms 003 100mW into 300 S N Ratio 103dB Frequency Response 20Hz 22KHz 3dB Crosstalk Left to Rig...

Page 51: ...2014 2015 Digital Audio Labs Audinate the Audinate logo and Dante are trademarks of Audinate Pty Ltd Livemix is a registered trademark of Digital Audio Labs Patents pending...

Reviews: