background image


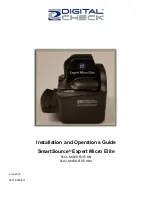
Installation & Operations Guide - SmartSource Expert Micro Elite 


June 2019 

8227 6059-001 

Page 3 of 30 


NO WARRANTIES OF ANY NATURE ARE EXTENDED BY THIS DOCUMENT. Any product or related information described herein is 
only furnished pursuant and subject to the terms and conditions of a duly executed agreement to purchase or lease equipment or to 
license software. The only warranties made by Digital Check, Inc., if any, with respect to the products described in this document are 
set forth in such agreement. Digital Check cannot accept any financial or other responsibility that may be the result of your use of the 
information in this document or software material, including direct, special, or consequential damages. 

You should be very careful to ensure that the use of this information and/or software material complies with the laws, rules, and 
regulations of the jurisdictions with respect to which it is used. 

The information contained herein is subject to change without notice. Revisions may be issued to advise of such changes and/or 
additions. 

Notice to U.S. Government End Users 

 This is commercial computer software or hardware documentation developed at private expense. Use, reproduction, or disclosure by 
the Government is subject to the terms of Digital Check standard commercial license for the products, and where applicable, the 
restricted/limited rights provisions of the contract data rights clauses. 

FCC Statement


The statement below is included in this document to comply with a Federal Communications Commission (FCC) regulation.  The FCC 
is an agency of the United States government; thus, the statement below applies to computing equipment installed in the United States 
of America.  Digital Check is taking appropriate steps to be in compliance with FCC regulations and similar regulations of other 
countries. 

Note:

 This equipment has been tested and found to comply with the limits for a Class B digital device, pursuant to part 15 of the FCC 

Rules.  These limits are designed to provide reasonable protection against harmful interference in a residential installation.  This 
equipment generates uses and can radiate radio frequency energy and, if not installed and used in accordance with the instructions, 
may cause harmful interference to radio communications.  However, there is no guarantee that interference will not occur in a particular 
installation.  If this equipment does cause harmful interference to radio or television reception, which can be determined by turning the 
equipment off and on, the user is encouraged to try to correct the interference by one or more of the following measures: 


Reorient or relocate the receiving antenna. 


Increase the separation between the equipment and receiver. 


Connect the equipment into an outlet on a circuit different from that to which the receiver is connected. 


Consult the dealer or an experienced radio/TV technician for help. 


Caution 

Changes or modifications not expressly approved by Digital Check could void your authority to operate this equipment.  


Canadian Regulatory Statement 

CAN ICES-3(B)/NMB-3(B) 


Trademarks 

Digital Check is a registered trademark licensed to Digital Check, Inc. in the United States and other countries.  SmartSource is a 
registered trademark of Digital Check, Inc.  All other brands and products referenced in this document are acknowledged to be the 
trademarks or registered trademarks of their respective holders. 


Summary of Contents for SmartSource Expert Micro Elite

Page 1: ...Installation and Operations Guide SmartSource Expert Micro Elite SSX1 MICROELITE RN SSX1 MICROELITE RNIJ June 2019 8227 6059 001...

Page 2: ...Installation Operations Guide SmartSource Expert Micro Elite June 2019 8227 6059 001 Page 2 of 30...

Page 3: ...us the statement below applies to computing equipment installed in the United States of America Digital Check is taking appropriate steps to be in compliance with FCC regulations and similar regulatio...

Page 4: ...Installation Operations Guide SmartSource Expert Micro Elite June 2019 8227 6059 001 Page 4 of 30...

Page 5: ...ing on the Unit 15 Using the power start stop button and the meaning of the status light 15 Preparing for Document Flow 16 Document card preparation 17 Inserting documents and aligning them for proper...

Page 6: ...Guide SmartSource Expert Micro Elite June 2019 8227 6059 001 Page 6 of 30 Solving problems 27 Jams in the track 27 Poor feeding 27 Poor quality images 27 Detailed troubleshooting chart 28 Section 5 3...

Page 7: ...reading ANSI standard E13B and CMC7 MICR encoding Front and rear 600 dpi color image cameras Easy opening track covers for speedy cleaning and maintenance Inkjet endorsing single line Easy maintenance...

Page 8: ...Installation Operations Guide SmartSource Expert Micro Elite June 2019 8227 6059 001 Page 8 of 30...

Page 9: ...se may cause the unit to pause or stop working or require the user to restart the unit Such surges and dips will generally not harm the unit Surge and dips are usually the result of other large electr...

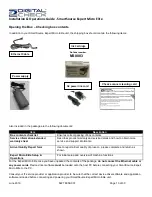
Page 10: ...n Arrival Quality Report form Use to report arrival quality of product please complete and return as shown Expert Micro Elite Setup Operations For initial setup and overview of machine functions For t...

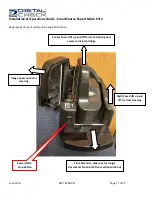
Page 11: ...out of your SmartSource Expert Micro Elite Image Cover opens for cleaning Power Start stop button Floor Extender slides out for longer documents Note both floor sections slide out Right Cover lifts up...

Page 12: ...nly the power supply that was packed with your SmartSource Expert Micro Elite Do not exchange power supplies between units or use non Digital Check supplied power supplies even if they look similar 2...

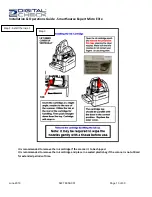
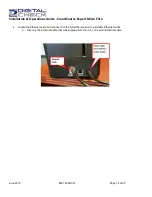
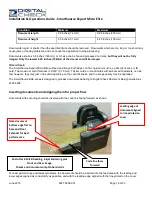
Page 13: ...001 Page 13 of 30 It is recommended to remove the ink cartridge if the scanner it to be shipped It is recommended to remove the ink cartridge and place in a sealed plastic bag if the scanner is not u...

Page 14: ...Expert Micro Elite June 2019 8227 6059 001 Page 14 of 30 4 Locate the Ethernet cable and connect it to the SmartSource and to a suitable Ethernet outlet a Use only the Ethernet cable that was supplied...

Page 15: ...ition of the machine Function Operation of button Blue Status LED Power on Press and hold the button for more than 2 seconds power button light will be on for a couple seconds and the will be blinking...

Page 16: ...nner is ready to scan or is Actively Scanning BLUE RAPID BLINKING 1 Press power button down 6 sec Scanner OFF 2 Press power button down 1 sec Release Motors ON Clear Track PURPLE RAPID BLINKING In Cle...

Page 17: ...s and cards should be clean dry and free of attached objects such as staples paper clips sticky tape or rubber bands 2 Smooth out creases folds and dog eared corners a Creased and folded documents may...

Page 18: ...ard thickness is 0 030 0 75 mm Thicker cards or credit cards with embossed characters can be fed however they may jam in the unit depending on the card thickness and the image quality may be degraded...

Page 19: ...singly from the feed area and stopped in the output area To continue processing place another document in the feed area Depending upon your application the unit may resume processing automatically or...

Page 20: ...ar function see Using the power start stop button above This will cause the unit to drive the stopped document out of the track Manually removing stopped documents If the stopped document is not eject...

Page 21: ...front of the unit The alternate entry can also be used in the same way to feed and image single paper documents which are too thick or too damaged to be fed through the normal feed hopper and track No...

Page 22: ...Installation Operations Guide SmartSource Expert Micro Elite June 2019 8227 6059 001 Page 22 of 30...

Page 23: ...ual Cleaning Before performing any cleaning turn off power to the unit and unplug the AC power cord For general cleaning of the outside covers of the machine any mild water based cleanser used sparing...

Page 24: ...or piped compressed air where available Air should be regulated to no more than 30 psi 2 0 bar 200 kPa Open the front cover and image cover and blow the track and surrounding walls and rollers clear o...

Page 25: ...age quality If streaks lines or a loss of image quality are seen the image cameras should be cleaned Open the image cover to expose the glass faces of the image cameras as shown Clean the glass faces...

Page 26: ...ressed air or a soft cloth or cotton swap moistened with isopropyl alcohol Cleansing wipes pre soaked with suitable solvent are available from the Digital Check Store www digitalcheck com part number...

Page 27: ...t quality or preparation Other causes of feed problems Feeder sensor requires cleaning see section 3 above Foreign objects attached to the documents tape staples adhesives etc Documents which are stap...

Page 28: ...ton Function Using the power start stop button meaning of the status light Application is not ready Consult application documentation Frequent Jams or Stops Track stops frequently with the same error...

Page 29: ...type or work source If other documents read well suspect print quality issues with the problem documents Inadequate work preparation Ensure work is properly aligned and loaded correctly in the feed t...

Page 30: ...eplace cartridge if empty Section 5 Replacement parts To obtain replacement parts call 1 847 446 2285 visit the Digital Check Store at www digitalcheck com or contact your authorized service provider...

Reviews: