background image

‑7‑

Digital Electronics Corporation

8-2-52 Nankohigashi, Suminoeku, Osaka, 559-0031 Japan

Tel. +81 - 6 - 6613 - 1101 (General No.)

FAX +81 - 6 - 6613 - 5888

4)

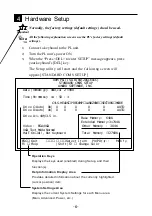
Confirm that both the C and D drives are set to [Auto]. This

designates that when the PL is started up, the hard disk's parameters

are automatically read out and used. If [Auto] is not selected, be sure

to change this setting to [Auto]. The [Auto] setting is factory set and

recommended for most users.

5)

Press the [ESC] key to call up the [SAVE & EXIT SETUP] menu.

After completing the hardware setup, in order to record all data and
application(s) use your OS (MS-DOS or Windows) to create partitions and
initialize the hard disk. Please consult your OS’s operation manuals for details.

5

Software Setup

Summary of Contents for PL-HD210

Page 1: ...cles are not allowed to enter the unit Any of these may cause either a breakdown or an electrical shock Do not place or store this unit in a location where there is direct sunlight excessive heat dust or vibration Do not store or operate this unit near chemicals or where there are chemi cal fumes Do not allow anyone other than Digital s own service staff to perform maintenance or adjustments to th...

Page 2: ...as shipped however should for any reason problems or damage have occurred during shipping please contact your Digital representative immediately for service Operation Instructions Package Contents Do not use the PL HD210 in locations where corrosive gasses are present since they can lead to a hard disk breakdown To prevent damage to file data be sure to shut down the unit s OS before turning OFF t...

Page 3: ...isk or other type of suitable magnetic media is strongly recommended This HDD has a finite usage lifetime The lifetime figure given in this document s Features is for reference and the regular exchanging of the current HDD unit for a new HDD unit is strongly advised Memory Capacity 6 0G bytes Sector Size 512 bytes Sector No of Disks 1 No of Logic Heads 2 No of User Cylinders 12416 Seek Time 12msec...

Page 4: ...Plug When using the PL HD210 as a Master be sure to remove the jumper plug like shown in the left side figure All of Digital s PL X900 Series units have a built in hard disk unit These units when shipped are all set as the PL s Master When an additional HDD unit PL HD210 is used be sure to set this unit s the jumper plug to Slave Except for the jumper plug shown here do NOT use any other short plu...

Page 5: ...bject Slot 0 Slot 1 Removal Handle Slot 1 Important 1 Remove the uppermost slot 1 expansion slot cover s two 2 attachment screws Note 2 Hold the PL HD210 s removal handle and slide the unit slowly into the expansion slot so that the rear face connector is completely inserted into the slot s connector pins 3 Reattach the two 2 expansion slot cover attachment screws When installing an HDD unit in sl...

Page 6: ... Auto 0b 0 0 0 0 0 AUTO Drive D Auto 0b 0 0 0 0 0 AUTO Drive A 1 44M 3 5 in Video EGA VGA VGA Text Mode Normal Halt On All But Keyboard Base Memory 640K Extended Memory 31744K Other Memory 384K Total Memory 32768K ESC Quit Select Item PU PD Modify F1 Help Shift F2 Change Color ROM PCI ISA BIOS 2A5LEU1C STANDARD CMOS SETUP AWARD SOFTWARE INC Important Note All the following explanation screens use ...

Page 7: ...meters are automatically read out and used If Auto is not selected be sure to change this setting to Auto The Auto setting is factory set and recommended for most users 5 Press the ESC key to call up the SAVE EXIT SETUP menu After completing the hardware setup in order to record all data and application s use your OS MS DOS or Windows to create partitions and initialize the hard disk Please consul...

Reviews: