


6
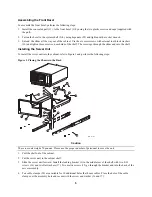
Installing the Interlock Actuator Latches
If additional products are installed into the cabinet, actuator latches for those products should be installed. To
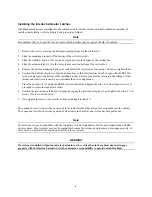
install actuator latches, refer to Figure 4 and proceed as follows:
Note
Part numbers (40), (41), and (42) are not part of this kit, rather they are part of the H9A10 cabinet.
1. Remove the screws securing the bottom mounting bracket to the cabinet (41).
2. Slide the mounting bracket off the bottom of the vertical bar (40).
3. Slide the stabilizer bracket (29) for the new product onto the bottom of the vertical bar.
4. Slide the actuator latch (30) for the new product onto the bottom of the vertical bar.
5. Replace the bottom mounting bracket (41) and install the screws removed in step 1 but do not tighten them.
6. Position the stabilizer bracket so that the bottom hole in the stabilizer bracket (42) aligns with the RETMA
rail hole adjacent to the bottom of the installed product. This may require the loosening and sliding of other
latches and stabilizer brackets to accommodate the new configuration.
7. Place the nut plate (31) behind the RETMA rail and install and tighten the two 10-32 truss-head screws (33)
provided to secure the stabilizer bracket.
8. Position the new actuator latch (30) to properly engage the interlock actuator (9), and tighten the two 6-32 set
screws (32) to secure the latch.
9. Now tighten the screws to secure the bottom mounting bracket (41).
The expanded view (A) shows the position of the actuator latches when all systems are pushed into the cabinet.
The expanded view (B) shows the position of all actuator latches after one system has been pulled out.
Note
The interlock system is compatible with the AlphaServer 1000, AlphaServer 1000A, and AlphaStation 600 RM
series systems. Other systems may not be compatible because the interlock actuator may not engage properly. In
these cases, do not install the interlock actuator on those systems.
WARNING
If a system is installed without an interlock actuator or the vertical bar in the cabinet does not engage
properly with the interlock actuator, it is the customer's responsibility to provide a stable cabinet.
Summary of Contents for AlphaStation 600
Page 8: ...Help...


