Service Manual
8-21
FRU Disassembly/Assembly
8
8.
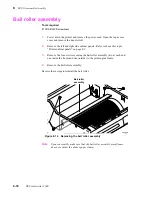
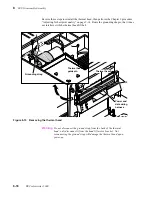
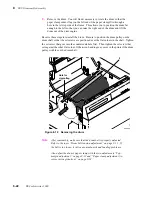
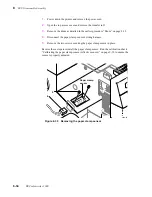
Remove the E-ring securing the right end of the drum's shaft to the print
engine frame. Also, remove the shaft's bronze bushing.
Note
During removal and replacement, be careful not to scratch or damage
the drum. Defects in the surface of the drum can affect print quality.
Figure 8-18 Removing the drum's right end bushing
7
8
Drum
Bail roller
assembly
7
8699-36
Summary of Contents for DECcolorwriter 1000
Page 11: ...Service Manual xi...
Page 16: ...Service Manual xv...
Page 56: ...2 24 DECcolorwriter 1000 2 Installing the Printer and Drivers...
Page 64: ...3 8 DECcolorwriter 1000 3 Verifying the Printer and Host Connections...
Page 70: ...4 6 DECcolorwriter 1000 4 Key Operator Training...
Page 170: ...8 46 DECcolorwriter 1000 8 FRU Disassembly Assembly...
Page 190: ...9 20 DECcolorwriter 1000 9 Checks and Adjustments...
Page 195: ...Service Manual A 5 Field Replaceable Units List A...
Page 198: ...A 8 DECcolorwriter 1000 A Field Replaceable Units List...
Page 204: ...C 6 DECcolorwriter 1000 C Wiring Diagrams...
Page 208: ...D 4 DECcolorwriter 1000 D Test Pattern Generator...


