9-2
DECcolorwriter 1000
9
Checks and Adjustments
Printing test patterns
Note
Do not print test patterns using the Black Transfer Roll; many
patterns will print blank.
Checking and adjusting the printer often involves printing the printer's built-in test
patterns. The following procedure explains how to select and print a test pattern.
1.
Turn off the printer.
2.
Remove the top rear cabinet panel to access the engine control board. Refer
to the Chapter 8 topic “Printer cabinet panels” on page 8-3.
3.
Set all the DIP 1 Switches off.
4.
Press and hold the TEST button and turn on the printer. Release the TEST
button. The printer is now in service mode.
5.
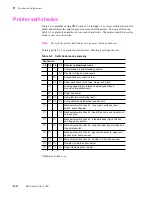
Select the desired test pattern, using DIP Switches 1-4 through 1-7, as
detailed in Table 9-1.
6.
Toggle DIP Switch 1-8 on then off to start the print. Leaving DIP Switch 1-8
on prints the selected pattern continuously. Alternatively, you can press and
hold the TEST button for 5 seconds to start the selected pattern.
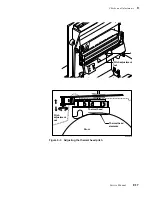
Figure 9-1 Engine control board DIP switches
1
8
1
4
Dip Switch 1
Dip Switch 2
(thermal head temperature)
8699-68A
ON
Summary of Contents for DECcolorwriter 1000
Page 11: ...Service Manual xi...
Page 16: ...Service Manual xv...
Page 56: ...2 24 DECcolorwriter 1000 2 Installing the Printer and Drivers...
Page 64: ...3 8 DECcolorwriter 1000 3 Verifying the Printer and Host Connections...
Page 70: ...4 6 DECcolorwriter 1000 4 Key Operator Training...
Page 170: ...8 46 DECcolorwriter 1000 8 FRU Disassembly Assembly...
Page 190: ...9 20 DECcolorwriter 1000 9 Checks and Adjustments...
Page 195: ...Service Manual A 5 Field Replaceable Units List A...
Page 198: ...A 8 DECcolorwriter 1000 A Field Replaceable Units List...
Page 204: ...C 6 DECcolorwriter 1000 C Wiring Diagrams...
Page 208: ...D 4 DECcolorwriter 1000 D Test Pattern Generator...

