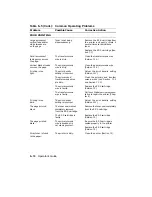
Table 6–5 (Cont.): Common Operating Problems
Problem
Possible Cause
Corrective Action
POOR PRINTING
Large amounts of
vertical fade and/or
white streaks are
on the page.
Toner is not being
dispersed evenly.
Remove the EP-S cartridge from
the printer and gently rotate it
several times to redistribute
toner.
Replace the EP-S cartridge (Sec-
tion 7.3.)
Small amounts of
fading occur across
the page.
The transfer corona
wire is dirty.
Clean the transfer corona wire
(Section 7.1.3.)
Vertical black streaks
occur on the page.
The primary corona
wire is dirty.
Clean the primary corona wire
(Section 7.1.2.)
Printing is too
light.
The print density
setting is incorrect.
Adjust the print density setting
(Section 2.11).
The primary and
transfer corona wires
are dirty.
Clean the primary and transfer
corona wires (see Section 7.1.2
and Section 7.1.3).
The primary corona
wire is faulty.
Replace the EP-S cartridge
(Section 7.3).
The transfer corona
wire is faulty.
Call your Digital service represen-
tative to repair the printer (Chap-
ter 8).
Printing is too
dark.
The print density
setting is incorrect.
Adjust the print density setting
(Section 2.11).
The page printed
blank.
The toner seal was not
completely removed
from the EP-S cartridge.
Remove the toner seal completely
from the EP-S cartridge.
The EP-S cartridge is
faulty.
Replace the EP-S cartridge
(Section 7.3).
The page printed
black.
The primary corona
wire is broken or is
not making contact.
Be sure the EP-S cartridge is
seated properly in the printer.
Replace the EP-S cartridge
(Section 7.3).
Stray toner is fused
to the paper.
The printer is dirty.
Clean the printer (Section 7.1).
6–10
Operator’s Guide
Summary of Contents for DEClaser 2100 plus
Page 19: ...Figure 1 1 Components Front Right Side View MLO 004826 1 2 Operator s Guide...
Page 21: ...Figure 1 2 Components Rear Left Side View MLO 004827 1 4 Operator s Guide...
Page 23: ...Figure 1 3 Components Inside the Printer MLO 004828 1 6 Operator s Guide...
Page 39: ...5 Replace the cover on the cassette Fig 2 14 MLO 004840 Operating Information 2 13...
Page 44: ...2 Fold out the extension tray Fig 2 17 MLO 004836 2 18 Operator s Guide...
Page 48: ...14 Close the rear output tray Fig 2 21 MLO 004834 2 22 Operator s Guide...
Page 65: ...Figure 2 1 Engine Test Print Fig 2 40 MLO 004525 Operating Information 2 39...
Page 68: ...Figure 2 2 Test Print A Fig 2 42 MLO 004851 2 42 Operator s Guide...
Page 72: ...Figure 2 3 Test Print B Fig 2 43 MLO 004852 2 46 Operator s Guide...
Page 75: ...Figure 2 4 Font List Fig 2 44 MLO 004853 Operating Information 2 49...
Page 224: ...Figure C 2 Serial Connections to Modem MLO 004885 Specifications C 5...
Page 225: ...Figure C 3 Serial Connections Without Modem MLO 004887 C 6 Operator s Guide...


