background image

Summary of Contents for LA50

Page 1: ...EK OLASO UG 001 Installing and Using the LASO Printer mamaama...

Page 2: ......

Page 3: ...EK 0LASO UG 001 Installing and Using the LASO Printer Prepared by Educational Services of Digital Equipment Corporation...

Page 4: ...ted and found to comply with the limits for a Class B computing device in accordance with the specifications in Subpart J of Part 15 of FCC Rules which are designed to provide reasonable protection ag...

Page 5: ...Panel Indicators and Switches 15 Printer Controls 16 Maintaining Printer 17 Troubleshooting Printer 18 Operator Checklist 18 Replacing Printhead 20 Replacing Fuse 24 Printer Configuration 26 Configur...

Page 6: ...stall use maintain troubleshoot and configure your LA50 printer Before you continue make sure you have all the items shown below If any items are missing or damaged immediately contact your Sales Repr...

Page 7: ...INSTALLING PRINTER Packing Removal 1 Remove access cover 2 Remove c d ar board ret amer...

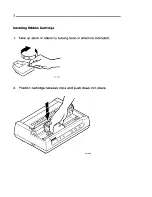
Page 8: ...Installing Ribbon Cartridge 1 Take up slack in ribbon by turning knob in direction indicated 2 Position cartridge between clips and push down into place...

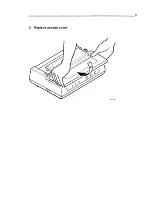
Page 9: ...3 3 Replace access cover...

Page 10: ...Installing Power Cable 1 Make sure power switch is set to off position 0 2 Plug power cable into rear of printer and electrical outlet MA 10 006...

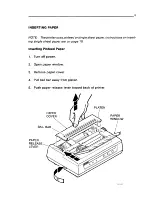
Page 11: ...gle sheet paper Instructions on insert ing single sheet paper are on page 10 Inserting Pinfeed Paper 1 Turn off power 2 Open paper window 3 Remove paper cover 4 Pull bail bar away from platen 5 Push p...

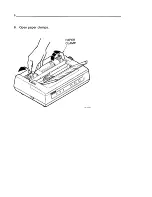
Page 12: ...6 Open paper clamps...

Page 13: ...7 Position paper on tractor If paper does not fit properly use white trac tor release levers to reposition tractors...

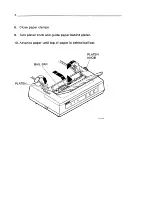
Page 14: ...8 Close paper clamps 9 Turn platen knob and guide paper behind platen 10 Advance paper until top of paper is behind bail bar BAIL BAR PLATEN KNOB I MA 10 010...

Page 15: ...9 11 Push bail ba r against platen 12 Close paper window 13 Replace paper cover...

Page 16: ...Inserting Single Sheet Paper 1 Turn off power 2 Open paper window 3 Pull bail bar away from platen 4 Push paper release lever toward back of printer PAPER WINDOW MA 10 012...

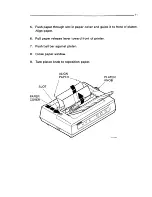
Page 17: ...lot in paper cover and guide it to front of platen Align paper 6 Pull paper release lever toward front of printer 7 Push bail bar against platen 8 Close paper window 9 Turn platen knob to reposition p...

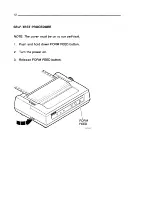
Page 18: ...SELF TEST PROCEDURE NOTE The cover must be on to run self test 1 Push and hold down FORM FEED button 2 Turn the power on 3 Release FORM FEED button...

Page 19: ...ghijKlmnopqrstuvwxyz tt X 1 012345678 I JKLMNOPQRSTWWXYZ J _ abtdefgh i j K1mnopqrstuvwxyz 0123456789 JKLMNOPQRSTUVWXYZC l abcdefghijKlmnopqrstuvwxyz I 0123456789 KLMNOPQRSTUVWXYZ J abcdef gh i j K1mn...

Page 20: ...10 015 3 Installation is now complete Please fill out and return the enclosed installation card A Customer Identification Number is located on the rear of the top cover If you are capitalizing this eq...

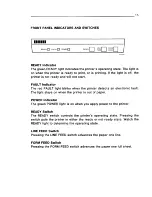
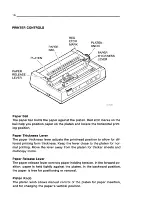
Page 21: ...printer detects an electronic fault The light stays on when the printer is out of paper POWER Indicator The green POWER light is on when you apply power to the printer READY Switch The READY switch c...

Page 22: ...t printing form thickness Keep the lever close to the platen for nor mal printing Move the lever away from the platen for thicker sheets and multicopy forms Paper Release Lever The paper release lever...

Page 23: ...per for the job Always make sure to position paper squarely and set it tightly around the platen Also make sure the paper thickness lever is in correct position To remove paper from the printer use th...

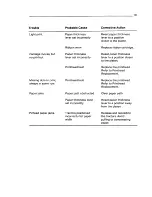
Page 24: ...ULT light is on Pressing the READY button causes printer to print one line Probable Cause Power cord not connected or broken Power source fault Fuse open Printer out of paper No printout Access cover...

Page 25: ...sition closer to the platen Printhead fault Replace the printhead Refer to Printhead Replacement Missing dots in print Printhead fault Replace the printhead always in same row Refer to Printhead Repla...

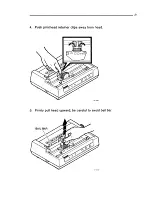
Page 26: ...20 Replacing Printhead 1 Turn off power 2 Remove access cover 3 Remove bb n on cartridge...

Page 27: ...21 4 Push pr mthead ret amer clips away from head MA 10 021 5...

Page 28: ...6 Plug in replacement head Make sure it is fully seated 7 Return printhead retainer clips to their original positions...

Page 29: ...23 8 Replace b n bon cart d n ge 9 Replace access cover...

Page 30: ...Replacing Fuse 1 Turn off power MA 10 005 2 Unplug power cord from power outlet...

Page 31: ...3 Turn fuse retainer counterclockwise FUSE RETAINER MA 10 026 4 Remove retainer 5 Replace fuse with one of equal value...

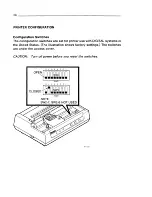
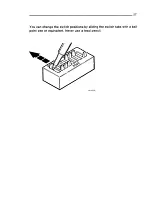
Page 32: ...n switches are set for printer use with DIGITAL systems in the United States The illustration shows factory settings The switches are under the access cover CAUTION Turn off power before you reset the...

Page 33: ...You can change the switch positions by sliding the switch tabs with a ball point pen or equivalent Never use a lead pencil MA 10 028...

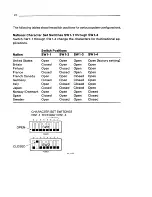
Page 34: ...ted States Open Open Britain Closed Open Finland Open Closed France Closed Closed French Canada Open Open Germany Closed Open Italy Open Closed Japan Closed Closed NorwayI Denmark Open Open Spain Clos...

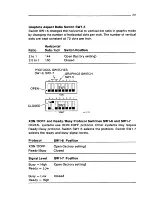
Page 35: ...0 Closed PROTOCOL SWITCHES SW1 6 SW1 7 GRAPHICS SWITCH sw1 s s T 9 9 17 G N3d0 8 L 9 9 17 G N3d0 MA 10 030 XON XOFF and Ready Busy Protocol Switches SW1 6 and SW1 7 DIGITAL systems use XON I XOFF prot...

Page 36: ...cate Wrap SW1 8 Switch Position Open factory setting Closed RIGHT MARGIN SWITCH SW1 8 8 L 9 S v 8 Z OPEN N3d0 8 L 9 S v 8 Z N3d0 BAUD RATE SWITCHES SW2 1 THROUGH SW2 3 MA 10 031 Baud Rate Select Switc...

Page 37: ...4 THROUGH SW2 6 MA 10 032 Switch Position Data Format SW2 4 SW2 5 7 bits plus odd parity Open Closed 7 bits plus even parity Closed Closed 7 bits plus 8th bit mark Open Open 7 bits plus 8th bit space...

Page 38: ...F to 104 F 10 to 90 LASO RA 100 or 120 Vac SO or 60 Hz LASO RB 220 or 240 Vac SO or 60 Hz Less than 180 W Serial RS232 C and RS423 EIA standard Disposable cartridge Two million characters life expect...

Page 39: ...Underlined Doublewidth 144 or 180 dots I inch horizontal 72 dots I inch vertical 2 1 or 2 5 1 aspect ratio 94 ASCII 81 Multinational 63 JIS Katakana 27 VT 100 Special Graphics 1 error indicator 16 5...

Page 40: ...aterials service you can be sure that your small system or terminal is getting the best possible maintenance CARRY IN SERVICE There are several hundred DIGITAL service centers in major cities world wi...

Page 41: ...Printed in Japan E1 1668 830210000...

Page 42: ...Digital Equipment Corporation Maynard MA 01754...

Reviews: