background image

iv

Contents

A

RRD42 Disc Drive Specification

Specification . . . . . . . . . . . . . . . . . . . . . . . . . . . . . . . . . . . . . . . . . . . . . . . .

A–1

Index

Figures

1–1

RRD42 Drive — Tabletop and Embedded . . . . . . . . . . . . . . . . . . . . .

1–3

2–1

Front Panel of the RRD42 Drive . . . . . . . . . . . . . . . . . . . . . . . . . . . .

2–2

2–2

Rear Panel of the Tabletop Drive (–DA Version) . . . . . . . . . . . . . . . .

2–3

2–3

Rear Panel of the Embedded Drive (–AA Version) . . . . . . . . . . . . . .

2–5

2–4

Connecting a SCSI Signal Cable — Drive to System . . . . . . . . . . . .

2–7

2–5

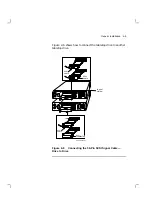
Connecting the 50-Pin SCSI Signal Cable — Drive to Drive . . . . . . .

2–9

2–6

Connecting a Power Cable to the RRD42 Drive Power Connector . . . 2–10

3–1

Front Panel of the RRD42 Drive . . . . . . . . . . . . . . . . . . . . . . . . . . . .

3–3

3–2

Rear Panel of the Tabletop Drive (–DA Version) . . . . . . . . . . . . . . . .

3–5

3–3

Rear Panel of the Embedded Drive (–AA Version) . . . . . . . . . . . . . .

3–7

3–4

Opening the Caddy . . . . . . . . . . . . . . . . . . . . . . . . . . . . . . . . . . . . . .

3–9

3–5

Loading a Disc into the Caddy . . . . . . . . . . . . . . . . . . . . . . . . . . . . . 3–10

3–6

Loading the Drive . . . . . . . . . . . . . . . . . . . . . . . . . . . . . . . . . . . . . . . 3–12

3–7

Ejecting the Caddy from the Drive . . . . . . . . . . . . . . . . . . . . . . . . . . 3–13

4–1

Manually Ejecting the Caddy . . . . . . . . . . . . . . . . . . . . . . . . . . . . . .

4–2

Tables

2–1

ID Jumpers 0–2 . . . . . . . . . . . . . . . . . . . . . . . . . . . . . . . . . . . . . . . . 2–13

Summary of Contents for RRD42

Page 1: ...RRD42 Disc Drive Owner s Manual Order Number EK RRD42 OM 003 Digital Equipment Corporation...

Page 2: ...the manufacturer s instructions may cause interference to radio and television reception It has been type tested and found to comply with the limits for a Class B computing device in accordance with...

Page 3: ...of Santa Cruz Operations Incorporated UNIX is a registered trademark of AT T Bell Laboratories This document was prepared and published by Educational Services Development and Publishing Digital Equi...

Page 4: ...ATTENTION LIRE LA REMARQUE DANS LE MODE D EMPLOI REMARQUE CETTE REMARQUE NE CONCERNE QUE LES ETATS UNIS ET LE CANADA En cas d envoi aux Etats Unis n utiliser que le cordon d alimentation inscrit sur L...

Page 5: ...inweis Wir sind verpflichtet Sie auf folgende Fakten hinzuweisen DBP Verf gung 1046 84 2 Abschnitt 5 Das Ger t wurde funktechnisch sorgf ltig entst rt und gepr ft Beim Zusammenschalten mit anderen EDV...

Page 6: ...r besonderen Beachtung Zur Sicherheit Sollte ein fester Gegenstand oder Fl ssigkeit in das Ger teinnere gelangen trennen Sie das Ger t von der Wandsteckdose ab und lassen Sie es von einem Fachmann ber...

Page 7: ...Installing the RRD42 Tabletop Drive 2 11 Installing the RRD42 Embedded Drive 2 12 Verifying the RRD42 Drive Installation 2 14 3 Using the RRD42 Disc Drive How the RRD42 Drive Operates 3 1 Operating t...

Page 8: ...Drive to System 2 7 2 5 Connecting the 50 Pin SCSI Signal Cable Drive to Drive 2 9 2 6 Connecting a Power Cable to the RRD42 Drive Power Connector 2 10 3 1 Front Panel of the RRD42 Drive 3 3 3 2 Rear...

Page 9: ...the owner of the RRD42 disc drive No prerequisites are necessary to use this manual Manual Structure Chapter 1 describes the RRD42 disc drive Chapter 2 shows how to install the RRD42 disc drive Chapt...

Page 10: ......

Page 11: ...system dependent Operating system support will be added when it becomes available The device uses the SCSI 2 small computer system interconnect bus and can be used on low end desktop and Digital work...

Page 12: ...ntains industry standard SCSI connectors on the rear panel An address selection switch 3 pin ac connector and audio output jacks are also on the rear panel Embedded Drive The RRD42 embedded drive is d...

Page 13: ...D42 Drive Figure 1 1 shows the RRD42 disc drive JACK HEADPHONE LEVEL CONTROL DIMPLE FOR ID NUMBER BUSY INDICATOR EJECT BUTTON EMERGENCY EJECT HOLE CADDY INSERTION SLOT SHR XR0062 90 LABEL HEADPHONE Fi...

Page 14: ...ULTRIX MS DOS and SCO UNIX operating systems To determine the correct operating system level consult your Digital sales representative Ordering Additional Disc Caddies To order additional disc caddies...

Page 15: ...llation with power on self test POST This chapter provides general installation procedures This chapter does not give specific host system installation instructions Part Locations To familiarize yours...

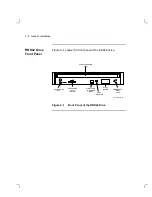
Page 16: ...el Figure 2 1 shows the front panel of the RRD42 drive JACK HEADPHONE LEVEL CONTROL DIMPLE FOR ID NUMBER BUSY INDICATOR EJECT BUTTON EMERGENCY EJECT HOLE CADDY INSERTION SLOT SHR XR0062 90 LABEL HEADP...

Page 17: ...bletop Figure 2 2 shows the rear panel of the RRD42 tabletop drive ID SELECT SWITCH SCSI BUS CONNECTORS POWER SWITCH AUDIO OUTPUT JACKS GROUND TERMINAL AC IN CONNECTOR 3 PIN R L 1 0 SHR XR0063 90 Figu...

Page 18: ...r has two modes Mode 0 Jumper Out In this mode the drive block size is 2 kilobytes Use Mode 0 under MS DOS and SCO UNIX operating systems Mode 1 Jumper In When the jumper is installed the drive operat...

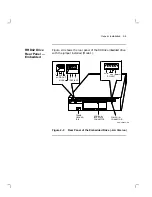
Page 19: ...Mode 1 SHR XR0064 90 L R GND AUDIO OUT 0 1 2 ID SELECT FRAME GROUND TAB SCSI BUS INTERFACE CONNECTOR POWER IN CONNECTOR DC INPUT 5V 5 GND 12V 10 SHR XR0064 90 L R GND AUDIO OUT 0 1 2 ID SELECT FRAME G...

Page 20: ...resentative Use a cable supplied by Digital Equipment Corporation Failure to do so may result in degraded performance of your RRD42 drive To connect a SCSI cable drive to system perform the following...

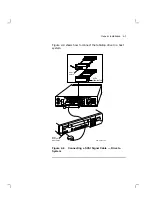
Page 21: ...2 4 shows how to connect the tabletop drive to a host system SCSI CABLE SCSI TERMINATOR SCSI TERMINATOR SCSI TERMINATOR o o o o 1 0 L R SHR XR0065 90 HOST SYSTEM SCSI PORT Figure 2 4 Connecting a SCS...

Page 22: ...3 Connect one end of a SCSI signal cable to the existing SCSI drive NOTE If the host system uses a KZQSA adapter module the SCSI cables must be type BC06P part number 17 02659 Other systems can use t...

Page 23: ...nect the tabletop drive to another tabletop drive 1 0 L R 1 0 L R SHR XR0066 90 SCSI CABLE SCSI SCSI SCSI SCSI CABLE SCSI TERMINATOR SCSI TERMINATOR SCSI TERMINATOR CABLE TO HOST SYSTEM Figure 2 5 Con...

Page 24: ...power cable to the RRD42 drive s power connector Figure 2 6 3 Connect the other end of the power cable to a nearby ac outlet NOTE For Digital service personnel the power cable is the drive s disconnec...

Page 25: ...ed expansion boxes should not exceed 6 meters 19 67 feet On Digital systems using the KZQSA SCSI to Q bus adapter the length of the external SCSI cable cannot exceed 2 meters 6 56 feet The cables used...

Page 26: ...The RRD42 does not require periodic cleaning However the environment where the drive is installed should be clean Setting the SCSI ID A set of pins with jumpers installed on the rear panel of the emb...

Page 27: ...n reported by the RRD42 disc drive depends on the mode selected Jumpers 0 2 Assign the embedded drive s ID number by setting the ID SELECT jumpers in or out Do not assign the same number used on anoth...

Page 28: ...two drives in the series can have identical SCSI IDs If you need to change the SCSI ID select the desired SCSI ID from Table 2 1 Verifying the RRD42 Drive Installation Executing POST To verify succes...

Page 29: ...2 Disc Drive How the RRD42 Drive Operates In this Chapter This chapter describes Location and function of components on the tabletop and embedded drives System software Disc and caddy handling Operati...

Page 30: ...3 1 Parts and Controls Function Caddy insertion slot Accepts a caddy loaded with a disc Emergency eject hole Provides a means to manually eject a caddy See chapter 4 Eject button Ejects the caddy fro...

Page 31: ...3 1 shows the front panel of the RRD42 drive JACK HEADPHONE LEVEL CONTROL DIMPLE FOR ID NUMBER BUSY INDICATOR EJECT BUTTON EMERGENCY EJECT HOLE CADDY INSERTION SLOT SHR XR0062 90 LABEL HEADPHONE Figu...

Page 32: ...o another SCSI device using a SCSI bus cable POWER switch Powers on and off the drive Ground terminal Connects to the host computer or an amplifier to reduce audio noise AC IN connector 3 pin Connects...

Page 33: ...hows the rear panel components of the RRD42 tabletop drive ID SELECT SWITCH SCSI BUS CONNECTORS POWER SWITCH AUDIO OUTPUT JACKS GROUND TERMINAL AC IN CONNECTOR 3 PIN R L 1 0 SHR XR0063 90 Figure 3 2 R...

Page 34: ...RD42 drive SCSI bus ID Mode select jumper Selects mode SCSI bus interface connector Connects the embedded drive to a SCSI host adapter using a connecting cable Power in connector Connects the embedded...

Page 35: ...SHR XR0064 90 L R GND AUDIO OUT 0 1 2 ID SELECT FRAME GROUND TAB SCSI BUS INTERFACE CONNECTOR POWER IN CONNECTOR DC INPUT 5V 5 GND 12V 10 SHR XR0064 90 L R GND AUDIO OUT 0 1 2 ID SELECT FRAME GROUND T...

Page 36: ...ides and lift the lid Figure 3 4 3 To load an empty caddy with a disc hold the disc by the edges and place the disc with disc label up into the caddy Figure 3 5 Do not touch the surface of the disc Be...

Page 37: ...Using the RRD42 Disc Drive 3 9 Figure 3 4 shows how to open the caddy SHR XR0070 90 Figure 3 4 Opening the Caddy...

Page 38: ...3 10 Using the RRD42 Disc Drive Figure 3 5 shows how to load a disc into the caddy SHR XR0073 90 Figure 3 5 Loading a Disc into the Caddy...

Page 39: ...tware is installed in the host system before operating the drive 1 Press the POWER switch to on at the rear of the tabletop drive and insert the caddy into the caddy insertion slot Figure 3 6 The driv...

Page 40: ...3 12 Using the RRD42 Disc Drive Figure 3 6 shows how to load the RRD42 drive with a disc and caddy SHR XR0074 90 DISC LABEL SHOULD BE FACING UP Figure 3 6 Loading the Drive...

Page 41: ...4 for manual ejection instructions CAUTION DO NOT PRESS THE EJECT BUTTON WHILE DEVICE IS IN OPERATION The RRD42 should be treated in the same manner as any other removable media device In particular...

Page 42: ......

Page 43: ...lving and Preventive Maintenance In this Chapter This chapter describes Manual ejection of the caddy from the RRD42 tabletop drive Bus terminators Power cables Generic system based diagnostics Repair...

Page 44: ...f power to the drive is turned off Use the following procedure for manual ejection 1 Turn off the power to the drive 2 Insert a steel rod about 1 2 millimeters in diameter and 35 millimeters or 1 37 i...

Page 45: ...ow to clean a disc Disc Care Do not drop the disc or caddy The caddy s shutter automatically opens when it is inserted into the drive Do not open the shutter manually and touch the disc When transport...

Page 46: ...poration Customer Services offers a range of flexible service plans On Site Service On site service offers the convenience of service at your site and insurance against unplanned repair bills For a mo...

Page 47: ...160 Digital SERVICenter sites worldwide factory trained personnel repair your unit within 2 days This service is available on selected terminals and systems Contact your local unit Digital SERVICente...

Page 48: ......

Page 49: ...le disc CDROM mode 1 data disc CDROM mode 2 data disc CD audio disc Audio combined disc Rotational speed Innermost track 530 r min at CLV 1 4 m s Outermost track 200 r min at CLV 1 2 m s Data transfer...

Page 50: ...ity 10 to 90 Atmosphere Noncondensing Nonoperating transportation Temperature 30 C 22 F to 55 C 131 F Humidity 10 to 90 Atmosphere noncondensing Power requirements 100 to 240 V ac 50 60 Hz Power consu...

Page 51: ...530 r min at CLV 1 4 m s Outermost track 200 r min at CLV 1 2 m s Data transfer rate Sustained rate 150 Kbyte s Burst rate 1 5 Mbyte s Access time Full stroke 0 7 s typical Average 1 3 stroke 0 45 s t...

Page 52: ...idity 10 to 90 Atmosphere noncondensing Host interface SCSI 2 Dimensions 146 05 mm W 2 41 4 mm H 2 208 2 mm D 5 3 4 in W 2 1 5 8 in H 2 8 2 in D Weight 1 3 kg 2 lb 14 oz Voltage 5 V dc 65 and 12 V dc...

Page 53: ...ling 3 8 Disc care 4 3 E Ejecting the caddy 3 13 Ejecting the caddy manually 4 2 I Installation RRD42 embedded drive 2 12 RRD42 tabletop drive 2 11 Installation generic 2 1 Installation RRD42 drive ve...

Page 54: ...ion of buttons switches connectors 2 1 operating 3 1 operating procedure 3 11 specification A 1 tabletop 1 2 S SCSI cable requirements RRD42 tabletop drive 2 11 SCSI ID RRD42 embedded drive 2 12 RRD42...

Reviews: