7-4
7. Double Stacking and Link Mode
Digital Projection
MERCURY 5000gv
Hookup
1. Use commercially available RGB signal cables to connect the RGB output of the master projector to the RGB input of the
slave projector until all the projectors are connected.
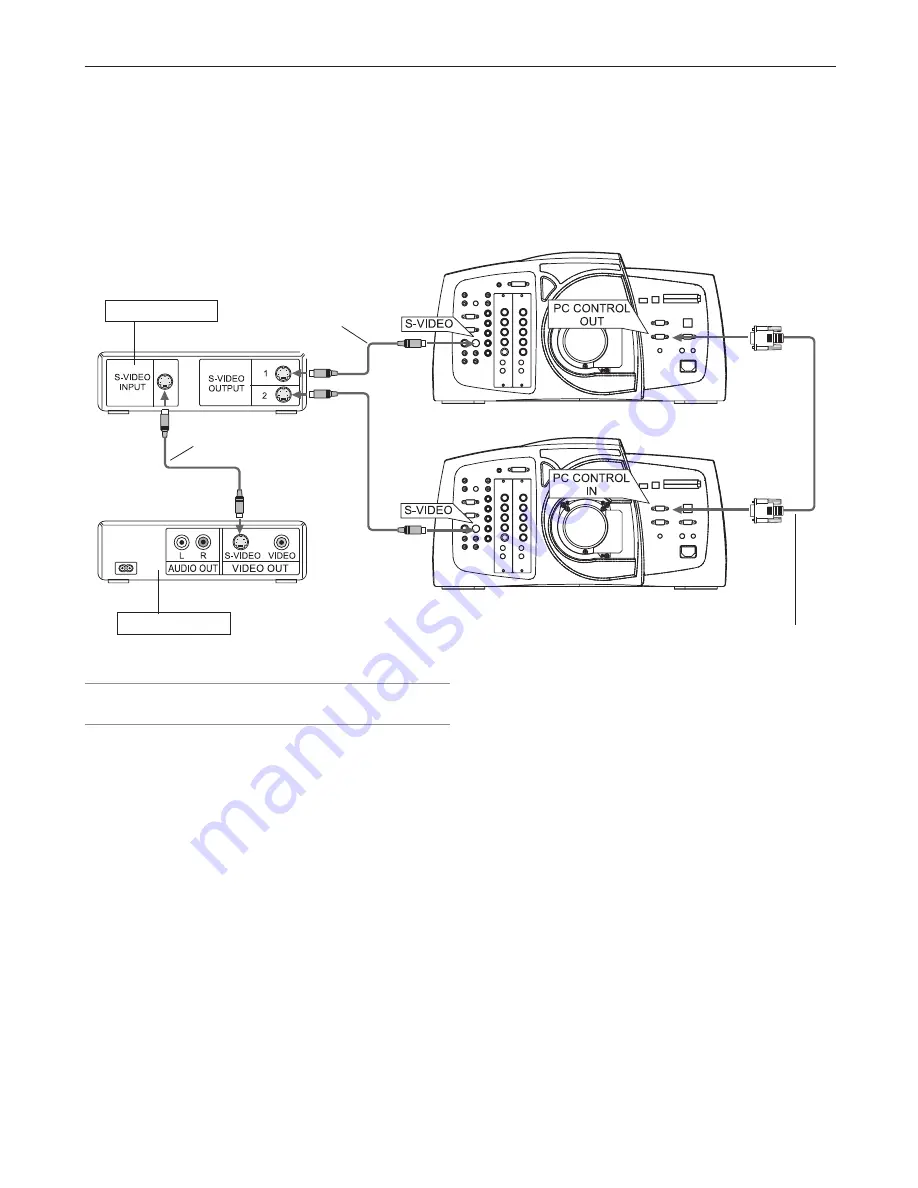
2. Next, using a commercially available, bi-directional RS-232C cable connect the PC CONTROL OUT terminal of the master
projector to the PC CONTROL IN terminal of the slave projector until all the projectors are connected.
3. Turn all the projectors on and roughly make some optical adjustments to each projector.
Bi-directional RS232C cable
(not supplied)
S-Video cables
(not supplied)
Distribution amplifer
Example: Composite signal
S-Video cable
(not supplied)
Video equipment
NOTE: Connect a commercially available distribution amplifier to both the
master and the slave projectors to distribute signal to two outputs of
the master and the slave projectors.
Summary of Contents for MERCURY 5000gv
Page 1: ...MERCURY 5000gv DMD Projector User s Manual ...
Page 2: ...ii ...
Page 6: ...Digital Projection MERCURY 5000gv vi ...
Page 8: ...Digital Projection MERCURY 5000gv viii ...
Page 32: ...2 Installation Digital Projection MERCURY 5000gv 2 12 ...
Page 40: ...3 Projecting an Image Digital Projection MERCURY 5000gv 3 8 ...
Page 50: ...5 Using the Viewer Digital Projection MERCURY 5000gv 5 6 ...
Page 60: ...6 Using the Projector in a Network Digital Projection MERCURY 5000gv 6 10 ...
Page 98: ...9 Routine Maintenance Digital Projection MERCURY 5000gv 9 4 ...


