Network Setup -
DW IP Finder™
1
To install the DW IP Finder, go to:
http://www.digital-watchdog.com
2
Enter “DW IP Finder” on the search box at the top of the page.
3
Go to the “Software” tab on the DW IP Finder page to download the installation file.
4
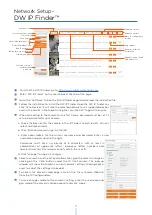
Follow the installation to install the DW IP Finder. Open the DW IP Finder and
click ‘Scan Devices’. It will scan the selected network for all supported devices
and list the results in the table. During the scan, the DW® logo will turn gray.
5
When connecting to the camera for the first time, a password must be set. To
set up a password for your camera:
a. Check the box next to the camera in the IP Finder’s search results. You can
select multiple cameras.
b. Click “Bulk Password Assign” on the left.
c. Enter admin/admin for the current username and password. Enter a new
username and password to the right.
Passwords must have a minimum of 8 characters with at least 4
combinations of uppercase letters, lowercase letters, numbers and
special characters. Passwords cannot contain the user ID.
d. Click “change” to apply all changes.
6
Select a camera from the list by double-clicking on the camera’s image or
clicking on the ‘Click’ button under the IP Conf. column. The pop-up
window will show the camera’s current network settings, allowing admin
users to adjust the settings as needed.
7
To access the camera’s web page, click on the ‘View Camera Website’
from the IP Config window.
8
To save changes made to the camera’s setting, enter the username and
password of the camera’s admin account and click ‘Apply’.
Thumbnail view
Firmware version
Camera’s uptime
Open IP configuration
settings
Ping camera
Camera’s network
information
Camera’s name, IP and
MAC addresses
Filter results
Scan network
Select network to scan
Show/hide thumbnail view
Refresh thumbnail view
Bulk password assignment
Bulk IP assignment
Firmware upgrade
Selected camera’s
username and
password
11

