background image

10

Basic MIDI Setup

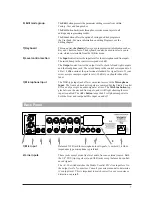
This setup could be used for a live performance or live recording
situation. The Studio Vocalist EX can recognize the chords you
play and output the appropriate harmony or you could use a
Vocoder preset to play the exact harmony notes you need. These
concepts are explained in greater detail later on in this manual. 

Connect as follows:

• 

Connect the output of your controller keyboard to the MIDI in

of the Studio Vocalist EX.

• 

Set your keyboard's MIDI transmit channel to 1 (the Studio

Vocalist EX's default channel) or change the Studio Vocalist
EX's MIDI receive channel to match your keyboard. See page
33 in the Utilities section for further details.

• 

Connect any MIDI sound modules to the MIDI thru jack.

Intermediate MIDI Setup

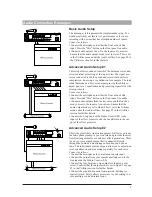
This configuration allows you to record key, chord and harmony
style change keystrokes from the front panel into a sequencer for
automated playback later. This could be useful for live vocal per-
formances using sequenced backing tracks. You could also use
the sequencer to back up your edited patches to disk. If you do
extensive editing, it is very important to store backup copies of
your work. 

Connect as follows:

• 

Connect the MIDI output of the Studio Vocalist EX to the

input of your sequencer or storage device.

• 

Connect the output of the sequencer or storage device to the

Studio Vocalist EX's input.

• 

The patch dump from the Studio Vocalist EX to the storage

device must be initiated from the Studio Vocalist EX. The
Studio Vocalist EX can receive a patch dump at any time. See
page 42 in the Utilities section for further details.

Advanced MIDI Setup

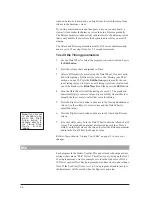
The setup at left may be found in many audio and MIDI record-
ing studios. The sequencer allows you to record and edit the key-
board performance that controls the harmony voices. Routing the
vocal performance through the Studio Vocalist EX and control-
ling it with the sequencer allows you to “craft” exactly the har-
mony performance you want. 

Connect as follows:

• 

Connect the MIDI output of your keyboard to the input of the

sequencer. 

• 

Connect the MIDI output of the sequencer to the input of the

Studio Vocalist EX. 

• 

Connect your MIDI sound module(s) to the Studio Vocalist

EX's Thru jack.

MIDI Connection Examples

Summary of Contents for STUDIO VOCALIST EX

Page 1: ...EX Version 1 10 ...

Page 2: ...ined by turning the equipment off and on the user is encouraged to try to correct the interference by one or more of the following measures Reorient or relocate the receiving antenna Increase the separation between the equipment and receiver that may cause undesired operation Connect the equipment into an outlet on a circuit different from that to which the receiver is connected Consult the dealer...

Page 3: ...une 20 Vibrato 21 Scoop 22 Timing 23 Mix 24 Harmony Editing Changing Softkey Assignments 26 Editing Individual Harmony Styles 27 Customizing A Harmony 29 Naming Programs and Styles Storing Your Edits 31 Utilities MIDI 33 MIDI Selection of Key and Harmony 35 MIDI Keyboard Split Point MIDI Song Utilities 39 MIDI Program Dump Utilities 42 I O Utilities Initialization Utilities 45 Footswitch Utilities...

Page 4: ...tave down doubling with male Gender Octave up doubling with female Gender Upper and lower octave doubling 100 wet Male Gender and a bit of downward pitch shift Female Gender and a bit of upward pitch shift Make sure to eat your spinach Think Belinda or Buffy Robot like effect Press a note on the keyboard to change notes Robot like effect Press a note on the keyboard to change notes Press a note on...

Page 5: ...PROGRAM Hints Hit a note from the front panel or a MIDI keyboard while singing Select the key from the front panel keyboard Sing all notes will be corrected Use the pitch wheel on a MIDI keyboard Hit a note from the front panel or a MIDI keyboard while singing These are extra Chordal harmonies for further experimentation They work in the same way as programs 21 through 30 These eight Scalic harmon...

Page 6: ...4 ...

Page 7: ...armony generation modes You can enlist varying degrees of musical intelligence to help you arrange harmony parts quickly and easi ly from fully manual where you pick each harmony note to semi manu al where you play the chords of your song on a MIDI keyboard and the harmony follows automatically to fully automatic where you enter the key and scale once and the rest is done for you We hope that you ...

Page 8: ...ram banks for performance or editing Song mode is for editing and performance of songs which are sequences of chord changes key types and variations triggered by MIDI the front panel or a footswitch Utility mode allows access to system MIDI footswitch and user preference configu rations The Bypass button mutes the Harmony components from the mix leaving the Lead Vocal and Reverb Note that if the L...

Page 9: ...professional standard for signal levels If your mixer accepts semi pro signal levels 10 dBu you should reduce this fader 9 Microphone Input The XLR type input jack offers convenient access to the Microphone Input The front and back mic inputs are summed but the Studio Vocalist EX can only accept one audio signal at a time The Mic Line button tog gles between the mic and line inputs and it will lig...

Page 10: ... own output to allow individual external processing The input voice is not mixed into any of these outputs 6 MIDI section The MIDI input receives MIDI control and program information from external MIDI devices such as keyboards and sequencers The MIDI output transmits system specific button pushes and program information which can be recorded and played back externally from a sequencer It also can...

Page 11: ...udio outputs from the dry voice and the four har mony voices to the inputs of your mixer Ensure that the audio output mode is set to Quad This is set in the Utilities menu under the Audio softkey See page 45 in the Utilities section for further details Connect the Loop Send of the Studio Vocalist EX to the input of the effect processor and the Loop Return to the out put of the effect processor Adv...

Page 12: ... the sequencer to back up your edited patches to disk If you do extensive editing it is very important to store backup copies of your work Connect as follows Connect the MIDI output of the Studio Vocalist EX to the input of your sequencer or storage device Connect the output of the sequencer or storage device to the Studio Vocalist EX s input The patch dump from the Studio Vocalist EX to the stora...

Page 13: ...the Output level fader up to the nominal level bump at halfway up the fader s travel This will set the output level to nominal 4 dB If you are sending audio to a mixer input that operates at 10 dB reduce this control according to the mixer s input meters Generating a Good Signal It is important that the singer perform as close as possible to the micro phone in order to reduce unwanted harmonizatio...

Page 14: ...ent key or chord root note in Scalic or Chordal harmony programs only Program Name A name of up to 16 characters is shown here There may be identical names in the User bank if edits have been made Program Harmony Type In Scalic or Chordal harmony programs only this character will be either an S or a C The S shows that the program is based on a Scalic harmo ny while the C shows that the program is ...

Page 15: ...mple below Several different harmony styles are assigned to each program so that you don t have to load a completely different program when for example you want to change from a major to a minor harmony Different Programs require different control input from you For example you can use the front panel keyboard or MIDI keyboard notes to choose the root note of the chord in a Chordal Program the Key...

Page 16: ...ound correct over your lead voice melody For examples of Chordal harmony choose any of the Programs 21 through 30 Choose a root note on the front panel keyboard and sing As you sing use the softkeys to switch between major minor and the other chord types and listen to how the harmony voices change Style naming conventions The first 3 to 4 characters of the name show the chord type such as maj min ...

Page 17: ...nes whether the har mony voices will follow the lead vocal sliding smoothly between notes sm or whether the harmony will not slide between notes but will jump from scale note to scale note in a stepped fashion st For more information on Chordal and Scalic harmony see the Basic Harmony Concepts chapter Vocoder Vocoder mode is named after a completely different technology that func tions in a simila...

Page 18: ...mance is good but some of the notes are out of tune For examples of Pitch Correct choose Programs 51 through 60 The pro gram list at the beginning of this manual provides more tips on setup Changing Harmonies with the Softkeys The softkeys below the LCD are offered in factory programs that are based on Scalic and Chordal harmony All other factory programs feature one softkey selection only The top...

Page 19: ...humanizing features Gender Detune Vibrato and Scoop each have their own library of styles from which you can choose Harmony uses a variation on the style concept which is described later in this chap ter The Mix and Program Name parameters do not use styles Editing a program in the Studio Vocalist EX can be done in either of two ways you can change which style is assigned to the program or you can...

Page 20: ...the harmony voice you want to make a change to increment or decrement the value of the selected parameter by one The Data Wheel The Data Wheel changes the parameter you have selected It is a detented clicking rotary encoder type with no start or stop point At the top level of Factory or User modes it is used to load pro grams At the top level of Songs mode it is used to load songs In all Edit mode...

Page 21: ...eversed for special effects To assign no Gender to voices you must still assign Gender 1 or 2 to those voices and change the Gender setting to 0 Setting The Gender settings range from 50 to 50 The positive values shift the overtones higher for female characteristics and the negative values shift the overtones lower for male characteristics To assign no Gender to voices you must still assign Gender...

Page 22: ... reduce the detune amount not add to it for example a Detune amount of 12 cents with Randomness set to 6 cents would vary from 6 to 12 with each new note Pitch Randomize Pitch Randomize further humanizes your harmonies by continuously varying the pitch through the duration of a note You have a selection of low medium or high settings To edit the Detune parameters 1 Use the Data Wheel to select the...

Page 23: ...s the time between when the Studio Vocalist EX produces a harmony note and the onset of vibrato Vibrato does not immediately occur after the delay period instead it increases gradually in intensity It is edited in 20 millisecond increments from 0 to 2 5 seconds Randomness Randomness applies random values to the combination of Depth and Rate Each new note you sing will have a slightly faster or slo...

Page 24: ... the voices scoop automatically at random intervals or in Vocoder mode only you can introduce it deliberately via MIDI velocity Scoop does not function in Pitch Correct mode Scoop Occurrence This parameter allows you to set how often you would like the Studio Vocalist EX to produce a scoop A 50 percent occurrence rate means that on average one in every two notes you sing will scoop into pitch Scoo...

Page 25: ...l To get your bearings start by setting the rates at the lower settings and increase once you find the Scoop Amount that you like 7 Vocoder styles only Press the right arrow button to advance to the Vocoder Threshold screen The Data Wheel changes the value above which scoops are triggered by keyboard velocity Timing This parameter adds a short timing delay between your input note and the onset of ...

Page 26: ...ming of voice 1 The graph and numerical displays increase values Press a softkey from either row beneath the four voices to select that voice for editing 5 Press the Right Arrow button to advance to the Timing Randomness screen Use the softkeys to select voices and the Data Wheel to adjust the values 6 Press the Right Arrow button to advance to the Attack and Release screen 7 Vocoder styles only T...

Page 27: ... the relative levels move together 3 To adjust the individual harmony levels press the Right Arrow but ton The LCD shows the current attenuation as a vertical bar with a numerical dB level Remember 0 dB is full volume for the selected voice Press the softkeys below the other voices to select them for level adjustment The softkeys may also be used to raise or lower values 4 To edit the individual v...

Page 28: ...ich to modify the harmony component of a program You have a choice of pre programmed harmony styles that can be attached to the various programs to suit your needs Assignment of Harmony Styles to Softkeys Each of the eight softkeys can be re designated to enable a different har mony style when pressed The same styles can be shuffled or a different style can be chosen for a particular softkey An ex...

Page 29: ...It is a Chromatic harmony set to double the lead voice at the same pitch or very close to it Harmony Voicing Except Pitch Correct and Vocoder This parameter allows you to arrange the intervals relative to your input note such as a 3rd above or 5th below harmony The Harmony Voicing screen is available only to the Chordal Scalic and Chromatic harmony types only Each of the three types has a differen...

Page 30: ...uld Each note slides its pitch into the next at a specific rate that you determine A small amount of portamento has been built into many of the factory programs The val ues range from 0 to 10 with 10 being the slowest rate or the maximum amount of portamento Vocoder Mode Select Vocoder Mode only There are 7 different Vocoder modes to choose from The first 4 deal with voice assignment In order for ...

Page 31: ... The Arrow buttons guide you to the next or previous screen the softkeys select the different editing fields and the Data Wheel is used to change the values Edit screen layout by harmony type CHROMATIC Harmony Type Voicing Bending Pitch Bend Portamento Rate Customize Style Name SCALIC Voicing Bending Pitch Bend Portamento Rate Customize Style Name CHORDAL Voicing Harmony Motion Pitch Bend Portamen...

Page 32: ... locks the har mony note on the previous one regardless of whether it was higher or lower In fact no change forms the basis for the Chordal harmony con cept where the harmony notes are confined to two or three notes per octave for any of twelve input notes Custom Harmony Key You must tell the Studio Vocalist EX what key your input notes are ref erenced to before you begin customizing The default k...

Page 33: ... cursor 5 Press Store to save your changes or press the Program button to can cel your changes and return to the top level Storing your Edits There are two ways to save your edits using the Store function 1 Program Store This is the term for saving any change you make such as attaching a different humanizing style to a program loading different harmony styles or changing the mix Factory programs c...

Page 34: ...dio Vocalist EX has automatically chosen the next blank user slot to store the new style to 3 Press Store again to accept the default name and destination If you want you can change the destination with the Data Wheel 4 Press Exit 5 Follow the Program Store procedure to attach the new style to your program permanently Note Once you have built up your own library of new styles keep in mind that whe...

Page 35: ...s Pressing this soft key pro duces the introduction screen as shown when the product is first powered up Displayed on the second line of this screen is the software version number The software version number indicates whether software updates if any have occurred MIDI Pressing the MIDI soft key within Utilities mode presents the MIDI Utilities sub menu From this screen you can choose a MIDI Utilit...

Page 36: ...below the options Turn the Data Wheel or use the upper and lower softkeys to select the desired channel Selecting the off option disables the MIDI program change fea ture Selecting the omni option causes the Studio Vocalist EX to respond to MIDI messages on all 16 MIDI channels 5 Press the Utilities button again to exit This returns you to the mode from which you entered To change the Vocoder MIDI...

Page 37: ... and play The chord voicings you use in your playing are interpreted by the Studio Vocalist EX as key and harmony information You can also set chord recognition so that it only recognizes chords played on the upper or lower part of your keyboard with a split point that you set This way left hand bass lines don t cause the harmonies to jump around See page 39 for more information on setting the spl...

Page 38: ...d can be recorded and played back from a sequencer Each button has its own CC16 value and is shown in the following graphic MIDI Notes give you another way to combine program changes and key and harmony changes into one MIDI channel Each MIDI note in the fol lowing reference table represents both a key and a style in a single mes sage Select your key or chord root from the octave matched to the so...

Page 39: ... the above or below options and the split point note selection 7 Press the Utilities button to exit to the previous mode MIDI Continuous Controllers CC The Studio Vocalist EX responds to MIDI CC messages like any synthe sizer module This section of the Utilities menu allows you to remap which MIDI controllers affect Studio Vocalist EX parameters Any of the 120 MIDI continuous controllers and After...

Page 40: ... the soft key corresponding to CC 4 Use the softkeys to select one of the three editable fields in the MIDI Controllers screen the internal parameter you want to control the CC that controls it and the control polarity The control polarity can be used to reverse the response of the controller 5 Press the Utilities button to exit to the previous mode MIDI Program Change mapping Incoming MIDI Progra...

Page 41: ...e used to send Song Select messages to other devices such as your sequencer in order to automate song changes during performance The MIDI Song Select receive and transmit options are off Ignore MIDI Song Select messages receive Enable external MIDI Song changes transmit Transmit front panel Song changes receive transmit Receive external and transmit front panel Song changes To change the MIDI Song...

Page 42: ... you would like remapped The display shows the names of the internal programs these numbers are currently mapped to 5 Press a soft key under the maps to prompt to move the brackets to the internal program selection field Use the Data Wheel to scroll through the program numbers 6 Press Utilities button to exit to previous mode To configure Program Change receive and transmit options 1 Enter Utiliti...

Page 43: ...ll Press a softkey under the maps to prompt to move the indi cator arrow to the internal song selection field Use the Data Wheel to select the desired internal song number 6 Press the Utilities button again to exit MIDI Song Step messages allow you to step sequentially through the various sections of a song in either forward or reverse directions There are several ways to configure the reception a...

Page 44: ...s and the Data Wheel to select the desired controller 6 Press the Utilities button once again to exit this will return you to the mode from which you entered MIDI Dump Utilities The Studio Vocalist EX s MIDI Dump Utilities allow you transmit pro grams songs and utility settings as MIDI system exclusive messages to other Studio Vocalist EXs or computer based sysex system exclusive librarian program...

Page 45: ...the unit will display Dumping while the dump is in progress When the dump has been transmitted in full the unit will display Dumping completed The time required to perform a bulk dump will vary with the number of programs styles and songs stored in the unit at any given time Typically a bulk dump will take about ten seconds to complete 6 Press the Utilities button once again to exit this will retu...

Page 46: ...ch you entered The Studio Vocalist EX s MIDI Dump Utilities also allow you to dump all utility settings this includes all global parameters as well as Continuous Controller Program Select and Song Select mappings To dump utility settings to another Studio Vocalist EX 1 Press the Utilities button from any mode this presents the UTILITIES main menu 2 Press the MIDI softkey this presents the MIDI Uti...

Page 47: ...or no longer want to keep The Studio Vocalist EX s Initialization Utilities allow you to clear an unwanted pro gram or song from memory resulting in a clean slate from which you can create a new one Note that once a program or song is initialized it is gone for good If you want to save your program or song before initializ ing it dump it via MIDI either to another Studio Vocalist EX or a sysex lib...

Page 48: ...you entered To initialize a song 1 Press the Utilities button from any mode this presents the UTILITIES main menu 2 Press the Init softkey this presents the Initialize Utilities sub menu 3 Press the softkey corresponding to Song 4 Use the Data Wheel to select the song to initialize 5 Press the Store button to initialize the song the unit will respond with Song Init complete 6 Press the Utilities b...

Page 49: ...FS300 3 button footswitch to meet your per sonal preferences Any button on the FS300 can be configured to control Bypass Latching BypL bypass is activated when the footswitch is pressed and released stays acti vated until the footswitch is pressed and released again Bypass Momentary BypM bypass activated only while footswitch is held down Program up Pgm Program down Pgm Song up Sng Song down Sng S...

Page 50: ...ton from any mode this presents the UTILITIES main menu 2 Press the User softkey 3 Use the Data Wheel to select the desired contrast level 4 Press the Utilities button once again to exit this will return you to the mode from which you entered To enable or disable voice editing of intervals 1 Press the Utilities button from any mode this presents the UTILITIES main menu 2 Press the User softkey 3 P...

Page 51: ...e Synth softkey 3 Use the Data Wheel to toggle the synthesizer tone on or off as desired 4 Press the Utilities button once again to exit this will return you to the mode from which you entered To adjust the synthesizer volume 1 Press the Utilities button from any mode this presents the UTILITIES main menu 2 Press the Synth softkey 3 Press the Right Arrow button 4 Use the Data Wheel to set the desi...

Page 52: ...ency response of the audio path is not affected To adjust the Bass Rejection Threshold 1 Press the Utilities button from any mode this presents the UTILITIES main menu 2 Press the Audio softkey 3 Press the Right Arrow button 4 Use the Data Wheel to increase or decrease the Bass Rejection Threshold as desired 5 Press the Utilities button once again to exit this will return you to the mode from whic...

Page 53: ...back control attenuates sibilant sounds in the audio path To adjust the Anti feedback Control 1 Press the Utilities button from any mode this presents the UTILITIES main menu 2 Press the Audio softkey 3 Press the Right Arrow button three times 4 Use the Data Wheel to increase or decrease the Anti feedback Control as desired 5 Press the Utilities button once again to exit this will return you to th...

Page 54: ...h are needed in the Chordal mode if you are not using MIDI Simply press the FS300 footswitch at the correct musical points to step through the changes in real time Alternatively MIDI can also be used to control the steps of Song playback Playing the Demo Songs Pressing the Songs button presents the Song Performance screen which will show you the information for the demonstration songs Song mode pe...

Page 55: ...and bridge is likely to change To create a new song section 1 Press the Songs button This presents the Performance screen 2 Turn the Data Wheel to locate a blank song The song name Blank Song will show in the LCD and the Bypass LED will light The Bypass LED always lights at the end of a section 3 Press the Edit button This presents the Arrangement editing screen The screen shown below represents w...

Page 56: ...rward and back through the steps If you have missed a chord press Insert and add it as before If you have more steps than you need or an incorrect entry press the Delete softkey Editing Your Steps If you would like to change something you entered in the Step Insert screen this can be done in the Step Edit screen This will allow you to modify chord root harmony style key and programs only You canno...

Page 57: ... with the Data Wheel 2 Press the Edit button once 3 Press the Name softkey 4 The current name is shown on the second line The softkeys are used to move the cursor and to enter letters numbers and symbols and the Data Wheel is used to select data 5 Press the Exit button twice and then Store or Exit then Store to save your changes To name a song section 1 Press the Songs button to enter Songs mode 2...

Page 58: ...ou need to know the arrangement of the song you are copying from or creating It might be helpful to jot it down on a piece of paper Start by writing down the whole song even the parts that don t have harmonies in verse chorus verse chorus form This helps considerably when you are in the Arrangement editing screen To arrange the parts of your song 1 Create at least two song sections as described pr...

Page 59: ...ermanent To change the key of your song 1 Press the Songs button to enter Songs mode and use the Data Wheel to select the desired song 2 Press the Edit button once 3 Press the note on the front panel keyboard that corresponds to the new key To check the new key press exit twice to bring you to the Performance screen where you can step through the song 4 To save the key change press the Store butto...

Page 60: ...tion of notes that is pleasing to sensibilities accustomed to the western twelve tone scale Harmonies that are correct are referred to as being Diatonic which is defined as any melody or group of chords that conforms to a single scale or key To illustrate this see the C major scale below Whether you studied music or not you ve no doubt heard it somewhere and could probably sing it from memory A di...

Page 61: ...demonstrates this Scalic and Chordal Harmony The Difference Probably the toughest part of understanding harmony is pinpointing the difference between the Scalic and Chordal harmony types There are many of each type of preset in the Studio Vocalist EX that by trial and error you have found useful yet not fully understood why Let s try to clear that up The practical difference could be summed up in ...

Page 62: ...e third fifth and optionally the seventh of a chord These are the choices that the Studio Vocalist EX has from which to produce a Chordal harmony The following graphic shows where the harmony notes would fall in a simple 1 voice above Scalic and Chordal harmony Notice that in the Chordal example the harmony notes jump over larger distances and are made of only the root third and fifth of the scale...

Page 63: ...equency Response dry 15 Hz to 20 KHz 0 1 dB Signal to Noise 95 dB A weighted auto gate engaged Total Harmonic Distortion 0 025 Noise Size 3 25 H x 19 W x 6 75 D 83 mm H x 483 mm W x 171 mm D Weight 8 15 lb 3 7 kg Internal Lithium Battery Sony CR2032 Note The lithium battery in the Studio Vocalist EX keeps a portion of the memory powered to retain user settings If you find that user pro grams or so...

Page 64: ...ge 0 15 20 63 65 119 16 17 18 19 64 X O O O X X O O O O X O CC Assignment Map 1 Key Harmony Select Song Step Forward Song Step Backward Reserved for Future Use Damper Pedal Program Change 0 127 0 127 Mappable System Exclusive O O See details on following pages System Common Song Position Song Select Tune Request X O X X O X Mappable System Real Time Clock Commands X X X X Aux Messages Local On Off...

Page 65: ... panel data size hi 00h data size lo 56h character set 1 byte LCD buffer 80 bytes levels 7 4 return levels 7 4 input levels LED state 2 bytes 1 bypass 2 factory 3 user 4 song 5 utility 6 edit format edit buffer procedure number 5Dh PACKED query type 1 edit buffer data size hi data size lo data Example F0 00 00 10 00 37 5D packed data F7 SYSEX query response DEVICE INQUIRY QUERY format procedure nu...

Page 66: ...ts byte 3 data 2 byte 6 0 bits byte 4 data 3 byte 6 0 bits byte 5 data 4 byte 6 0 bits byte 6 data 5 byte 6 0 bits byte 7 data 6 byte 6 0 bits byte 8 data 7 byte 6 0 bits Example To represent the value 131 convert to hexadecimal hex 131 decimal 0083 hex Group the hex value into two pairs 00 83 Translate each number into binary 0 0 hex 0000 0000 binary 8 3 hex 1000 0011 binary result 0000 0000 1000...

Page 67: ...d SYSEX Header 7 bytes Number of Styles 1 byte Style Header 2 bytes Style Data xx bytes EOX Repeated for total number of Styles see note 2 MIDI SYSEX Dump 1 Studio Vocalist EX Program Formats see note 1 below 2 Dump 1 Style List Order PS4preset style PS4EFFECT stytle detune style vibrato style time style time OFF scoop style mix style timbre style variation style custharmony style variation style ...

Page 68: ...S 1 The data enclosed by the dotted line is transmitted in 8 7 bit packed format e g MSbits byte followed by n 7 data bytes with MSbits cleared SYSEX Header 7 bytes Number of Styles 1 byte Style Header 2 bytes Style Data xx bytes EOX Repeated for total number of Styles see note 2 MIDI SYSEX Dump All Studio Vocalist EX Program Formats see note 1 below 2 Dump All Programs Style Order PS4preset style...

Page 69: ...e Style Header 2 bytes Style Data xx bytes EOX Repeated for total number of Styles see note 2 MIDI SYSEX Dump 1 Studio Vocalist non EX Program Formats Note this dump will also be accepted by a Vocalist Workstation non EX version see note 1 below 2 Dump 1 Style List Order PS4preset style PS4EFFECT stytle detune style vibrato style time style time OFF scoop style mix style timbre style variation sty...

Page 70: ...epth 2 0 to 100 for 0 to 100 8 depth 3 0 to 100 for 0 to 100 9 rate 0 0 to 99 for 0 to 9 9 10 rate 1 0 to 99 for 0 to 9 9 11 rate 2 0 to 99 for 0 to 9 9 12 rate 3 0 to 99 for 0 to 9 9 13 delay 0 0 to 250 for 0 to 2 50 14 delay 1 0 to 250 for 0 to 2 50 15 delay 2 0 to 250 for 0 to 2 50 16 delay 3 0 to 250 for 0 to 2 50 17 random 0 0 to 10 18 random 1 0 to 10 19 random 2 0 to 10 20 random 3 0 to 10 ...

Page 71: ...ff 18 MIDI system channel 0 to 15 16 omni 17 off 19 MIDI Voc channel 2 0 to 15 16 omni 17 off 20 MIDI Voc channel 3 0 to 15 16 omni 17 off 21 MIDI Voc channel 4 0 to 15 16 omni 17 off 22 MIDI current CCmap idx 0 volume 1 detune 2 vibdepth 3 vib rate 4 harmhold 23 MIDI current CCparm 0 to 15 20 to 119 120 aftch 121 none 24 MIDI current CCpol 0 1 25 MIDI KVS mode 0 program change 1 notes 2 chords an...

Page 72: ...8 protected 69 protected 69 protected 70 protected 71 protected 72 protected 73 protected BUTTON PRESS switch 4 for key press which are on off values control absolute 5 for key press with a value control relative inc 6 for key press with a relative increment value control relative dec 7 for key press with a relative decrement value CONTROLLER SWITCHES AVAILABLE THRU MIDI SYSEX 1 NOTE KEY use contr...

Page 73: ... 1010 27 1B 0001 1011 28 1C 0001 1100 29 1D 0001 1101 30 1E 0001 1110 31 1F 0001 1111 32 20 0002 0000 33 21 0002 0001 34 22 0002 0010 35 23 0002 0011 36 24 0002 0100 37 25 0002 0101 38 26 0002 0110 39 27 0002 0111 40 28 0002 1000 Decimal Hexadecimal Packed Bytes Table Decimal Hexadecimal Packed 100 FF9C 03 7F 1C 50 FFCE 03 7F 4E 25 FFE7 03 7F 67 10 FFF6 03 7F 76 5 FFFB 03 7F 7B 2 FFFE 03 7F 7E 1 F...

Page 74: ... 801 566 7005 International Distribution 7 Farmington Road Amherst New Hampshire 03031 U S A Fax 603 672 4246 DigiTech is a registered trademark of DOD Electronics Corporation Copyright 1998 DOD Electronics Corporation Studio Vocalist EX VERSION 1 10 Mar 02 98 18 2110 C ...

Reviews: