background image

DECLARATION OF

CONFORMITY

manufacturer’s Name: 

DigiTech  

manufacturer’s Address:  8760 S. Sandy Parkway


Sandy, Utah 84070, USA

Declares that the product:

Product name: Vocalist Live Pro  

Note: Product name may be suffixed by the letters-EU. 

Product option: 

 None

Conforms to the following Product Specifications:


Safety:  IEC 60065 (7th ed. 2001)


EmC: 

EN 55013 (2001+A1)


EN 55020 (1998)


Supplementary Information:

The product herewith complies with the require-
ments of the Low Voltage Directive 73/23/EEC 
and the EmC Directive 89/336/EEC as amended 
by Directive 93/68/EEC.


Vice-President of Engineering-mI               


8760 S. Sandy Parkway   


Sandy, Utah 84070, USA 


Date: February 15, 2008

European Contact:  Your local DigiTech Sales and 
Service Office or


harman music Group


8760 South Sandy Parkway


Sandy, Utah


84070 USA


Ph: (801) 566-8800


Fax: (801) 566-7005

ELECTROMAGNETIC

COMPATIBILITY 

This unit conforms to the Product Specifications 
noted on the 

Declaration of Conformity

Operation is subject to the following two 
conditions:

 this device may not cause harmful 
interference, and 
 this device must accept any interference 
received, including interference that may 
cause undesired operation.  

Operation of this unit within significant 
electromagnetic fields should be avoided.

use only shielded interconnecting cables.

U.K. MAINS PLUG WARNING

A molded mains plug that has been cut 
off from the cord is unsafe. Discard the 
mains plug at a suitable disposal facility.

NEVER UNDER ANY CIRCUMSTANCES 
SHOULD YOU INSERT A DAMAGED 
OR CUT MAINS PLUG INTO A 13 AMP 
POWER SOCKET.

Do not use the mains plug without the 
fuse cover in place.  Replacement fuse 
covers can be obtained from your local 
retailer.  Replacement fuses are 13 amps 
and mUST be ASTA approved to BS1362.

IMPORTANT SAFETY INSTRUCTIONS

Summary of Contents for VOCALIST LIVE PRO

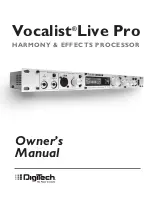
Page 1: ...6OCALIST 2 9 43 02 33 2 IVE 0RO WNER S ANUAL...

Page 2: ...source at installation Connect this equipment only to the power source indicated on the equipment rear panel To reduce the risk of fire or electric shock refer servicing to qualified service personne...

Page 3: ...84070 USA Ph 801 566 8800 Fax 801 566 7005 ELECTROMAGNETIC COMPATIBILITY This unit conforms to the Product Specifications noted on the Declaration of Conformity Operation is subject to the following...

Page 4: ...ed by the manufacturer 7 The foregoing is in lieu of all other warranties expressed or implied and DigiTech neither assumes nor authorizes any person to assume any obligation or liability in connectio...

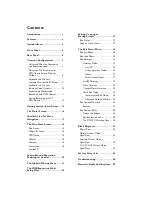
Page 5: ...and Expression Pedal Inputs Control 20 The Global I O Setup Menu 21 The MIDI Expression Pedal Setup Menu 24 Editing Copying or Storing Presets 27 Edit Preset 27 Copy or Store Preset 27 The Edit Preset...

Page 6: ......

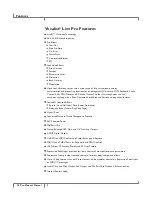
Page 7: ...ide variety of Lead Voice and Harmony Voice effects Vocal Harmony styles and professional vocal effects including Lexicon Reverbs and Delays In addition to generating natural sounding harmonies the Vo...

Page 8: ...con Licensed Effects Reverb Vocal Hall Vocal Plate Room Ambience Delay and Echo Studio Ping Pong Tape Guitar Tuner Soundcraft Studio Grade Microphone Preamp 48V Phantom Power Mic Pass Thru Stereo Bala...

Page 9: ...d Everything should be included and in perfect working order If anything is missing contact the factory at once Please help us become acquainted with you and your needs by completing your warranty car...

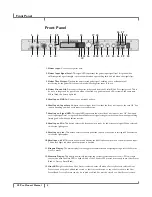
Page 10: ...l It is green when sufficient vocal signal strength is present amber when approaching limiting and red when the limiter is active 8 Vocal Input Mic This button selects the front panel mic input for th...

Page 11: ...is set to Aux Main This Lead Level defines the maximum achievable level when using Lead Level in the Preset Expression Links 22 Harmony Level Adjusts the Harmony Voices Level in the Main Out and S PD...

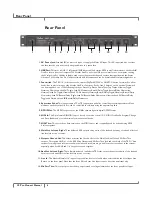
Page 12: ...expression pedal for controlling real time parameters Many elements on the Vocalist Live Pro can be controlled in real time using the expression pedal 5 S PDIF Out The S PDIF output echoes the MAIN ou...

Page 13: ...able or XLR to adapter on an XLR cable to plug into your mixer s line inputs Alternatively you can use a Direct Injection DI box to provide a mic level signal to the mixer s XLR inputs 1 Guitar and Mi...

Page 14: ...ocal input Assure this input is selected using the Line Vocal Input button on the front panel in the Vocal Input section Remote functionality is achieved using an external MIDI floorboard controller T...

Page 15: ...esired modes The keyboard MIDI data is echoed out through the MIDI Thru output to the daisy chained MIDI Synthesizer that provides the FOH Front Of House Engineer with the audio signal The Main Aux Se...

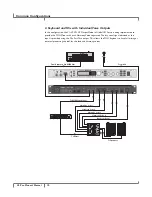
Page 16: ...d and Mic with Individual Voice Outputs In this configuration the V1 V2 V3 V4 Output Mode in Global I O Setup is being implemented to provide the FOH Mixer with each Harmony Voice separately The dry v...

Page 17: ...nt from the DAW into the Line In and the guitar track audio is sent into the Guitar Input Assure the Line In is selected as the vocal input using the Line Vocal Input button on the front panel It may...

Page 18: ...sed as the tracking input and vocal microphone is connected to the Vocal Input A USB cable is connected from the PC to the Vocalist Live Pro for PC MIDI control of the Vocalist Live Pro s presets and...

Page 19: ...outputs Many mixers accept only mic levels on the XLR inputs You will know this is the case if you find that you have to turn your Input Level completely down in order to avoid clipping at the mixer...

Page 20: ...e the string is A highlighted indicates the string is In Tune with the displayed note A highlighted symbol to the left of the In Tune symbol indicates the note is flat and that you need to tune up A h...

Page 21: ...oggles the ground lift on or off When the button is lit the ground is lifted Press the Outputs Ground Lift button on the rear panel to lift the Main Out and Mic Pass Thru XLR outputs and the Aux Out 1...

Page 22: ...verb Lexicon Delay and Delay Tempo in BPM Beats Per Minute The Right Side of the Preset Screen Line 1 indicates the Harmony Mode Lines 2 and 3 list the Harmony Voicings used To the right of the Graphi...

Page 23: ...Edit Select knob to select it When an adjustable parameter is selected Low Cut Frequency for example turn the Edit Select knob to adjust it Note that when you change parameters in the Edit Preset menu...

Page 24: ...efined MIDI Controllers are made in the Edit Preset menu See page 24 for more information Utilities Factory Reset This menu includes the Factory Reset Utilities that will restore the Vocalist Live Pro...

Page 25: ...ks and 5 seconds pass without any Edit Select knob activity the Vocalist Live Pro will revert back to last preset that was loaded Version This non selectable option shows the current Vocalist Live Pro...

Page 26: ...MIDI Expr Pdl Setup and press the knob to enter the menu 3 Scroll down several pages to Exp Pedal Type and press the Edit Select knob to enter the menu 4 Choose the Expression Pedal Type that you have...

Page 27: ...n Aux Separate In this mode the Main Output reflects the mix controlled by the front panel level knobs The Aux Output carries a mix of lead and harmony controlled by level settings in the I O Setup Me...

Page 28: ...Voices Lead FX Toggle Toggles the Lead Effects of the current preset Off and On The Lead FX button light on the front panel indicates the status of the Lead Effects Lead FX Momentary The Lead Effects...

Page 29: ...essed and deactivated when released The Lead FX and Reverb Delay buttons light on the front panel indicating the status of their parameters Harmony Lead FX Reverb Delay Toggle Toggles the Harmony Voic...

Page 30: ...rmony Mode is selected Range 1 to 16 Harmony 4 Ch Notes V4 Ch Defines which MIDI Channel the Vocalist Live Pro will read Note Data and Pitch Bend Data from for Harmony Voice 4 when 4 Channel Notes Har...

Page 31: ...efined this gives you a bend range of 48 semitones equal to 4 octaves 2 negative octaves plus 2 positive octaves bend range Range 0 to 24 Semitones Split Zone Disabled Disables MIDI Split Zone functio...

Page 32: ...Min MIDI Velocity Defines the minimum MIDI velocity expected from the MIDI device you are cur rently using Note that notes played below this velocity will be ignored by the Vocalist Live Pro Range 0 t...

Page 33: ...o the left of the altered parameter or option and the red System Store button LED becomes lit Note that the Back button does not cancel changes you ve made to a preset or menu but it can cancel the St...

Page 34: ...r that is currently selected 2 Turn the Edit Select knob to change the selected character The available characters include blank numbers from 0 9 capital letter and lower case letters 3 Press the Edit...

Page 35: ...atio means that for every 2 dB the input level changes the output level changes 1 dB Warning Using a high compression ratio increases susceptibility to feedback due to the higher gain used Range 1 0 1...

Page 36: ...an Aeolian Mode 1 2 A3 4 5 A6 A7 Locrian Locrian Mode 1 A2 A3 4 A5 A6 A7 In Sen Japanese In Sen Scale 1 A2 4 5 A7 Arabic Arabic Scale 1 A2 3 4 5 A6 7 Neapolitan Neapolitan Scale 1 A2 A3 4 5 6 7 Neapol...

Page 37: ...by 10 cents and a 50 cent flat input will be corrected by 50 cents With the amount set to 80 a 10 cent flat input will be corrected by approx imately 5 cents and a 50 cent flat input will be corrected...

Page 38: ...he center of the desired frequency band defined in Band Limit Center Frequency all frequencies outside this band are attenuated while all fre quencies inside the band have no attenuation There is no b...

Page 39: ...utton is selected on the front panel to match your application Once musIQ Harmony Mode has been selected the musIQ Harmony Voicings must be defined either by using the options found in the Voicings Pa...

Page 40: ...ale information to create musical diatonic harmonies Scalic Harmonies are more dynamic than the Chordal Harmonies since for each Lead Vocal note there are unique Harmony Voice notes Some simple popula...

Page 41: ...c Harmony Major Scales and three Minor Scales Lead Voice C C D E A E F F G A A A B A B Maj1 3 5 E 4 G 7 E 3 A A 7 F 3 A 7 F 3 B A 7 G 3 B 7 A 4 C 7 B A 4 C 7 B 4 D 7 C 4 E A 7 C 3 E 7 D 4 F 7 D 3 F 6...

Page 42: ...of 0 Unison will apply the Chordal Harmony Voice at the current Chordal Harmony Note while a setting of U3 will apply the Chordal Harmony Voice three chord tones above the current Chordal Harmony Not...

Page 43: ...s played on the MIDI keyboard Especially useful for keyboard players generating background harmonies based exactly on the notes being played Four Channel Notes 4 Channel Notes Harmony Mode allows you...

Page 44: ...CHORDAL NOTES HARMONY These parameters are applicable to the Chordal Notes and 4 Channel Notes Harmony Modes Note Latch Note Latch feature is turned Off or On When Note Latch is On the Note Attack an...

Page 45: ...l Voice Edit Mode you do not see the parameters that have been automatically set when a Voicing Patch is selected but by switching to Advanced Voice Edit Mode these parameters are displayed Voicing Pa...

Page 46: ...l value of their Pan definitions Range 0 to 99 Voice Style Patch Off Turns the Voice Style off Time Time Decoupling Harmony Voices begin and end with varying delays rela tive to the lead vocal Time Pi...

Page 47: ...1 4 Off Turns the specified musIQ Harmony Voice Off 8 2 Oct Up Up 2 octaves 5 Up an octave plus a 5th 3 Up an octave plus a 3rd 8 1 Oct Up Up an octave 5 Up a 5th 3 Up a 3rd U Unison 3 Down a 3rd 5 D...

Page 48: ...1 4 Off Turns the specified Chordal HarmonyVoice Off O Oct Up Up an octave U6 Up 6 chord tones U5 Up 5 chord tones U4 Up 4 chord tones U3 Up 3 chord tones U2 Up 2 chord tones U1 Up 1 chord tone 0 Unis...

Page 49: ...the specified Harmony Voice A higher setting will correct the Harmony Voice to the Harmony Note more aggressively but will have less natural pitch varia tion and may sound more robotic Range 0 to 99 P...

Page 50: ...scoop randomization 3 Scoop Rand Short Short scoop randomization 4 Scoop Up Long Long scoop up 5 Scoop Up Medium Medium scoop up 6 Scoop Up Short Short scoop up 7 Scoop Dn Long Long scoop down 8 Scoo...

Page 51: ...also practical when used judiciously for fattening up high energy signals Ambience Ambience is used to simulate the effect of a small or medium sized room without noticeable decay Pre Delay Pre Delay...

Page 52: ...ork together to control the overall ambience of the reverberation As Shape is advanced reverberation builds up more slowly and sustains for the time set by Spread Low Spread settings result in a rapid...

Page 53: ...ed Vocal Hall Range 1ms to 150ms Room Range 1ms to 100ms ER Level Adjusts the level of early reflections within the reverb This parameter is only available when the Vocal Hall or Room Type is selected...

Page 54: ...o low frequencies which are all elements commonly associated with tape recordings Tape Delay offers up to 5 sec onds of mono delay Input Level Adjusts the level of the original input signal relative t...

Page 55: ...eard at when the Input Signal is present This provides attenuation up to 18dB of the delay signal while a performer is singing or playing to help provide intelligibility As the performance pauses the...

Page 56: ...ch as Pan CC Data 64 equals the Center or Zero Pan position Note that when using the Harmony Level and Lead Level Expression Links the maximum achievable levels are defined by the relative settings on...

Page 57: ...100 HARMONY GENDER 3 101 HARMONY GENDER 4 102 HARMONY PORTAMENTO 103 HARMONY VIBRATO STYLE 1 104 HARMONY VIBRATO STYLE 2 105 HARMONY VIBRATO STYLE 3 106 HARMONY VIBRATO STYLE 4 107 HARMONY VIBRATO AMO...

Page 58: ...Pro Owner s Manual Block Diagrams Effects Flow Normal Output Mode Signal Flow Note that in Aux Main Output Mode the front panel Levels knobs adjust the Main Out S PDIF Out and Aux Out mixes Block Dia...

Page 59: ...2 V3 V4 Output Mode Signal Flow Note that in Main Aux Separate Output Mode the front panel Levels knobs adjust only the Main Out and S PDIF Out mixes and relative Lead and Harmony Levels for the Aux O...

Page 60: ...Q General No 6 Unison musIQ General No 7 2Unisons musIQ General No 8 4Unisons musIQ General No 9 3rd 5th UP musIQ General No 10 3rd 5th DN musIQ General No 11 3d3u5u musIQ General No 12 U 3u5u musIQ G...

Page 61: ...ls Guys musIQ Pop No 46 Blind Boys musIQ Gospel R B No 47 Take 5 3 musIQ Pop No 48 Pro Choir musIQ General No 49 Rich Quint musIQ General Yes 50 3uUnisons musIQ General Yes 51 CSN musIQ Rock Yes 52 Ea...

Page 62: ...istmas Scalic General No 81 SusChords Shift Techno No 82 FModalScle Scalic World Yes 83 Do U LuvMe Scalic Pop No 84 SurferGirl Scalic Pop No 85 4Freshman Scalic Pop No 86 D HarMinor Scalic World Yes 8...

Page 63: ...turned on has its volume turned up and is not muted Make sure the correct Vocal Input is selected Mic or Line Verify that when you sing into the microphone or provide the lead voice the Vocal Input S...

Page 64: ...g style provide low MIDI velocities ensure that in the MIDI Expression Pedal Setup menu the Min MIDI Velocity is set accordingly I hear hum on my guitar or vocal signals Try a combination of the groun...

Page 65: ...nput Impedance 2 4KOhms Balanced Mic Thru XLR Male Direct Connect to Mic In Line Connectors 1 4 Balanced Unbalanced TRS Connectors Input Sensitivity for 0dBFS 4 5dBu to 21dBu Input Impedance 10K Ohms...

Page 66: ...ects Internal Sample Rate of D A Converters USB B Port USB 1 1 Compliant USB Full Speed Mode 12Mbps Class compliant MIDI port Digital Inputs MIDI IN THRU Ports Power 120VAC 60Hz 220 240 VAC 50 60Hz 10...

Page 67: ......

Page 68: ...trademarks of the Harman Music Group Other product names modeled in this product are trademarks of their respective companies that do not endorse and are not associated or affiliated with DigiTech Th...

Reviews: