INSTALLATION MANUAL
DIGIWAY PLUS
21
cdvi.com
cdvigroup.com
EN
Double door confi guration
Double door confi guration
Part I : Mechanical fi xing
Part I : Mechanical fi xing
The double door confi guration applies to both the types DWPD102X and DWPS102X.
The double door confi guration applies to both the types DWPD102X and DWPS102X.
For the types DWPD, for which a central profi le is provided, it is necessary to install a back plate which ensures perfect alignment between
For the types DWPD, for which a central profi le is provided, it is necessary to install a back plate which ensures perfect alignment between
the profi les and 2 lateral back plates in place of the regular single door back plate. Follow the instructions below for the mechanical fi xing of
the profi les and 2 lateral back plates in place of the regular single door back plate. Follow the instructions below for the mechanical fi xing of
the structure ( Part I : mechanical fi xing).
the structure ( Part I : mechanical fi xing).
In case of usage of 2 single standard operators type DWPS102X to drive a double door, make the mechanical fi xing by following the
In case of usage of 2 single standard operators type DWPS102X to drive a double door, make the mechanical fi xing by following the
regular procedure for each single door.
regular procedure for each single door.
•
•
PART I : Mechanical fi xing
PART I : Mechanical fi xing
•
•
PART II : Electrical connections
PART II : Electrical connections
•
•
PART III : Final
PART III : Final Set-up
Set-up
Part I : Mechanical fi xing
Part I : Mechanical fi xing
1. Backplate fi xing
1. Backplate fi xing
•
•
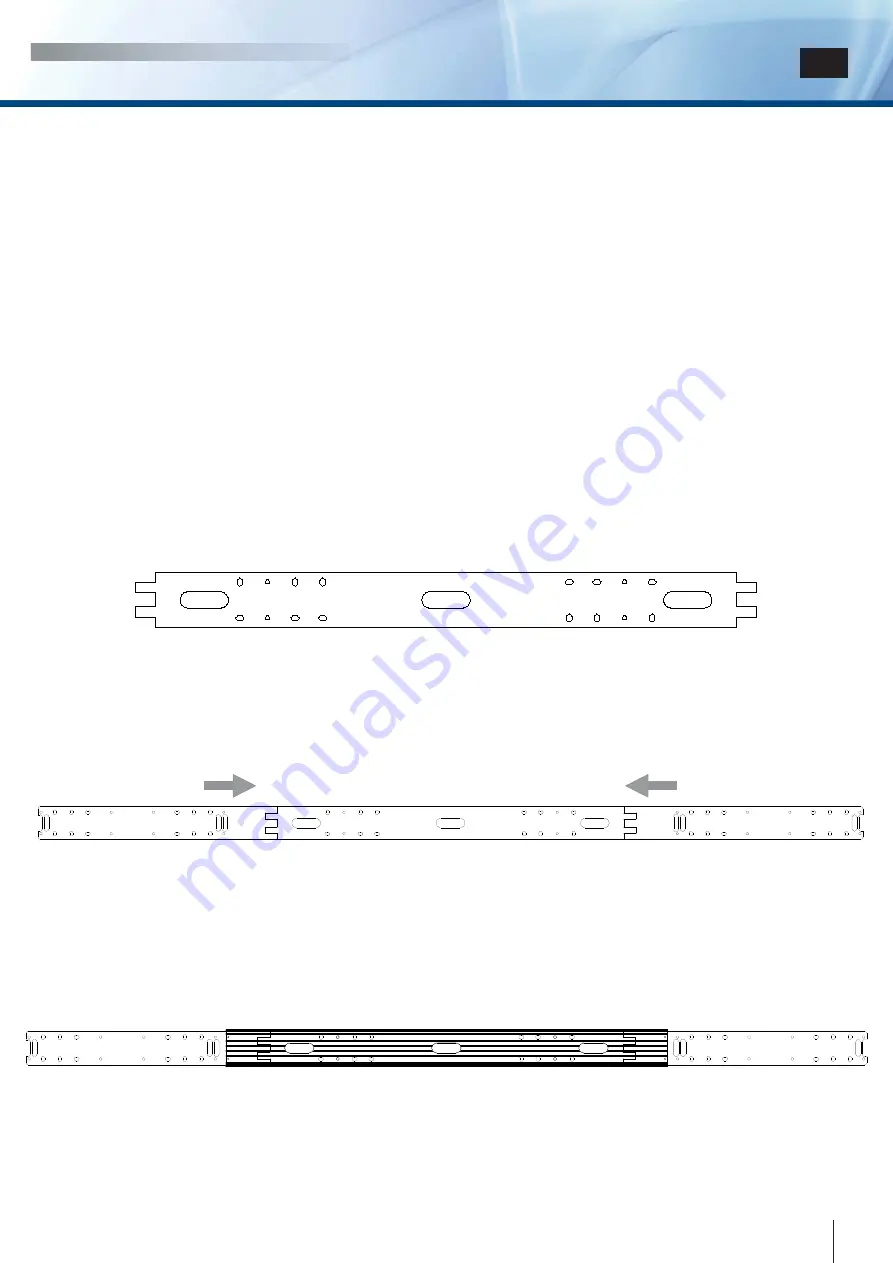
Locate the best position for the central back-plate, locating the centre of the plate with the centre of the double door;
Locate the best position for the central back-plate, locating the centre of the plate with the centre of the double door;
•
•
Mark the position of the holes for the plugs provided;
Mark the position of the holes for the plugs provided;
•
•
Make the holes and insert the plugs provided;
Make the holes and insert the plugs provided;
•
•
Pass the power supply cable through the central hole of the back-plate;
Pass the power supply cable through the central hole of the back-plate;
•
•
Fix the central back-plate by using the screws and the plugs provided ensuring it is perfectly level.
Fix the central back-plate by using the screws and the plugs provided ensuring it is perfectly level.
•
•
Couple the side back-plates byeach side and locate the position of the oval holes.
Couple the side back-plates byeach side and locate the position of the oval holes.
•
•
Make the holes and insert the plugs
Make the holes and insert the plugs
•
•
Fix the side back-plates with the screws provided.
Fix the side back-plates with the screws provided.
2. Central profi le fi xing
2. Central profi le fi xing
Fix the back central profi le with the side caps with the 4 screws M6x14 provided on the central back-plate;
Fix the back central profi le with the side caps with the 4 screws M6x14 provided on the central back-plate;


