background image

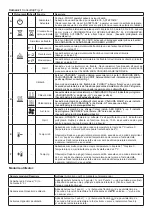
Controls: See Fig. 2

Icon Display Function Description

A

-

Power / 

Standby

Press Once to turn the product ‘ON’.

Press a second time to put the product into ‘STANDBY’

(When returning from ‘STANDBY’ mode the product will return to previous settings unless 

the product has been plugged out, in which case it will reset to factory settings)

B

Sleep 

Timer

Press  multiple  times  to  change  the  ‘SLEEP  TIMER’  in  0.5  hr  increments  from  0.5 

hr  to  8.0  hr  before  turning  off.  The  remaining  time  on  the  ‘SLEEP  TIMER’  displays.                                                                                         

(This icon is Green in Colour)

C

Flame Effect

‘FLAME EFFECT’ button cycles the unit 

sequentially through the 4 setting, LOW FLAME, 

HIGH FLAME, DEMO MODE and OFF.

f1

Low 

Flame

This setting will run the flame effect at a low brighness level. (The display will show F1)

f2

High 

Flame

This setting will run the flame effect at a high brighness level. (The display will show F2)

fP

Demo 

Mode

This setting will slowly pulse the flame effect between low and high brightness. (The display 

will show FP)

-

Off

This  will  turn  the  flame  effect  off.  If  the  heater  is  running,  the  display  will  activate  and 

remain active to read the set temperature and show if the product is on LOW HEAT/ HIGH 

HEAT/COOL BLOW.

D

Heat 

‘HEAT’ button cycles the unit sequentially through the 4 settings: LOW HEAT, HIGH HEAT, 

COOL BLOW and OFF. The heat setting will be indicated by an icon in the floating display 

see Fig.1. 
When the flame effect is ‘ON’ the floating display will turn off after 5 seconds, however 

if the heater is being used independantly of the flame effect. The low heat or high heat 

icon will appear continuously in the floating display.

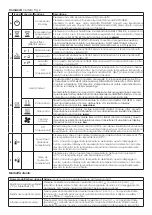
Low 

Heat

This setting will run the heater at ‘LOW HEAT’ this setting will be indicated by the ‘LOW 

HEAT’ icon and the letters ‘LO’ appearing in the display.

(This icon is Orange in Colour)

High 

Heat

This icon in the floating display indicates ‘HIGH HEAT’ this setting will be indicated by the 

‘HIGH HEAT’ icon and the letters ‘HI’ appearing in the display.

(This icon is Red in Colour)

Cool 

Blow

This icon in the floating display indicates ‘COOL BLOW’ this setting will be indicated by 

the ‘COOL BLOW’ icon and the letters ‘CB’ appearing in the display.

(This icon is Blue in Colour)

-

Off

This switches the heater and blower ‘OFF’, no icon will be displayed in the floating display. 

Note the blower will run for 10-20 seconds after being turned off this is to ensure the product 

cools down safely.

E

-

Temp 

Down

Press multiple times to lower the heater temperature in 1°C increments. The lowest 

temperature that can be set 5°C. 

Note: Once you stop at your desired temperature this will flash 3 times, then the display 

will show the room temperature as detected by the product. If the set temperature is 

lower than the detected room temperature the heater will not activate.

F

-

Temp 

Up

Press multiple times to increase the heater temperature in 1°C increments. The highest 

temperature that can be set 37°C. 

Note: Once you stop at your desired temperature this will flash 3 times, then the display 

will show the room temperature as detected by the product. If the set temperature is 

lower than the detected room temperature the heater will not activate.

User Modes:

Mode Name /Discription

Action (Actions cannot be input by remote control)

Change Celsius (° C) to Fahrenheit (° F)  Press both 3 Dot Button (

)  and 2 Dot ( 

)  on the unit and hold until beep 

is heard and display flashes. (To revert back to Celsius repeat this action)

Disable Heat Options

Hold both 1 Dot Button ( 

) and Flame Button ( ), on the unit, for 2 

seconds, when the heater has been disabled the display will read “--” and 

beep.

Enable Heat Options

Hold both 1 Dot Button ( 

) and Flame Button ( ), on the unit, for 2 

seconds. When the heater has been sucessfully enabled the heater will beep 

and the show the set temperature.

Summary of Contents for 25 FIREBOX

Page 1: ...lub do okazjonalnego u ytku NO Dette produktet egner seg kun for godt isolerte rom eller sporadisk bruk RO Acest produs este adecvat exclusiv spa iilor bine ventilate sau utiliz rii ocazionale CZ Tent...

Page 2: ...1 2 A B C A C E B D F DF2550 EU E DF2550 EU 500H E...

Page 3: ...464 mm 626 mm 225mm 3 4 5...

Page 4: ...ed from 3 years and less than 8 years shall not plug in regulate and clean the appliance or perform user maintaince The appliance must be positioned so that the plug is accessible Although this applia...

Page 5: ...on is Orange in Colour High Heat This icon in the floating display indicates HIGH HEAT this setting will be indicated by the HIGH HEAT icon and the letters HI appearing in the display This icon is Red...

Page 6: ...oviding you with a satisfactory service Please retain your receipt as proof of purchase Remote Control See Fig 2 The maximum range of use is 5metres NOTE It takes time for the receiver to respond to t...

Page 7: ...m glichen Gefahren verstehen Kinder im Alter von 3 bis 8 Jahren d rfen das Ger t nicht mit dem Strom verbinden regulieren reinigen oder Wartungsarbeiten daran vornehmen WICHTIG DIESE ANWEISUNGEN SORGF...

Page 8: ...auf Hohe Hitze Das Symbol auf dem Floatingdisplay zeigt STARKE HITZE an Diese Einstellung wird durch das Symbol STARKE HITZE angezeigt und die Buchstaben HI High Heat erscheinen auf dem Display Das S...

Page 9: ...tung als Beleg auf Fernbedienung Siehe Abb 2 Die maximale Reichweite betr gt ca 5 Meter HINWEIS Der Receiver ben tigt Zeit um auf den Transmitter zu reagieren HINWEIS Der Receiver f r die Fernbedienun...

Page 10: ...nde gevaren begrijpen Kinderen ouder dan 3 en jonger dan 8 jaar mogen de stekker van het apparaat niet in het stopcontact steken hem instellen en reinigen of onderhoudswerkzaamheden uitvoeren BELANGRI...

Page 11: ...eft HIGH HEAT aan deze instelling wordt aangegeven door de icoon HIGH HEAT en de letters HI verschijnen op de display Deze icoon is Rood van kleur Cool Blow Deze icoon op de drijvende display geeft CO...

Page 12: ...ERKING Het duurt even voordat de ontvanger reageert op de transmitter OPMERKING De ontvanger voor de afstandsbediening bevindt zich in de display richt de afstandsbediening hierop bij het invoeren van...

Page 13: ...e doivent pas brancher r gler ou nettoyer l appareil ou effectuer aucune des op rations de nettoyage et d entretien r alisables par l utilisateur IMPORTANT LIRE ATTENTIVEMENT CES INSTRUCTIONS ET LES C...

Page 14: ...c ne HIGH HEAT et les lettres HI apparaitront l cran Cette ic ne est de couleur Rouge Coup de froid Cette ic ne sur l cran flottant indique COOL BLOW Ce r glage est indiqu par l ic ne COOL BLOW et les...

Page 15: ...r un service satisfaisant Veuillez conserver votre facture comme justificatif d achat T l commande Voir Fig 2 La port e maximale d utilisation est 5 m tres REMARQUE Le r cepteur peut prendre peu de te...

Page 16: ...i8aninuauvoies conectezelapriz s regleze i s cure e aparatul i nu au voie IMPORTANT ACESTE INSTRUC IUNI TREBUIE CITITE CU ATEN IE I P STRATE PENTRU CONSULTARE ULTERIOAR s realizeze ntre inereaefectua...

Page 17: ...ceast pictogram de pe afi ajul flotant indic C LDUR MARE i este indicat de pictograma C LDUR MARE i de literele HI care apar pe afi aj Aceast pictogram are ro u albastru Aer rece Aceast pictogram de p...

Page 18: ...l s ar putea cauza pierderea sau deteriorarea acestora precum i nt rzieri n asigurarea unor servicii de asisten tehnic satisf c toare V rug m s p stra i factura chitan a cu care a i achizi ionat produ...

Page 19: ...llegare regolare e pulire l apparecchiatura o eseguire la manutenzione da parte dell utente IMPORTANTE LE PRESENTI ISTRUZIONI DEVONO ESSERE LETTE CON ATTENZIONE E CONSERVATE PER USO FUTURO Questa appa...

Page 20: ...zzate sul display Questa icona di colore arancione Calore alto Questa icona sul display mobile indica HIGH HEAT Calore alto Questa impostazione indicata dalla relativa icona e dalle lettere HI visuali...

Page 21: ...are perdita o danni e ritardi nel fornire un servizio di assistenza adeguato Conservare la ricevuta scontrino come prova di acquisto Telecomando Vedere Fig 2 La distanza operativa max di ca 5 metri NO...

Page 22: ...ilania regulowa czy ci ani konserwowa urz dzenia Urz dzenie nale y ustawi w taki spos b aby wtyczka by a atwo dost pna Mimo e urz dzenie spe nia normy bezpiecze stwa nie zalecamy jego u ytkowania na g...

Page 23: ...owym Wysoki poziom grzania Toustawienieumo liwiawybraniewysokiegopoziomugrzania Nawy wietlaczu b dzie widoczna ikona wysokiego poziomu grzania oraz litery HI Ikona w kolorze czerwonym Ch odny nawiew T...

Page 24: ...imy o zachowanie dowodu zakupu Zdalne sterowanie patrz rys 2 Maksymalny zasi g u ytkowania wynosi oko o 5 metr w UWAGA Odebranie sygna u z nadajnika przez odbiornik mo e chwil potrwa UWAGA Odbiornik s...

Page 25: ...en enchufar regular ni limpiar el aparato o llevar a cabo tareas de mantenimiento IMPORTANTE LEA ATENTAMENTE ESTAS INSTRUCCIONES Y CONS RVELAS PARA FUTURAS CONSULTAS Este aparato debe colocarse de mod...

Page 26: ...Poco calor y las letras LO Este icono es de color naranja Mucho calor Este icono en la pantalla emergente indica que se ha configurado Mucho calor por lo que adem s ver las letras HI en la pantalla Es...

Page 27: ...ducto y en retrasos a la hora de proporcionarle un servicio satisfactorio Por favor conserve su tique como prueba de compra Mando a distancia Consulte la Fig 2 La distancia m xima de uso es de 5 metro...

Page 28: ...aparelho ou realizar a manuten o de usu rio O aparelho deve ser posicionado para que a tomada esteja acess vel IMPORTANTE ESTAS INSTRU ES DEVEM SER LIDAS CUIDADOSAMENTE E CONSERVADAS PARA REFER NCIA F...

Page 29: ...ALOR BAIXO e as letras LO aparecem no visor este cone Ac o em Cor Temperatura Baixa Este cone no visor flutuante indica VENTO FRESCO esta configura o ser indicada pelo cone VENTO FRESCO e as letras CB...

Page 30: ...traso no fornecimento de um servi o satisfat rio Conserve o recibo como prova de compra Remoto Controle Ver Fig 2 O alcance m ximo 5metros NOTA Demora algum tempo para o receptor responder ao transmis...

Reviews: