background image

8  

www.dimplex.com


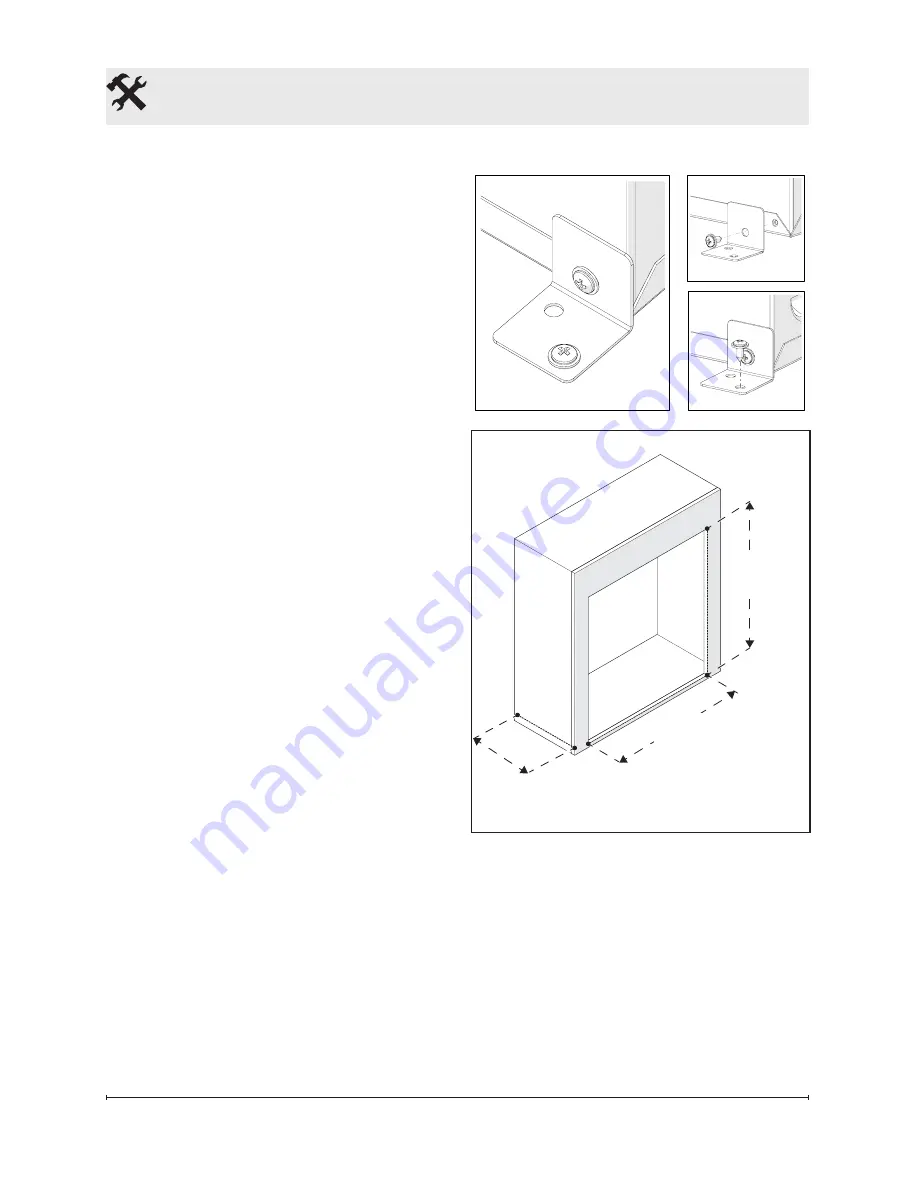
place for securing and using the 

provided L-bracket and the screw 

that was removed attach the fire-

box to the mantel. (Figure 2)

!


NOTE: 

There are no guide 

holes provided for the L-Brackets 

in the mantel.

If not installing the unit into a Dim

-

plex mantel the required opening 

dimensions of the fireplace are: 

21 ¼ in. (540 mm) wide x 21 ⅝ in. 

(550 mm) high x 7 ¼ in. (184 mm) 

deep (Figure 3).
The firebox is to be installed 

from the front of the mantel and 

inserted so that the flanges are 

flush against the front surface of 

the mantel.

  Fireplace Installation


Figure 3

21 ¼ in. 

(540 mm)

21 ⅝ in. 

(550 mm)

7 ¼ in. 

(184 mm)

Figure 2

Summary of Contents for 6908891459

Page 1: ...ION Always read this manual first before attempting to install or use this fireplace For your safety always comply with all warnings and safety instructions contained in this manual to prevent persona...

Page 2: ...gh to emphasize CAUTION Procedures and techniques which if not carefully followed will result in damage to the equipment WARNING Procedures and techniques which if not carefully followed will expose t...

Page 3: ...e hazard and will void the warranty Please record your model and serial numbers below for future reference model and serial numbers can be found on the Model and Serial Number Label NO NEED TO RETURN...

Page 4: ...ned or if it has been dropped or damaged in any manner Contact technical service at 1 888 346 7539 IMPORTANT INSTRUCTIONS Do not use outdoors This heater is not intended for use in bathrooms laundry a...

Page 5: ...roper outlet Do not change the plug in any way Always plug heaters directly into a wall outlet receptacle Never use with an extension cord or relocatable power tap outlet power strip Do not burn wood...

Page 6: ...residential installation This equipment generates uses and can radiate radio frequency energy and if not installed and used in accordance with the instructions may cause harmful interference to radio...

Page 7: ...ircuit is required A dedicated circuit is preferred but not essential in all cases A dedicated circuit will be required if after installation the circuit breaker trips or fuse blows on a regular basis...

Page 8: ...n the mantel If not installing the unit into a Dim plex mantel the required opening dimensions of the fireplace are 21 in 540 mm wide x 21 in 550 mm high x 7 in 184 mm deep Figure 3 The firebox is to...

Page 9: ...OTE When any button is pressed the intake tempera ture will be displayed on the On Screen Display for 5 seconds B Flame Effects The Flames can be turned off by pressing the button then again to turn b...

Page 10: ...it is adjusted NOTE Holding the button down on the unit will change the temperature from C to F or vice versa Disable Heat If desired depending on the season the heater on the unit can be disabled The...

Page 11: ...ority or Retailer for recycling advice in your area Operation pressing the button repeat edly until the sleep timer displays nothing Resetting the Temperature Cutoff Switch Should the heater overheat...

Page 12: ...ith a clean dry cloth To remove fingerprints or other marks the front glass panel can be cleaned with a damp cloth The front glass panel should be completely dried with a lint free cloth to prevent wa...

Page 13: ...d and inspected prior to shipment and subject to the provisions of this warranty Dimplex warrants such products to be free from defects in material and workmanship for a period of 12 months from the d...

Page 14: ...bour or transportation costs Such costs shall be the purchaser s responsibility What Dimplex and its dealers and service agents are also not responsible for IN NO EVENT WILL DIMPLEX OR ITS DIRECTORS O...

Page 15: ...P Cord Set 4100090204RP Flicker Rod 5902620100RP Partially Reflective Panel 5902580100RP Front Glass 5902570100RP Felt Feet Pads Set of 4 8600140101RP Log Set Assembly 0478550100RP Glass Media 0441480...

Reviews: