background image


7


Fireplace Installation 

 WARNING: 

Ensure the power 

cord is not installed so that it is 

pinched or against a sharp edge 

and ensure that the power cord is 

stored or secured to avoid tripping 

or snagging to reduce the risk 

of fire, electric shock or injury to 

persons.

 WARNING:

 Construction 

and electrical outlet wiring must 

comply with local building codes 

and other applicable regulations 

to reduce the risk of fire, electric 

shock and injury to persons. 

 WARNING:

 Do not attempt 

to wire your own new outlets or 

circuits. To reduce the risk of fire, 

electric shock or injury to persons, 

always use a licensed electrician.

 WARNING:

To reduce the risk 

of fire, do not store or use gaso

-

line or other flammable vapors or 

liquids in the vicinity of the heater.

Grounding Instructions

This product must be grounded. 

If it should malfunction or break

-

down, grounding provides a path 

of least resistance for electric 

current to reduce the risk of 

electric shock. This product is 

equipped with a cord having an 

equipment-grounding conductor 

and a grounding plug. The plug 

must be plugged into an appropri-

ate outlet that is properly installed 

and grounded in accordance with 

all local codes and ordinances.

 DANGER: 

Improper connec

-

tion of the equipment-grounding 

conductor can result in a risk 

of electric shock. Check with a 

qualified electrician or serviceman 

if you are in doubt as to whether 

the product is properly grounded. 

Do not modify the plug provided 

with the product – if it will not fit 

the outlet, have a proper outlet 

installed by a qualified electrician.
This product is for use on a 

nominal 120-volt circuit and has 

a grounding plug that looks like 

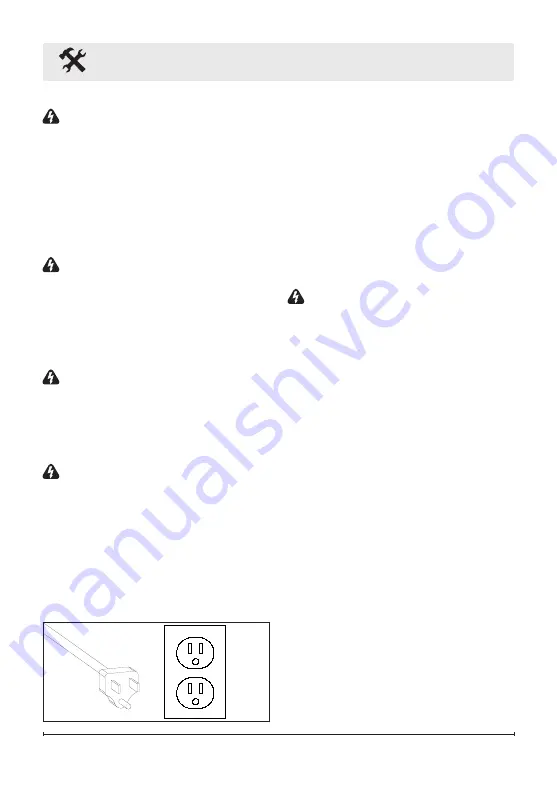
the plug in Figure 1. Make sure 

that the product is connected to 

an outlet having the same con

-

figuration as the plug. No adapter 

should be used with this product.

!

NOTE: 

A 15 Amp, 120 Volt cir

-

cuit is required. A dedicated circuit 

is preferred but not essential in 

all cases. A dedicated circuit will 

Figure 1

Summary of Contents for 6909450159

Page 1: ...read this manual first before attempting to install or use this fireplace For your safety always comply with all warnings and safety instructions contained in this manual to prevent personal injury o...

Page 2: ...emphasize CAUTION Procedures and techniques which if not carefully followed will result in damage to the equipment WARNING Procedures and techniques which if not carefully followed will expose the us...

Page 3: ...void the warranty Please record your model and serial numbers below for future reference model and serial numbers can be found on the Model and Serial Number Label of your fireplace Model Number Seria...

Page 4: ...d in any manner Contact technical service at 1 888 346 7539 Do not use outdoors The fireplace is not intended IMPORTANT INSTRUCTIONS for use in bathrooms laundry ar eas and similar indoor locations Ne...

Page 5: ...iring must comply with local building codes and other applicable regulations to reduce the risk of fire electric shock and injury to persons WARNING Do not attempt to wire your own new outlets or circ...

Page 6: ...r television reception which can be determined by turning the equipment off and on the user is encouraged to try to correct the interference by one or more of the following measures Reorient or reloca...

Page 7: ...t resistance for electric current to reduce the risk of electric shock This product is equipped with a cord having an equipment grounding conductor and a grounding plug The plug must be plugged into a...

Page 8: ...ODPH 1 02725 1 H RDUG 7 IXVH 1 37 3 5 1 1 5 5 1 1 1 1 3 3 6PDOO ODPH 1 DISPLAY REMOTE MOTOR HEATING ELEMENTS Wiring Media Installation 1 Remove the two knobs in the top corners Figure 2 2 Remove the f...

Page 9: ...igned feature to represent the embers of the fire slowly fading out Figure 3 A NOTE Although the heater has been turned off the fan may still run to prevent over heating B Light Control Adjusts the li...

Page 10: ...F 26 C 78 F 24 C 75 F 22 C 71 F OF for use without the heater Press and hold the down arrow for 5 seconds to switch tempera ture readout from C and F Disable Heat If desired depending on the sea son...

Page 11: ...equirements CR2025 button battery Locate and remove the battery bracket Figure 4 The battery has two sides one with a button feature and the other is flat Insert the battery with the but ton side down...

Page 12: ...lightly with a clean dry cloth To remove fingerprints or other marks the front glass panel can be cleaned with a damp cloth The front glass panel should be completely dried with a lint free cloth to p...

Page 13: ...a period of 12 months from the date of the first purchase of such product The limited 12 month warranty period also applies to any implied warranties that may exist under applicable law Some jurisdict...

Page 14: ...THIRD PARTY WHETHER IN CON TRACT IN TORT OR ON ANY OTHER BASIS FOR ANY INDIRECT SPECIAL PUNITIVE EXEMPLARY CONSEQUEN TIAL OR INCIDENTAL LOSS COST OR DAMAGE ARISING OUT OF OR IN CONNECTION WITH THE SA...

Page 15: ...splay Board 9601130600RP Thermistor 9601130700RP Flame LED s 9601140300RP Ember LED s 9601140400RP Cord Set 9601131100RP Front Glass 9601140500RP Remote Control 9601140600RP IR Sensor 9601131400RP Cry...

Reviews: