background image


7

 Installation

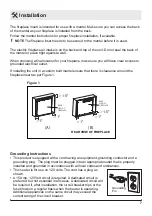
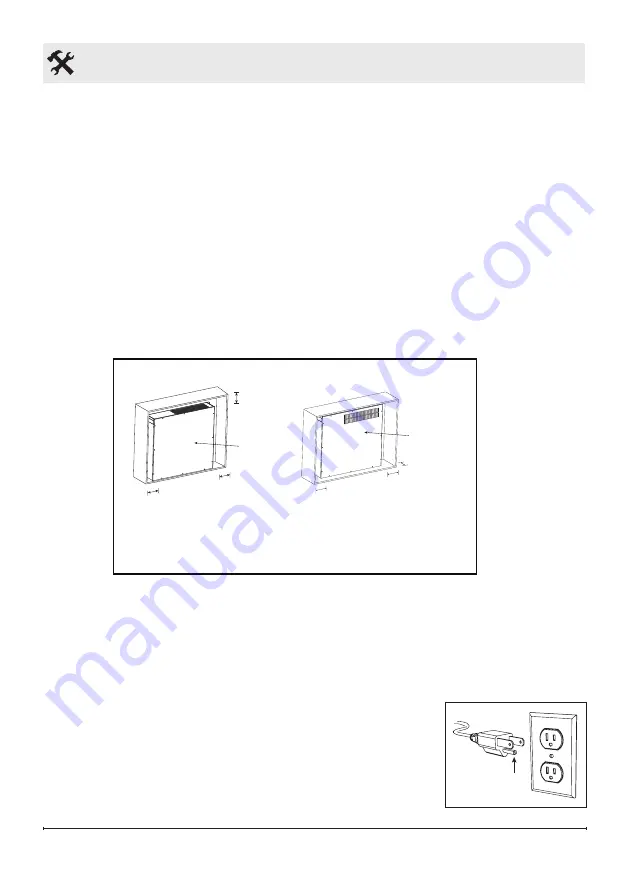
Figure 1

The fireplace insert is intended for use with a mantel. Make sure you can access the back 

of the mantel as your fireplace is installed from the back.
Follow the mantel instructions for proper fireplace installation, if available.

!


NOTE


The fireplace insert needs to be secured to the mantel before it is used. 

The electric fireplace air intake is on the back and top of the unit. Do not seal the back of 

the mantel or place tight against a wall.

When choosing a final location for your fireplace, make sure you will have clear access to 

grounded electrical outlet.

If installing the unit in a custom built mantel ensure that there is clearance around the 

fireplace insert as per Figure 1.

1"

1"

1.5"

REAR

VIEW OF

FIREPLACE

REAR

VIEW OF

FIREPLACE

1.5"

1"

1"

REAR VIEW OF FIREPLACE

(A)

(B)

Grounding Instructions

•   This product is equipped with a cord having an equipment-grounding conductor and a 

grounding plug.  The plug must be plugged into an appropriate outlet that is properly 

installed and grounded in accordance with all local codes and ordinances.

Grounding 

Pin

•   This heater is for use on 120 volts. The cord has a plug as 

shown.

•   A 15 Amp, 120 Volt circuit is required. A dedicated circuit is 

preferred, but not essential in all cases. A dedicated circuit will 

be required if, after installation, the circuit breaker trips or the 

fuse blows on a regular basis when the heater is operating. 

Additional appliances on the same circuit may exceed the 

current rating of the circuit breaker. 

Summary of Contents for 6910280100

Page 1: ...lectric Fireplace Always comply with the warnings and safety instructions contained in this manual to prevent personal injury or property damage To view the full line of Dimplex products visit www dim...

Page 2: ...d techniques which if not carefully followed will result in damage to the equipment WARNING Procedures and techniques which if not carefully followed will expose the user to the risk of fire serious i...

Page 3: ...MENEA EL CTRICA 3165189 SP2320 IR FGPB XXXXXXXXXXXXX VOLTS VOLTIOS AMPS AMP RES AMPERO Hz CAT DE CAT CAT NO ETL SERIAL NO DE S RIE DE SERIE 24120SLF SO 693 7122520X00 RXX CAUTION ATTENTION PRECAUCI N...

Page 4: ...ice or have it inspected by qualified electrician To disconnect the fireplace turn the controls off then remove the plug from the outlet Do not use outdoors IMPORTANT INSTRUCTIONS Do not insert or all...

Page 5: ...s B digital devices pursuant to part 15 of the FCC rules These limits are designed to provide reasonable protection against harmful interference in a residential installation The equipment generates u...

Page 6: ...Type LED Approvals Dimensions SPF1808L IR Width 19 480 mm Height 17 430 mm Depth 8 1 2 215 mm Weight 28 6 lbs 13 kg Mantel Opening Width 18 1 4 462 mm Height 16 1 2 419 mm SPF2308L IR Width 24 1 4 61...

Page 7: ...here is clearance around the fireplace insert as per Figure 1 1 1 1 5 REAR VIEW OF FIREPLACE REAR VIEW OF FIREPLACE 1 5 1 1 REAR VIEW OF FIREPLACE A B Grounding Instructions This product is equipped w...

Page 8: ...ote 1 5 4 3 2 Power ON OFF The ON OFF button turns the fireplace ON and OFF When the fireplace is OFF power indicator icon is lit red Power icon turns green when power is ON The fireplace has a built...

Page 9: ...on the fireplace for 3 seconds to change the displayed temperature units NOTE This function cannot be set with the remote control Timer Set Mode When timer mode is activated 0 0 appears on the displa...

Page 10: ...nd flashing E3 indicate that the Child Lock function is activated The Mode Up or Down buttons will not operate and E3 will be displayed when pressed The power ON OFF button will also not operate but o...

Page 11: ...teries please contact your local municipality your waste disposal service or the point of sale where you purchased this item Maintenance Remote Control The battery compartment is located on the back e...

Page 12: ...er should be cleaned and inspected regularly depending on conditions and at least at yearly intervals WARNING Any electrical repairs of this unit should be carried out by a licensed electrician in acc...

Page 13: ...urn on the heater If the problem persists call customer service E3 displayed on control panel Child lock function activate To inactivate the Child Lock function holding the POWER button for 10 seconds...

Page 14: ...nspected prior to shipment and subject to the provisions of this warranty Glen Dimplex Americas Ltd herein called Glen Dimplex Americas warrants such products to be free from defects in material and w...

Page 15: ...E PURCHASER discretion either repair or replace such defective product or part without charge If Glen Dimplex Americas is unable to repair or replace such product or part or if repair or replacement i...

Page 16: ...ex Americas 1 888 346 7539 www dimplex com 2020 Glen Dimplex Americas Technical Service Contact our friendly customer service team for technical and trouble shooting support Make sure you have your sa...

Reviews: