Electrical Connection
WARNING – THIS APPLIANCE MUST BE EARTHED
This heater must be used on an AC ~ supply only and the voltage
marked on the heater must correspond to the supply voltage.
Before switching on, please read the safety warnings and
operating instructions.
Controls -
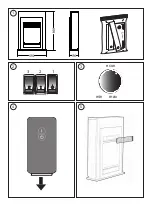
see Fig. 2
Three switches provide a choice of heat settings. The appliance
is in standby mode when the mains lead is plugged in. This is
indicated by the red neon behind the flame effect screen. The
two selector switches are in the ON position when the side with
the markings on (i.e.
I
, or
II
) are pushed in.
Push button switch 1
Controls the electricity supply to
the heater and flame effect.
If both selector switches 2 and 3 are in the OFF position, the
product works on flame effect only.
Selector switch 2 (I)
Provides 750W heat output
Selector switch 3 (II)
Provides 1500W output with switch
2
also
pressed.
Thermostat (T) -
see
Fig. 3
In order to maintain a certain room temperature, set the controller
to ‘max.’. Operate the appliance at full power until the required
room temperature is reached. Set back the thermostatic controller
until the appliance switches off with an audible “click”. This
temperature will be kept almost constant by the thermostatic
control switching on and off automatically.Please note that the
appliance can only be switched on when the thermostat setting
is higher then the room temperature.
Remote control - see Fig. 4
The maximum range of use is ~ 5metres.
Warning: It takes time for the receiver to respond to the
transmitter.
Do not press the buttons more than once within two seconds
for correct operation.
Battery Information - see Fig. 4
1. To activate the remote control remove the battery isolation
strip, which is used to ensure your remote control reaches you
fully charged.
2. To replace the remote control battery, turn over the remote
control, and follow the diagram embossed on the remote control
3. Only use CR2025 or CR2032 size of batteries.
Tipping Restraint
- see
Fig. 1
WARNING: FALLING OR TIPPING APPLIANCES CAN
CAUSE INJURY OR DEATH OF YOUNG CHILDREN, PLEASE
ENSURE CHILDREN DO NOT CLIMB, HANG OR STAND ON
THIS PRODUCT.
WARNING: THE APPLIANCE IS PROVIDED WITH A TIPPING
RESTRAINT, THIS RESTRAINT IS NOT A SUBSTITUTE FOR
PROPER ADULT SUPERVISION. THIS RESTRAINT MAY PROVIDE
PROTECTION AGAINST TIPPING FURNITURE. DO NOT ALLOW
CHILDREN TO CLIMB ON FURNITURE. FAILURE TO DETACH
THIS RESTRAINT BEFORE MOVING FURNITURE MAY RESULT IN
INJURY AND DAMAGE.
This product is provided with a ‘Tipping Restraint Kit’ as
shown in Fig 1, to prevent the product accidentally tipping
over. Fitting Instructions are supplied with this kit please
follow these instructions carefully.
Thermal Safety Cut-out
The built-in overheat cut-out switches off the appliance
automatically in the event of a fault! Switch off the appliance or
disconnect the mains plug from the socket.
Remove any obstructions which may have caused the
overheating. After a short cooling down phase, the appliance
is ready for use again! If the fault should occur again, see your
local dealer!
WARNING: In order to avoid a hazard due to inadvertent
resetting of the thermal cut-out, this appliance must not be
supplied through an external switching device, such as a timer,
or connected to a circuit that is regularly switched on and off by
the utility.
Maintenance
WARNING: ALWAYS DISCONNECT FROM THE POWER
SUPPLY BEFORE ATTEMPTING ANY MAINTENANCE.
Light Emitting Diode
This fire is fitted with LED (Light Emitting Diode) lamps. These
LED lamps are maintenance-free and should not require
replacing during the life of the product.
Cleaning
WARNING – ALWAYS DISCONNECT FROM THE POWER
SUPPLY BEFORE CLEANING THE HEATER.
For general cleaning use a soft clean duster – never use abrasive
cleaners. The glass viewing screen should be cleaned carefully
with a soft cloth.
DO NOT use proprietary glass cleaners.
To remove any accumulation of dust or fluff the soft brush
attachment of a vacuum cleaner should occasionally be used
to clean the outlet grille of the fan heater.
It is possible to clean the inner glass and logset by removing
the outer glass panel. To remove the outer glass, remove the
4 screws holding the grille in position, (see
Fig.5
), remove the
grille and lift clear the outer glass.
Refit the outer glass in reverse of above.
WARNING: do not operate the product without the grille and outer
glass in position as this may effect the operation of the heater.
Recycling
For electrical products sold within the European
Community. At the end of the electrical products
useful life it should not be disposed of with
household waste. Please recycle where facilities
exist. Check with your Local Authority or retailer
for recycling advice in your country.
After Sales Service
Should you require after sales service or should you need to
purchase any spares, please contact the retailer from whom
the appliance was purchased or contact the service number
relevant to your country on the warranty card.
Please do not return a faulty product to us in the first instance
as this may result in loss or damage and delay in providing
you with a satisfactory service. Please retain your receipt as
proof of purchase.
Summary of Contents for 82077193
Page 2: ...1 2 4 1 2 3 I II 3 min max T econ 5...
Page 21: ......
Page 22: ......
Page 23: ......
Page 26: ......

